


Ron Alexander, Director of the EAA Sportair Workshops, says one of the main reasons why builders fail to complete aircraft building projects is lack of confidence in their abilities. Recognizing this need among those “rolling their own,” Alexander created what has become the EAA Sportair Workshops.
The EAA Sportair Workshops are designed to provide aircraft homebuilders with certain basic skills necessary for constructing an airplane and to give the builder confidence that he or she can do the job. The workshops were started by Alexander’s former company, Alexander Aeroplane Co. in 1993, and were taken over by the EAA in January 2000. Alexander continues to run the program for EAA as a member service.
 I had been seeing the ads in Sport Aviation for the workshops for a number of years, but after I started building a Pietenpol Air Camper, I really began to take notice of anything in Sport Aviation and other publications that might increase my knowledge and skills. I was particularly wary of the metalwork required for the airplane.
Many of the steel parts for the Piet can be bought; in fact, I purchased most of the steel fittings for the wing assemblies from a company called Replicraft. The quality of the parts is excellent, but they aren’t inexpensive. Buying the remaining metal parts is still an option, but I want to do as much as I can myself in the building process, and look on it as an opportunity to learn some new skills.
I checked out my local community college, but all they offered was arc welding. The course meeting time wasn’t convenient, either. Last December, I spotted an ad in Sport Aviation for the winter and spring Sportair Workshops, and noticed that they were offering one on gas welding in Greensboro, N.C., only three hours away. I signed up immediately.
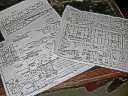
|
The workshops in Greensboro covered a variety of topics for the builder and those considering building. Introduction To Aircraft Building is designed for those unsure about beginning the aircraft building process and to assist those planning to build with selecting an appropriate project. The Fabric Covering workshop taught all one need to know about covering an airplane using the Polyfiber process. Gas Welding taught the basics of metallurgy and welding and allows for as much “hands-on” practice as possible. Other workshops offered the same weekend were Sheet Metal Basics, Composite Construction and Engine Installation. All the workshops ran over two full days, a Saturday and Sunday.
EAA Sportair also offers classes in TIG Welding and type-specific workshops for particular kit-builts; the Vans RV series being the most popular. Workshops are held around the country, although some are only offered in certain locations. For example, Griffin, Ga., is the only location for the TIG Welding workshop. EAA Sportair is assisting in the development of new curricula for workshops at major air shows such as EAA Airventure.
Greensboro, N.C. is a great location for these workshops – not just because it’s convenient to me. Guilford Technical Community College (GTCC) hosts the workshops and their aviation facility, located right on Piedmont Triad International Airport, has plenty of classroom space, laboratory/workshop areas for sheet metal, engines and welding, and a central hangar filled with all sorts of airplanes, pieces of airplanes, engines and components to be used for instructional purposes. GTCC offers courses and training preparing students for the A&P exam.
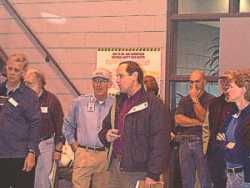
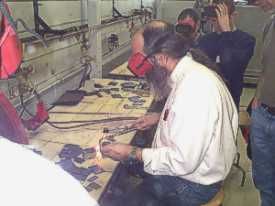
Early Saturday morning, I joined about 50 other participants slurping coffee and poking around the hangar looking at the hardware. After a brief introduction by Alexander, we divvied up into our respective classes with our designated instructor. There were 10 of us signed up for the welding workshop.
|
Our instructor, Gene Kearns, an instructor in Aviation Maintenance Technology at GTCC, is an A&P with an IA. He ran his own machine shop for 22 years and worked in other shops making parts for Boeing and Cessna. He also taught machine shop to high school students, was a graduate assistant at Western Carolina University and has taught in industry. He’s been on the faculty at GTCC for four years.
Gene started us out in the classroom, talking first about safety issues and then going on to the basics of welding. We learned about the development of welding, particularly oxy-acetylene welding, in the early 20th century. From there, Gene continued into a discussion of the properties of metals and particularly steels. We learned that the strength of steel can be affected by the rate at which it is allowed to cool. We learned that an excess of acetylene in the flame will introduce too much carbon into the weld, seriously weakening it.
In a discussion of the various types of steel, Gene described the different characteristics of low carbon versus high carbon steel, and the effects of adding trace amounts of other materials to steel such as chromium and molybdenum. The numerical system for identifying the alloy components of steels was de-mystified. Steel is described using a four-digit numerical system. The first two numbers describe the trace metals added to the steel and the last two give the concentration of carbon. For example, 4130 steel, common as the material for aircraft tubing, contains chromium and molybdenum with a .0030 percentage of carbon. As a result, 4130 steel is regarded as moderate carbon steel. The concentration of carbon is one determining factor in its relative hardness. High carbon steel, 1090 for example, is very hard, and is great for tools. But, it is also brittle, which explains why if you use your knife blade to pry something apart, it may break rather than bend.
|

Next, Gene progressed to the particulars of oxy-acetylene welding. All welding, he explained, depends upon the complete melting of material on both sides of the weld. This is called penetration – good penetration is essential to obtaining a strong weld. The critical skill is “carrying a puddle,” which means melting a small area where the metals join and moving that melted area along the joint. The difficult thing, as we were to find through experience, is to get good penetration through the steel without burning a hole through the metal. It’s a lot harder than it sounds. The final element involves the filler rod, which is usually but not always of the same composition as the materials being welded, that adds material to the joint as it is melted in the flame. Gene said that maintaining and moving the puddle while adding material from the rod is akin to patting your head and rubbing your stomach – it’s difficult at first but can be mastered with practice.
Gene discussed heat treatment and normalization of welds, which means reheating the area around a weld and allowing it to cool slowly to relieve stresses induced in the parts by the heat of the welding process. Normalization, particularly of oxy-acetylene welds is somewhat controversial – some old-time aircraft welders say every weld should be normalized with a rosebud torch, others say that the nature of gas welding heats up a larger area surrounding the weld, and that normal cooling in a heated, draft-free room is sufficient.
|
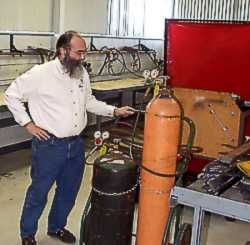
After hearing about all of this in the classroom, it was time to move to the shop, where we would get to try out all of this new-found knowledge. GTCC has a welding lab, with about a dozen individual work stations, each with a firebrick-covered table and connections for a torch. We all drew welding goggles, and got from Gene a tutorial on how to light the torch and how to set the flame correctly. Too much acetylene in the flame creates a secondary light blue flame cone in addition to the central darker blue flame, and introduces excess carbon into the weld making it brittle. Too much oxygen causes the flame to burn through the metal. Gene showed us how to slowly reduce the acetylene to where the secondary cone just disappeared, giving the proper flame.
He demonstrated a simple butt weld using two small rectangular pieces of steel, then gave each of us a stack of little rectangles to practice with. We learned by doing that the metal often distorts as it is heated and the welder may have to offset the two pieces slightly and allow the heat to draw them together as the weld progresses down the joint. By trial and error, we got an idea of how much heat was too much causing a burn through, and what too little heat in the weld looked like. We also learned about “popping,” where the flame goes out with a loud pop, splattering molten metal from the weld. Gene said that a dirty torch tip can cause popping, as will trying to weld with a tip that is too large.
Next, we tried our hands at lap welds. This involved putting one piece of practice stock over another offset somewhat, and welding the top piece to the bottom along the edge of the top piece. After welding quite a few lap welds we progressed to T-joint welds, in which one piece stands on it side on another piece and the weld is made along the joint. These different types of welds are progressively more difficult, because of the difference in heat dissipation from a weld site in the middle of a piece of metal as opposed to the dissipation from a weld on the edge. Heat can only dissipate in one direction from an edge, making it much easier to burn through. Most of the heat has to be concentrated on the crossbar of the “T”, where can dissipate in all directions, and only occasionally move the flame over to the edge-on piece. It took me a lot of practice to keep from burning through, yet get good penetration in the weld.
|
Sunday, Gene added another wrinkle – filler rod. Filler rods come in varying thicknesses about 30 inches long and are melted in the flame along with the base metal. Do this correctly, and the weld looks like a series of dimes laid overlapping in a line. Do it poorly, as I did quite a few times, and the rod sticks in the weld, or creates uneven globs and craters in the weld. This is definitely a learned skill and one where practice is the only way to master it. After about an hour, I started to get into a rhythm with the flame and the rod, and I could make at least a part of a weld look – well honestly – not terrible.
The final task was to learn to weld aircraft steel tubing. The school had a box full of practice pieces about six inches long that were notched on one end. This notch, called a fish mouth, properly cut allows for a close fitting T-joint to another piece of tube. We found that some fit pretty well, and some were not such good fits. We each took a half dozen pieces of tubing and gathered around Gene for a demonstration.
First, he aligned the tubes to form the joint, then tack welded them together. Then, looking from below the stroke of the “T”, he welded around the joint from the 12 o’clock position to the 3 o’clock, then from the 6 o’clock to the 9 o’clock. Then he went back and filled in from the 3 to the 6 o’clock and finished from the 9 back to the 12 o’clock position. The reason for welding a section and skipping around to the other side was to equalize the heating around the weld to avoid distortion.
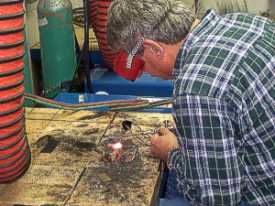 One of the participants practices welding some small pieces of steel together. |
Now it was our turn to try. I quickly realized that what Gene had done was a lot harder than it looked. First of all, the tubing was a good deal thinner than the flat stock we had been practicing on. This became quite apparent when I blew a hole right through one of the tubes. My first effort looked like termites had munched on the metal in places, and in other places like a kid’s drip castle at the beach.
I had plenty of practice tubing so I kept at it. I finally began to get the feel of how much heat was enough to get penetration in the joint without burning through the thin tubing, and also to develop a rhythm with the filler rod. After about a half hour of practicing on a number of welds, I got one that was not bad – it didn’t have any holes in it, and there were no big protrusions. My next weld wasn’t as good; I burned a hole in the side of a tube.
My consistency did improve, though, and by mid-afternoon Sunday, I felt like I was getting into the groove. My last weld started a little shaky; I didn’t have the rhythm with the filler rod exactly right but midway around the first quarter circle it felt better. The next quarter circle went well and I moved back to the other side of the joint doing the third quadrant. Finally, I progressed to the last quarter and tried to keep everything together. I crossed over the tack weld and lifted the rod and torch away. It looked good – well – good for me. It wasn’t professional but it was my best effort of the day. Gene looked over my shoulder on his rounds through the lab. He looked at the joined tubes, turning it over and around and looking at the weld from all sides.
He gave his verdict: “It’s a little thin in filler, but … I’d fly that weld.”
