


Nowadays, everyone wants a moving map along with their GPS. Up until now, you’ve hadthree options:
- Install a Bendix/King KLN-89 or KLN-90 and make due with their extremely crude moving map capability;
- Install an Argus moving map costing thousands of dollars, and put up with the extra lost panel space and yet another database that needs to be updated; or
- Rely on a yoke-mounted handheld GPS with moving map, and accept the resulting clutter of wires and low-contrast liquid-crystal display.
Why doesn’t someone come out with a good, high-resolution, easy-to-read moving mapintegrated into a panel-mounted GPS? I’m happy to tell you that II Morrow has done exactlythat with their new GX55.
As if that wasn’t enough, II Morrow went one better with the GX55: they made itrack-compatible with their 600-series Lorans and their 800-series FlyBuddy GPS. The rackis the same, the wiring is the same, so installation is a snap: just slide out your oldLoran, slide in the new GX55, and change the antenna. That’s it! No change in wiring isrequired. If your Loran drives your autopilot and/or your HSI, then the GX55 will do thesame.
Features Galore
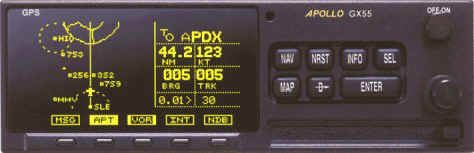
The GX55 display gorgeous. It’s electroluminescent, which is nothing new in aviationbut you just don’t see this type of display often offered in the price range of the GX55.Display resolution is 160 by 80 pixels, which is comparable to that of the II MorrowPrecedus handheld (but of course with far better contrast). A photocell controls howbright the display is, dimming it automatically for nighttime operations. Directly belowthe display are five “smart” keys which do some great things that we willdiscuss later. The main keypad features the same familiar push buttons that II Morrow hasused in its past GPS models, so if you’ve used any of them your learning curve will beshort. My favorite button is the “Direct” button. Push it, select the airportand push “Enter.” Now you’re on your way to wherever you wanted to go.
The GX55 has a datacard that just pops out the at the push of a button, just like thehigh-end GPS units. The datacard may be updated as often as every twenty eight days andcovers the Americas. The card has the airports, VORs, NDBs, intersections, and special useairspace. The GX55 also allows you to store up to 500 user-defined waypoints, and up to 35user-defined flight plans of up to 20 legs each (reversible).
The GPS engine is a parallel 8-channel design, which means it can normally track allvisible satellites at once, not just the four required for a 3D position fix or the fiverequired for RAIM. The unit has standard CDI outputs (left/right, to/from, and flag) soit’s easy to interface with any standard nav head or HSI. It also has a standard RS232bidirectional data port for interfacing with your fuel totalizer, notebook computer, orwhat have you.
The feature list is long, but you can read it in the brochures. Let’s cut to the chaseand deal with the really important questions. Is it user friendly? Is it built well? Canyou see the display easily in bright daylight conditions? Will it wind up being anobsolete lame duck like the Lorans it so neatly replaces? That’s what I wanted to find outwhen my shop, Avionics West, installed our first GX55 in acustomer’s Cessna not long ago.
Inspecting the Merchandise
Time to tear open the shipping box and see what we’ve got. This is not a demo model,it’s one that we just received to be installed in a customer’s aircraft. (I refuse towrite about products only using a demo model. Many products that demo well don’t hold upin a real field installation.) We find GX55 to be packaged well, making damage in shippingextremely unlikely. The GPS receiver and installation materials are packaged inanti-static bags. We inventory all the parts and find everything to be present, right downto the Allen wrench used to lock and unlock the GX55 from its mounting tray.
The GX55 case is made totally of sheet metal, and even the front bezel is metal. Wecheck out all the buttons and knobs, and they feel just like buttons and knobs shouldfeel. (I’ve found this to be true throughout the II Morrow product line.)
Since this is our first GX55 installation, I can’t stand the thought of putting it inthe airplane without first opening it up to see what’s inside. My challenge is todisassemble the GX55 without destroying it. Once the covers came off, I’m in for a realshock: the inside of the GX55 is mostly air! Less than half of space inside is actuallyutilized. One large printed circuit card, a small card and the display card. That’s it!Clearly the only reason the GX55 is so large is so that it will fit in the existing Lorantrays, otherwise it could be half-size. Another benefit of all this open space is that theradio runs cool and no forced-air cooling is required.
Like all of the latest-generation avionics from II Morrow, the circuit boards are allsurface-mount. This makes them extremely compact and reliable, but if you ever have aproblem with the GX55 you’ll want to send it back to the factory for repair. This is notsomething you can work on with your Weller gun!
The 10-year lithium battery that keeps the memory alive when the unit is powered downis not soldered to the board, so anyone can change it when it gets weak (if you still ownthe airplane). Early GPS models had the battery soldered to the board and had to bereturned to the factory for battery replacement, but not so with the GX55. Examining thecircuit board, my only wish-list item is that they included a replaceable fuse.
The circuit boards and case represent high American-built quality. Fit andfinish are good. No jagged edges anywhere. Everything fastens together with machinescrews, again showing quality. I find three different Quality Assurance inspectors’ stampsjust on the case alone. It appears someone is interested in quality. Another minorcomplaint: the unit serial number is attached with a sticker instead of being etched intoor hard-mounted to the case. Granted, the GX55s serial number is in the software, but Ipersonally feel better when the serial number can’t be removed from the case.
Having reassembled the radio apparently in one piece, I glance at the manual just tosee if it is written in plain English. I find the user’s guide easy to read, and theoperation steps make sense. The manual even comes with a quick reference guide, what Icall a “cheat sheet.” It also has a troubleshooting guide in the back, and IIMorrow’s 800-number in case you come across something you can’t figure out. Finally, afterall these years, the manufacturers seem to be letting pilots write the manuals, notsoftware engineers. From what I can tell, though, the only time you’ll need the manual iswhen you first initialize the GX55, and perhaps the first few times you use the flightplan mode. Everything else is bone-head basic.
Let’s Fire It Up
Now it’s time to plug the GX55 into the power supply and light the thing up. By the wayyou can order a cable/connector from II Morrow (p/n 500-4027) and plug it into any 10-40volt DC power supply, so you can familiarize yourself with the unit (in simulation mode)at home. The moving map operates in simulation mode also, and you will see fixes go by,special-use airspace alerts come up, and so forth. I recommend doing this before using itin flight, because I’ve found it’s much easier to learn new equipment at home than in thecockpit. In the flight simulator mode the GX55 will fly flight plans and warn you aboutspecial use airspace just as if you were in the flying machine. The only things that don’twork at home are the remote lights and CDI outputs, of course.
I power up the GX55 on the bench for the first time, and already I like it. The displayis simply outstanding in the ambient light of this room. I hold the “Nav” buttonas I turn on the GX55, which places it in the “Flight Simulation” mode. The GX55lets you know in no uncertain terms that you are in the simulator mode as “NOT FORFLIGHT” appears on the display. It then asks you to push a couple buttons to set yoursimulated groundspeed and altitude. Now all you do it tell the GX55 where you want to go(using the “Direct” and “Enter” keys) and you’re off.
The nav pages show you all the usual things such as a CDI indicator, groundspeed,waypoint identifier, ETA, ETE, track, bearing, UTC and just about anything else you couldwant. I found the on-screen UTC display to be a great tool in IFR conditions, no moreadding with the watch. There’s even a page that shows you the minimum safe altitudes (MSAand MESA). MESA is the altitude you’ll need to fly to clear the terrain by 2,000′ alongthe flight-planned route. This can be very handy in flight planning: if the MESA is16,500′ for your trip and you are flying a Cessna 150, then you may want to plan adifferent route.
Navigation Made Easy
Another neat feature of the GX55 is the ability to customize each nav page. You canmake each page show what you want to see. If you want the CDI, groundspeed and UTC on thefirst nav page, then you can customize it that way. There is also an “autonav”mode in which the unit automatically displays each nav page in rotation. While some IIMorrow users swear by this feature, I swear at it: I find it annoying because when I wanta particular piece of nav information, I can’t stand waiting until the right page scrollsby. I found I could get all the data I normally need on one customized nav page, so Inever have to change pages or resort to autonav mode.
The GX55 has a flight timer that can be programmed to start running once you’ve passeda certain groundspeed (for example, 60 knots). In other words, once you exceed 60 knots ontakeoff, the timer starts; once you drop below 60 knots on your landing roll, the timerstops. Neat, huh? (I wonder if the timer will run or stop if you’re in a spin goingstraight down at 120 knots?)
The “Direct-To OBS” function is really handy when you need to intercept aparticular radial from or bearing to a fix. To activate this feature, you press the”Direct” key twice, then dial in the desired bearing using the concentric dataentry knobs, not unlike what you’d do with a normal OBS knob. Then you intercept thebearing, much as you’d track a VOR radial. Of course, the fix needn’t be a VOR, and thisfunction can be really handy for tracking extended runway centerlines.
Whenever you’re navigating to a waypoint, you can press the “INFO” key todisplay data about the waypoint: frequencies, identifiers, lat/lon, and (if the waypointis an airport) runway lengths, runway lighting, ILS frequencies, field elevation,available fuel, and so forth. There’s even a place to enter comments, so you could put inthe phone number of the local taxi or mention in the comment section no fuel is availableafter 6:00 PM or whatever you want to remember about that waypoint.
Pressing the the “NRST” key brings up a list of the nearest 20 airports; ifyou turn the large knob, you can see the nearest 20 VORs, NDBs, intersections anduser-defined waypoints. In each case, the fixes are sorted from nearest to farthest away,and you’ll see the distance and bearing to each from your present position. There’s evenan arrow on the display to give you a general idea of which way the fix is, so you canturn toward it quickly in an emergency. If you want more information about any of thefixes on the “NRST” list, you can get it simply by pressing the “INFO”button. To navigate to one of the fixes on the list, simply press “Direct” and”Enter.” It’s very intuitive, and all of this also works in the simulation modeso you can try it out at home.
While in NAV mode, the “Smart Keys” come into play. These are keys beneaththe display that have software-generated labels above them to show their function. Forexample, by pressing the “DB” Smart Key you can create a waypoint defined byradial and distance from any known fix, similar to the old rho-theta RNAV units. The”DB” Smart Key also allows you to delete or modify your user-defined waypoints.Pressing the “FPL” Smart Key puts you in the flight plan editor and lets youcreate, modify, delete, and activate flight plans. The “SYS” Smart Key lets youcustomize your nav pages, adjust CDI sensitivity, and set other system parameters. It alsolets you theft-proof your GX55 by entering your name and a password, if you wish. TheseSmart Key functions are very powerful, but I suggest you learn to use them on the groundbefore trying them out in the air.
Now That’s A Moving Map!
Finally, we come to the piece de resistance, the GX55’s MAP mode. I believe thatII Morrow should be required to placard the unit as follows:
GX55 CONSUMER WARNING: |
Friends, it’s that good. The GX55 map is much like an Argus 3000with a course line, except that in my opinion it’s easier to read than the Argus. All youdo is keep the aircraft on the course line and maintain airspeed and altitude.
Now here’s where things get even better. The Smart Keys in the MAP mode are labelledAPT, VOR, INT, NDB. I’m sure you know what they stand for. Here’s how they work. Let’s sayyou push the “APT” Smart Key. The button lights up and airports appear on themoving map display along with their identifiers. Now push APT again, only the outsideedges of the button are lit, and the airports remain on the screen but their identifiersdisappear, thereby decluttering the screen. Press APT again and now only the outline ofthe button is lit and the airports disappear, further decluttering the display. The VOR,NDB, and INT Smart Keys work the same way for fixes in those categories.
This is really slick. In most moving maps (including the Argus and all the handheldsI’ve tried), you have to work your way through a bunch of menus in order to declutter themap display, and that usually turns out to be more trouble than it’s worth. With the GX55,you can control what appears on the map with a simple press of a key. Special-use airspaceis always shown on the map.
While in MAP mode, you can adjust the scale of the moving map from 0.1 mile to 250miles simply by just turning the small knob. Auto-range is also supported, but I wasn’tthrilled by it. You can configure the GX55 to warn you when you approach special-useairspace. This is a great feature and easy to use. The “MSG” Smart Key willflash if there is something you need to know, such as approaching or entering special-useairspace or losing your GPS position.
By turning the large knob, you can put the GX55 into a split-screen mode with a movingmap on the left side of the display and nav information on the right side: waypoint ID,distance, groundspeed, bearing, track, and off-course distance. The map is smaller in thismode, but quite useable if you use the Smart Keys to declutter it. You can also remove thecourse line on the moving map but I don’t know why you would do that. Just keep theaircraft on the line and look out the window for traffic, it’s so simple.
With all this, I’ve only touched on about half the features of the GX55, but these arethe most important ones. To say this is a feature-rich radio is putting it mildly. Butenough fiddling around on the bench. Let’s install this puppy in an airplane!
Installation Made Simple
II Morrow made the GX55 rack-compatible with the prior panel-mounted Lorans they built.Of course, if you don’t have an II Morrow Loran in your aircraft, you can purchase ainstallation rack and have the GX55 installed. But our first GX55 sale is going into aCessna R-182 that had a II Morrow 618TCA Loran installed with a top-mounted antenna, soinstallation should theoretically be a snap. I told the customer to allow three hours forinstallation because this was our first GX55 installation and I wasn’t really sure what Iwas getting into. I learned long ago that things often aren’t as easy as they seem.
We remove the 618TCA from the rack with a screw driver, slip the GX55 into the rack,and tighten it down with the supplied Allen wrench. What a difference in weight! The GX55only weighs 2.6 pounds (it’s mostly air, remember?), while the Loran weighed over 4pounds. Obviously the weight and balance will have to be updated.
Now for the antenna. Fortunately, this Loran antenna was top-mounted so we could putthe GPS antenna in the same location. (Bottom-mounted antennas don’t work with GPS!) Wehad to remove some of the headliner to get to the nuts that held the antenna mountingscrews on. Removing the old antenna is a two-person job, one to hold the nuts inside thecabin and one to turn the screws outside. (How many avionics technicians does it take toscrew in a lightbulb?)
II Morrow was smart, they made the foot print of the GX55 GPS antenna exactly the sameas the Loran antenna, so no new holes have to be drilled. We install the GPS antenna withnew mounting screws and torque them down. The Loran antenna used what we call a BNCconnector at the end of the coaxial cable, but the GPS antenna requires a higher-qualitylow-attenuation TNC connector, so we have to change the connector. The TNC requiresspecial tools to install, so you’ll probably have to get your avionics shop involved. Youcould use a BNC-to-TNC adapter but doing so defeats the purpose of the low-attenuationconnector, so it should be considered only as a last resort. We have the necessary tools,so we install the TNC on the cable, connect it to the new GPS antenna, and reinstall theheadliner.
Now for the exciting part. We pull the Cessna out onto the ramp, power-up the GX55,initialize it with the current time and location, and within 4 minutes it is trackingsatellites and working fine. Now back inside the shop to revise the weight and balance andcomplete the 337 form. We gain about 3 pounds of useful load. Total install time: lessthan an hour, including the paperwork. (Had the Loran antenna been on the bottom of theaircraft, the installation could have taken several more hours because the GPS antennamust be on top of the aircraft, no exceptions.)
Flying the GX55
I tell the customer that I want to do a test flight with the new GX55. I explain thatthis is necessary to verify that the GPS will work with his Cessna autopilot, but the realreason is because I’m always looking for an excuse to fly and anxious to see how this unitperforms in flight. The customer agrees, so up and away we go. I select a destinationwaypoint and press the “Direct” button and “Enter.” The GPS gives me abearing of 335 degrees, and I set up the autopilot for nav-coupling and engage it. The HSIneedle centers up and the autopilot keeps it centered. So it appears the GX55 outputs willwork the same as the removed Loran did.
Now I turn the aircraft so the sun is directly on the display. I want to see if it willwash out in bright light. It doesn’t. I think the GX55 display is one of the best on themarket. LCD and LED units aren’t even in the same league, and I’m not convinced CRTdisplays (e.g., KLN-90, Argus) are any better (but they sure cost and weigh more).
I fly directly to an intersection and ask ATC to verify that they show me right at thatfix, which they do. I shoot an ILS in VFR conditions and watch the runway come up on themoving map of the GX55. True, you can’t use it for approaches, this is a VFR-onlyinstallation. But seeing that runway in front of me on the moving map is a good feeling.We land and I reluctantly turn over the keys to the owner. Later in the week, I call thecustomer and ask what he thinks of his GX55. He tells me he loves it, and is still blownaway by the performance for the dollar.
The Bottom Line
I have subsequently installed a bunch of GX55’s and all my customers have been ecstaticabout the unit. (If my customers aren’t happy with a product, then I won’t sell it.) Whenthey hand out the “product of the year” awards, I’d like to see II Morrow get itfor the GX55. It’s easy to use, easy to read, and the customers love it. That’s what it’sall about.
POSITIVES: Finally manufacturers are waking up and offering aircraftowners what they want. Removing an outdated Loran and installing a GPS with a moving mapthat slides in the same rack is great! It’s easy to read and operate for under $3,000; bycomparison, installing an IFR-approved GPS plus an Argus moving map would cost more than$8,000. The user’s manual is in plain English. The radio has buttons and knobs that feellike they should. The user interface is easy to learn and use, the map declutteringfeatures are the best I’ve seen, and the database can be updated by the owner simply bychanging plug-in datacard. And the GX55 is a high-quality made-in-USA product withexcellent factory support. What more could you ask for?
NEGATIVES: It’s not certified for IFR approaches…but give me abreak: less than1% of the II Morrow Lorans that the GX55 is designed to replace were evercertified for IFR-enroute, much less IFR-approach. Actually, the GX55 is TSO-C129 (ClassA2) certified for IFR enroute and terminal flight (not approaches). But to have itinstalled as IFR-capable may not be just a slide-it-in affair; you’d need to add external”Message” and “Parallel Track” annunciators, and a connection to a CDIor HSI is required.
To install an approach-certified GPS, you’d have to re-wire the aircraft to meet theIFR requirements, which could cost thousands of dollars. My advice to most owners is toinstall an inexpensive VFR GPS like the GX55 and plan on waiting a few years until thingslike WAAS sort themselves out before thinking about spending a small fortune on anapproach-certified GPS installation.
CAVEATS: If your Loran antenna is bottom-mounted, installation of theGX55 will cost more because a completely new antenna installation on the top of theaircraft will be required. Even with a top-mounted Loran antenna, the GX55 isn’t quiteowner-installable because of the TNC connector (which requires special tools to install)and the requirement to file a Form 337. And after reading this article, somebody’s boundto ask, “Tom, you said this unit is half-full of air, so why does it cost$2,995?”
