


With a new, remanufactured, major overhauled or top overhauledengine utilizing proper break-in procedures is critical to avoidinghigh oil consumption and its related problems. The main purposeof break-in is to seat the compression rings to the cylinder walls.Let me explain what ring seating is all about.
While a new steel cylinder may look like a smooth surface inside,it really isn’t. A stone hone has been used to give the surfacemicroscopic grooves…peaks and valleys so to speak. Each tinygroove acts as the oil reservoir holding oil up to the top levelof the groove where it then spreads over the peak surface. Thepiston ring must travel up and down over this grooved surface,and must "hydroplane" on the oil film retained by thegrooves. Otherwise, the ring would make metal-to-metal contactwith the cylinder wall and the the cylinder would quickly wearout.
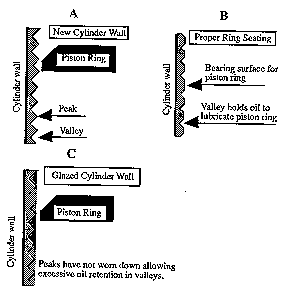 Howeverthe ring will only ride on this film of oil if there is sufficientsurface area to support the ring on the oil. When the cylindersare freshly honed the peaks are sharp with little surface area.Our goal when seating the rings on new steel cylinders is to flattenout these peaks to give more surface area to support the rings,while leaving the bottom of the groove intact to hold enough oilto keep the surface of the cylinder wet with oil. See illustration(taken from Sky Ranch Engineering Manualby John Schwaner).
Conventional chrome-plated cylinders, generally referred to as"channel chrome", are not honed because they alreadyhave tiny channels (or cracks) in the chrome surface created duringthe electroplating process. However, the same flattening of thepeaks must be accomplished. Because chrome is much harder thansteel, this seating process can take substantially longer withchannel chrome cylinders than with steel ones.
Ceramic-impregnated cylinders such as Cermicrome, Nu-Chrome andCermiNil work a bit differently. The cylinders have a porous surfacethat retains oil. Only a brief period of time is required duringbreak-in for the piston ring to smooth the surface area to providesufficient area for the ring to be supported on a film of oil.These cylinders break in very quickly.
You sometimes hear about cylinders becoming "glazed’ if break-inisn’t done properly. When glazing occurs, oil oxidizes in thetiny grooves or channels on the cylinder walls, causing the groovesto become plugged with varnish. If the grooves get plugged, theycan’t do their job of maintaining a consistent oil film on thecylinder walls. The result is usually high oil consumption andblow-by.
Things you should know
As the owner or pilot, you need to do a couple of things to assistthis ring seating. First, you should use straight mineral oilduring the initial break-in period, because it has less lubricitythan normal ashless dispersant oil and therefore provides increasedfriction to aid in this seating. Second, you should operate theengine at high manifold pressure during the initial break-in period,in order to push the rings out against the walls as hard as possibleto aid in the seating.
Try to keep ground runs to an absolute minimum. This is most importantwith engines that have not been run in a test cell, and will berun for the first time on the aircraft. All factory new and factoryremanufactured engines will have been run in the factory testcell for 30 minutes to 2 hours. Some large overhaul shops alsogive their newly overhauled engines a test-cell run before shipment,but most shops don’t. So be sure to ask if your engine was runand for how long.
All ground running should be done with all cowlings and bafflesin place. A decowled engine receives very little colling air,so running without the cowling could damage the new cylinders.
Preparing for the first run
Fill the engine oil sump to rated capacity with straight mineraloil, preferably 40 weight. We find 40 weight is better than 50weight as the lighter oil will flow a little faster and carryoff heat a little better. Dissipating heat is a major concernduring break-in. You should use 50 weight oil if the ambient temperaturewill be above 80F. However, hot weather isn’t ideal for break-in.
Remove a spark plug from each cylinder, preferably a bottom plug.Hook the aircraft up to an APU and crank the engine with the startermotor for a period of one minute. This will allow the engine’soil pump to distribute some oil throughout the oil galleys ofthe engine. If the engine is equipped with a turbocharger, removethe oil discharge line from the turbo and make sure there is oilflowing out of the turbocharger.
If the aircraft is equipped with an electric boost pump use itto pressurize the fuel system to look for leaks. Run the pumpon "high" or "emergency" speed with full throttleand mixture at idle cutoff.
First run (30 seconds to 1 minute)
Keep this run to minimum time necessary to complete task.
Start the engine and run at 1000 RPM or less for approximately30 seconds to one minute. Inmediately after startup, make surethat oil pressure starts rising and goes to the upper part ofthe green arc. If it stops in low green or lower, shutdown immediatelyand determine source of problem.
Check that idle RPM is approximately correct (usually about 600RPM at minimum throttle), that both mags work, and that idle manifoldpressure is in the vicinity of 12 inches (if the engine is equippedwith a manifold pressure gauge). Check idle mixture at shut down:as you slowly pull the mixture control, you should get a slightRPM rise before the engine quits.
After shutdown, check for oil leaks and make adjustments to anythingthat is grossly in error. Let the engine cool down completely.
Second run (1 to 2 minutes)
Keep this run to minimum time necessary to complete task.
Start engine and allow to warm until oil temperature needle comesoff of peg. Do normal but brief run-up, checking mag drop. However,do not cycle the prop at all.
If the engine is equipped with an electric boost pump, make surethat it will boost pressure, even to the point of starting toflood the engine. If the aircraft has a two-speed boost pump controlledby a throttle switch, it may not be possible to get high boostat idle throttle position, but even low boost should bring upthe pressurea bit.
With the throttle pulled back to idle check for correct idle speed— 600 RPM for most engines but consult your manual in advanceto be sure. Slowly pull the mixture out to shut down the engine,there should be about a 25 to 50 RPM rise if the mixture is setcorrectly. A greater rise indicates to rich an idle mixture, alower rise or no rise at all indicates to lean an idle mixture.
Shut down and check for leaks, make any indicated adjustments.Let the engine cool down completely.
First flight (30 minutes)
Pick a time when you will be able to taxi right to runway andtake off. If necessary, make prior arrangements with tower. Startengine, taxi out, do a normal runup but do not cycle prop. Ifeverything appears okay—oil pressure high in the green and oiltemperature off of peg—initiate takeoff on longest runway available.
On carbureted aircraft without an engine-driven fuel pump, watchfor any indications of mixture problems which may cause a rough-runningengine. On aircraft with engine driven fuel pumps (including allfuel injected engines), monitor fuel pressure or fuel flow closely,If too high (way beyond red-line), reduce to red-line with mixturecontrol. If too low (two gallons-per-hour short of red-line orless), abort the takeoff and determine the reason.
Closely monitor RPM. If it doesn’t get within 100 RPM of red lineand there is sufficient runway available, abort the takeoff. Therecould be a problem here if the tach calibration is off to thelow side, which is where most mechanical tachs are. Some havesuggested doing a tach check on the second ground run with a digitaltach checker such as the Cardinal tach checker. However, I preferto avoid getting RPM up in the 2000+ range during the ground runs.
If the aircraft is equipped with a multiple probe EGT and youare is able to monitor EGT in addition to the above-mentioneditems, abort the takeoff if any single EGT exceeds 1500 degrees.
Also abort the takeoff if anything sounds, smells, or feels unusual,even if you can’t quite "put your finger on it." Youshould be "spring-loaded" to abort this takeoff, continuingonly if everything seems very close to "just right".This is a good rule for all takeoffs, but especiallythe first takeoff on a new engine!
After takeoff, make a shallow climb and maintain the highest climbairspeed with which you are comfortable. Once you get to a safealtitude, you should make your climb very flat—around 200 to300 feet-per minute. The goal is to keep as much cooling air flowingover the engine as possible. Circle above airport for 30 minutes(just to be on the safe side). For a normally-aspirated engine,do not get much above pattern altitude so that power output remainshigh.
On fixed pitch propeller aircraft, keep the RPM at the top ofthe green. On controllable pitch aircraft keep MP at the top ofthe green or higher and high RPM as well. If you have cowl flaps,keep them wide open. Use maximum rated continuous power if thatcan be done without over-temping the engine; otherwise, reducepower only to the extent necessary to keep cylinder head temperatureand oil temperature in the green. Use full rich mixture to helpkeep CHTs down.
After 30 minutes make normal landing, carrying as much power aspossible during approach. Taxi as quickly as prudent to parkingand shut down immediately.
Holding this first flight to 30 minutes over the airport justabove pattern altitude is a concession to safety. The first flightwould be better extending for a couple of hours, but I have beensurprised too many times by problems to stay up very long or getvery far away from the airport.
Un-cowl and closely inspect the engine for any signs of problems,leaks, cracks, etc. Pay close attention to those things that mighthave come loose such as clamps and fittings. I have been amazedat how many things can get loosened up after the engine startsproviding some vibration. Make adjustments dictated by flighttest results. Let cool down completely.
Second flight (1 1/2 to 2 hours)
This is a fun one! Take off normally. Stay low and carry as muchpower as possible, especially MP at very top of green or higher.Use rich mixture to keep CHTs in line. Staying at low altitudeis important if the engine is normally-aspirated because thisallows for the greatest MP. We have seen problems with break-inat high altitude airports.
For me this flight is great fun because it means I get to whipup and down a gorgeous section of the California coast at 500AWL (above water level) with the airplane balls-to-the-wall…anexpression, by the way, that originally came from having the ballends on the early throttles all the way forward towards the firewall.
After two hours, I return to the airport. If there are no problemsfound and nothing that needs adjustment, I turn the aircraft overto its owner. I instruct the owner to fly the airplane "hard"for the next eight hours, keeping the MP as high as possible and(if normally-aspirated) avoiding any high-altitude flights, preferablystaying below 5,000 feet.
Finishing the job
How can you tell when an engine is broken in? In the old days,it used to be when the oil consumption stabilized, which is stilla good indicator. With today’s sophisticated probe-per-cylinderengine analyzers I can often see individual cylinders seat. Whenthe CHT on any cylinder drops about 50 degrees in the space ofa few minutes with no change in engine operating conditions, thatcylinder has seated. I almost always see Cerrnicrome seat withinan hour. Standard nitrided steel cylinders take three to fourhours, and channel chrome a couple hours more.
At five hours, change the oil and filter, or clean the screen.Refill the sump with fresh mineral oil. At ten hours, drain theoil again, change the filter or clean the screen, and refill withwhatever ashless dispersant oil you are going to use. I recommendAeroshell 100W unless operating circumstances dictate a multi-weightoil. Give the engine a thorough going-over. Put a torque wrenchon every exposed nut and bolt and check torque. I am amazed athow many loose bolts we find. If anything is dramatically loose,do whatever is necessary to check the bolts around the one withloose torque.
Some recommend going on break-in procedure and oil for up to 25hours. My experience is that if the engine isn’t broken in at10 hours, it just isn’t going to happen. The only possible exceptionis channel chrome jugs which might take slightly longer.
If the engine hasn’t broken in after 10 hours, you either haveto put up with the high oil consumption, or pull the cylinders,break the glaze with a hone, check the rings for damage and correctmaterial (personally I would install new rings), reinstall thecylinders, and start all over from scratch.
But if you do the right thing during those first critical 2 or3 hours of break-in, you’ll get good ring seating and low oilconsumption every time.
