


")


")


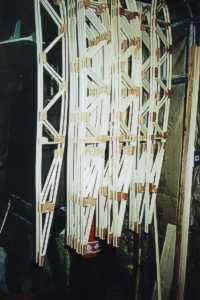
One Saturday after I walked back into the house from my shop reeking of varnish, my wife said I must be high on the fumes. I wasn’t; I wear a good filter mask when I’m varnishing or doping, but I was on a natural high. I’d just finished putting the second coat of epoxy varnish on the right-hand outer wing panel of my Pietenpol Air Camper project. The right wing was finished, except for covering, which will come much later after major assembly is built. I still have the 29-inch center section to build, but finishing the right outer panel, in addition to the left outer wing panel I finished in the early fall, means that the wings are about done.
 That’s right, I’m building an airplane. Crazy, huh? I would have thought so myself a couple of years ago. What made me start? How did I choose what to build? How did I know I had the necessary skills to build an airplane, one that I would trust to haul my butt through the air? How have I kept my interest up and continued to work on it, knowing that it is probably at least a year or more away from being finished?
All good questions, ones that every builder, particularly a first-time builder like myself, needs to answer before the first metal is bent or wood is glued. Some need to be asked of oneself repeatedly throughout the project.
How did I come to the decision to build? Actually, I kinda crept up on that one. I’ve gone to Oshkosh (now AirVenture) and other major and not-so-major fly-ins for years. I’ve always admired the homebuilts and the people who built them. I admire their work ethic, their perseverance and, in many cases, their craftsmanship. I told myself, only half believing it, that I wanted to build an airplane "some day."
 That "some day" became more definite at Sun ‘n Fun in 1999. I was walking the flight line with friends, looking and admiring, and talking to a very knowledgeable friend who is both a talented airplane restorer and an attorney. We got on the subject of building and he said he was starting to build a Pietenpol. He talked about the history of the design, and about the wood construction. He mentioned that, although it is a plans-built design — there are no complete kits sold — there are a number of suppliers of prefabricated components ranging from wing ribs and metal assemblies to complete fuselages. He said that the average home handyman who had some experience working on airplanes could build one with relative ease. All you really need, he said, was a suitable place to build it, a set of plans common, woodworking and household tools, and a couple of years. The kicker was when he said a Piet could be built for a little as $5,000. Wow!
I wasn’t so sure about the relative ease part, but I did fit the description of a confirmed tinkerer and handyman, at least in my own mind. I did much of the renovation work on our 1870s house over the course of two years. I’ve assisted our mechanic on many repairs and alterations to our Bellanca, including a complete overhaul of the engine last year. I didn’t have $5,000 rattling around in my pocket, but over a couple of years, that was doable. What I lacked was a place to build, until I remembered an old garage on the back of my property where I stored old lumber and the yard equipment.
A Place To Work
 When I got back from Florida, I took a good look at the garage. It measured roughly 19 feet by 20 feet, of wood frame construction with a metal roof. It looked to be about 50 years old. It had no foundation; the bottom timbers were laid on the ground and the framing nailed to them, and the old bottom timbers were long rotted out, especially on one side of the building. Above the rotted area, though, the building was in pretty good shape. The roof was sound. There were two overlapping sliding garage doors, both of which could only be partially opened because the building had settled down several inches. The garage was full of old lumber, doors, assorted junk and the lawn mower, shovels and rakes.
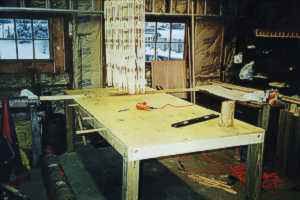
I formulated a plan to clean it out, jack it up, build a foundation under it, replace the rotten wood, pour a concrete floor and bring electricity out to it from the house. Along the way, I decided to insulate it and to remove one of the sliding doors. I framed up the opening to include some old windows and a regular entry door I found in the building. I kept the other sliding door for easy access. I told my wife I had come to the conclusion the building needed to be rescued or demolished, and I’d decided it was valuable for storage — "Oh, and I might put a little workshop area in one corner." Yeah, right.
I started in June, and by early November, it was finished. I lost 10 pounds digging out the dirt floor for the slab by hand. After all the sweat, though, the finished product exceeded my expectations. I had a smooth concrete floor, adequate electrical power with 10 outlets well-spaced throughout the building, good lighting from four overhead florescent fixtures, and insulation sufficient to allow it to be heated with a small electric or propane heater. A hand-painted sign on the door christening the shop the "Skunk Wurx" completed the job. By then, I’d come clean and ‘fessed up to my wife that my ulterior motive was to build an airplane in the shop. She just shook her head.
Why A Pietenpol?
And What Engine To Hang On The Front?
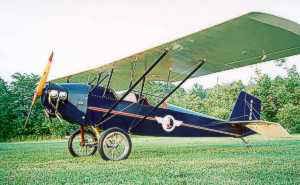
 Based on my Sun ‘n Fun conversations I had already decided to build a Pietenpol Air Camper, even before I started the shop renovation project. Why did I choose the Air Camper? I wanted a simple, fly-for-fun airplane. The Piet, with its open cockpit, slow speed and vintage look fit the bill. I wanted a project appropriate for a first-time builder, preferably with the major structures built of spruce because of my familiarity with woodworking — again the Pietenpol met those criteria. And, I needed something that would fit in the shop. The Pietenpol’s plank-like wing can be built in three sections with the longest being a shade over 13 feet. The fuselage will also fit, but after engine installation, it will have to be angled in. Finally, cost was a factor. Mine won’t come in at $5,000, but I have a shot at keeping it under $8,000.
Early on, I decided not to power my Pietenpol with the classic Ford Model A engine. I live in the mountains of western Virginia, with few suitable fields for forced landings. I’m a longtime glider pilot and have scouted many of the landable fields in the area. Many of them are tight for a glider, and I didn’t want to increase my chances of ending up in one with the Pietenpol. The conversion of the Ford engine includes a single magneto ignition and modifications to the oil system to provide lubrication allowing the engine to run at sustained RPMs never envisioned by Henry. This, coupled with the fact that on a good day, a Ford "A" engine will yield about 50 horsepower, made me look elsewhere.
In the 1960s, Bernie Pietenpol build an Air Camper powered by a six-cylinder Chevy Corvair engine. I’m told the Corvair-powered Piets fly very well, with a lot better performance than the Fords. But, I found a Continental A-65 engine at a nearby airstrip that had been in storage for a number of years. It needs to be opened up and thoroughly checked out, but was running fine when it was removed from the dinged Aeronca it came out of. A deposit is holding it until I need it.
Resources
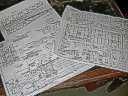
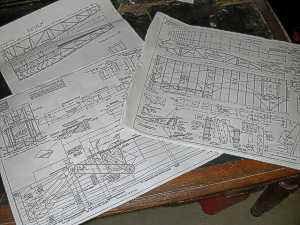
 Now it was time to buy a set of plans. I got in touch with Don Pietenpol, the son of Bernard Pietenpol, who designed the Air Camper back in the 1920s. Don still sells the plans originally drawn by his father and a young draftsman assistant back in the mid-1930s. The first Air Camper flew in 1929, and is generally credited with being the airplane that started the homebuilding movement. Plans were published in the 1932 Flying and Gliding magazine, and people have been building the little square-cornered monoplane ever since.
About the time I was buying the plans from Don, I began to find a number of resources for Pietenpol builders. One group, the Buckeye Pietenpol Association, had a Web site and regular newsletters, but they appeared to go out of existence about the time I started building. I did find an excellent web site that contains a wealth of information and links to suppliers. And, I found and quickly signed up for a Pietenpol builders’ list-serve. Over the past year, the list-serve has put me in touch with a lot of builders asking the same questions I have, and providing answers to many of them.
From the aircamper Web site, I got a recommendation on a spruce supplier in Canada. The owner was supposed to be very knowledgeable about Pietenpol construction, and would sell the wood for the entire plane, or for the wings only or fuselage and tail feathers only for those on a budget. The quality of his wood was reported to be outstanding, and all the spruce came precut to the proper dimensions.
Doing It
 I decided to build the wings first, still unsure about some of the details of the fuselage, particularly whether to build the long or short fuselage version. This would allow me to postpone that decision and research the ramifications of the two options. A cashier’s check went to Western Aircraft Supply, and a week later, I got a phone call saying the spruce was on its way to Richmond, Va., via Northwest airfreight. Amazingly, all the wood for the wings fit neatly into a ten-inch-by-14-feet heavy cardboard tube. On November 29, 1999, I drove to Richmond, paid the airfreight bill and cleared the shipment through customs. When I unpacked the shipment later that night, I could tell that the reports were right — the spruce was of top quality and expertly cut.
Over the following year as I progressed on the wings, the quantities of spruce in the various dimensions almost always came out exactly as needed. Other than a few additional pieces of quarter by half-inch capstrip, the only other wood required was aircraft grade plywood in varying thicknesses. On December 1, 1999, with a cold rain falling outside and a space heater warming the shop, I cut my first spruce.
Next – building the wings …
