One of the most important bits of information pilots can glean from our instrument panels is airspeed. It’s used on takeoff to gauge when to apply backpressure for liftoff, it’s used when landing to ensure we’re neither too slow or too fast, and we use it in cruise to help verify performance (and establish bragging rights). Depending on the airplane and the day’s mission, we may also use it to ensure we’re at or below an appropriate speed before penetrating turbulence or conducting various maneuvers.
Airspeed also is important when we’re trying to get the best performance out of an aircraft. When climbing right after takeoff, choosing the best angle of climb speed gets us over the trees at the far end of the runway while the best rate gives us a greater altitude gain over time. Among other factors, the airspeed we want to fly depends on our operational objective, which can be as simple as getting to our destination as quickly as possible. Ultimately, though, the airspeed we want to fly often is dictated by the power settings we use.
Marked Vs. Unmarked
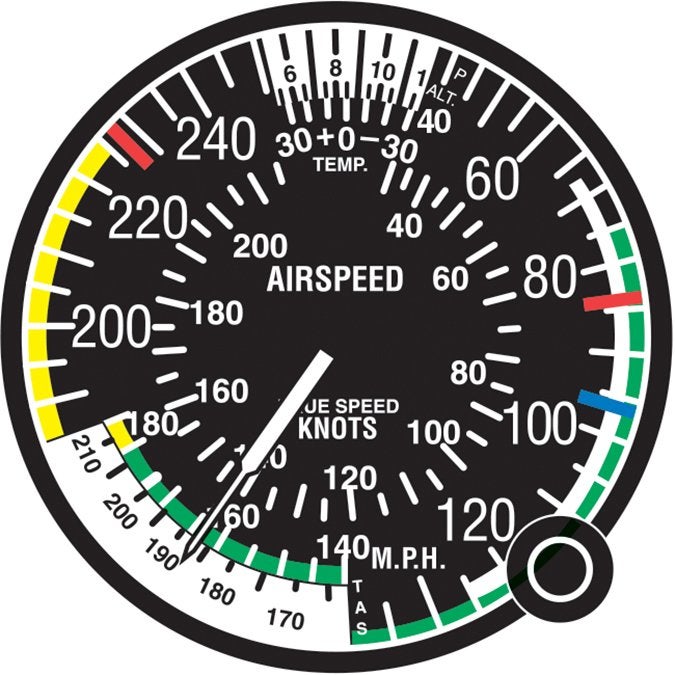
A traditional round-dial airspeed indicator, like the one pictured in the sidebar “Airspeed Indicator Markings” below, includes various color-coded markings to help us remember how to fly. However, important airspeeds we use in everyday flying—like the landing gear operating airspeed, VLO, or design maneuvering speed VA—aren’t depicted. They should be available via a placard affixed on or near the instrument panel, however.
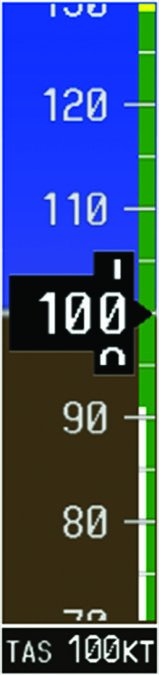
Modern “glass” panels, like the Garmin G1000 integrated flight deck, also use color-coding to remind the pilot of important speeds and ranges. The same colors and markings are used, as outlined in “Airspeed Indicator Markings.” A G1000 airspeed tape is depicted on the right.
Some other speeds we may want to use also aren’t marked on the airspeed indicator. The best speeds for a cruise climb, for example, or a short-field landing aren’t there. Depending on our mission, we may want to run as close to the top of the green arc as we can for higher cruise speeds or loaf down around the best endurance speed, at which drag and fuel consumption are minimized, along with forward progress. The former is kinda/sorta on the ASI, but the latter isn’t.
Perhaps the most important unmarked airspeed is that for a single-engine airplane’s best glide. It’s the speed you want to fly when the engine quits and you’re now flying a glider in search of a landing area.
Keeping Track
With all these important unmarked airspeeds, how can we keep track of them? Some, like VLO and VA, probably are on the aforementioned placard. But best glide isn’t, nor is the best speed for a short-field landing. How to keep track of the unmarked speeds we may need from time to time?
Short of pawing through the POH all the time, and appearing unprepared, one answer is to develop your own placard or list of target airspeeds for various operations. Another might be to somehow mark the airspeed indicator with the additional speeds we want. A third—and the method I use—is to simply memorize them.
For example, I know my Debonair’s published best engine-out glide speed is 105 KIAS. For a normal, mid-weight landing, I want to be at 70 KIAS and decelerating as I cross over the “fence,” 250 or so feet short of the runway threshold. For a short-field attempt, I’ll aim for 65-67 KIAS over the fence. If the airplane is heavy and there’s plenty of runway—which usually happens at larger airports where they want me to keep up my speed anyway—I’ll cross the threshold a little faster, maybe 75-80 KIAS, and bleed it off before touchdown, to save the tires and brakes for another day.
The only other airplane I fly regularly is an Aeronca Champ. It does most things somewhat…elegantly, but high speed isn’t one of them. It’s a proverbial one-speed airplane: take off at 60 or so, climb at 60 or so and approach at 60 or so.
One point in all this is to know the airplane you’re flying. These speeds can trend upward a knot or three if the airplane is heavier than normal, or be reduced by a similar amount if it’s just me and a few gallons of fuel. Quite literally, your mileage may vary.
So if these speeds can vary from time to time by a few knots here and there, why are we spending all this energy trying to nail down and write down these airspeeds? Instead of slavish adherence to specific airspeeds, perhaps there’s another metric?
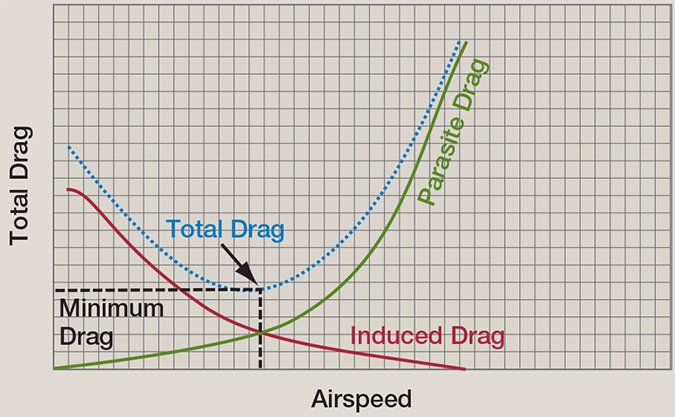
The most efficient cruising speed is found at the bottom of the total drag curve, itself formed by combing the curves for induced and parasite drag. But that speed usually is painfully slow, so most operators opt for something higher on the parasite drag curve.
Pitch Plus Power
You’ve probably heard the phrase “pitch plus power equals performance.” This means that, everything (weight, temperature, altitude, etc.) being equal, a specific power setting and a certain pitch attitude will return the same airspeed and rate of climb/descent every time. In fact, there may be only two or three power settings/airspeeds you need to know in addition to what’s marked on the airspeed indicator and/or a placard.
One of these is easy-peasy: Takeoff and climb should be at full throttle and high rpm, presuming there’s no limitation against it. A lot of people use 25 inches of manifold pressure (MAP) and 2500 rpm for climb, but I think that’s too much work. If we’re flying a normally aspirated engine, as the airplane climbs, MAP will drop off about one inch per 1000 feet. The IO-520 in my Debonair is rated to put out full power at 2700 rpm, and it will do that all day long. So I leave the prop control full forward for climb.
In addition to ensuring I’m developing all the power I can, full throttle on my engine enrichens the mixture a bit to help with cooling. If I used the throttle to reduce MAP shortly after takeoff, I also would be “turning off” that little bit of extra fuel flow (even with the mixture full rich) at a time when there’s not enough air flowing through the cowling to ensure things stay cool.
By shoving everything full forward, there’s no need to worry about power settings in the initial climb, especially in IMC, and you can leave the power controls alone, at least for the initial portion of the climb. So that’s the first power setting: full throttle, high rpm for climb. Let the airspeed take care of itself.
The second power setting is the one to use on an ILS. For me, this is typically around 18/2500, gear down and flaps up. This works out to about 120 KIAS in my airplane. While maneuvering to the FAF or being vectored to join the final, I’ll typically use this 18/2500 until crossing the FAF. Then the gear goes out and the airplane starts to descend at around 500 fpm and 110 KIAS. I may have to adjust power an inch or two, depending on wind, to stay on the glideslope. I’m not really worried about IAS, or groundspeed for that matter, just the glideslope. Once the runway environment is in sight, reducing power to 15-16 inches with the same pitch attitude almost immediately puts me in the white arc for flap extension prior to landing.
A third power setting is the one to use for holding. Again the 18/2500 or even 18/2300 works well for me, returning 120 or so KIAS, gear and flaps up. There’s an argument to use 90 KIAS in the hold but I find my airplane is a bit too mushy at 90 KIAS without flaps. Extending flaps in a hold likely means they need to be retracted upon leaving the hold, another extra step. Flying it at 120 KIAS is another opportunity to simplify things.
Of course, if you’re flying a turbocharged airplane, an overpowered twin or something with a fixed-pitch prop, some of this won’t work. Read on for a one-size-fits-all solution.
Don’t Take My Word For It
If you’re still concerned about nailing the various airspeeds for things like holding or flying an ILS, or your airplane is unique in setting power, there’s no substitute for some hands-on experience. To get it, go fly. You can do this by yourself or with an instructor/buddy/civilian to watch for traffic.
Climb out to 5500 feet AGL. While maintaining level flight, reduce power to your ballpark ILS setting, say 20/2500. As the airplane slows and while maintaining 5500 feet, trim it for 120 KIAS. Once things stabilize, lower the gear and let the airplane descend down to at least 3500 or even 2500 AGL, but pay attention to the VSI. If it’s just more than 600 fpm, you’ve found the right power setting/configuration for flying an ILS at 120 KIAS. If you want to fly an ILS at 90 KIAS and 475 fpm or so of descent, use 18/2500 as a ballpark, then fine-tune it.
Do this as much as you like, and experiment with gear/flaps/power to find the setting/configuration that produces the desired performance. Remember, also, that you’ll have to reduce power as you descend in order to maintain the same settings, since MAP increases in the descent of a normally aspirated engine. Presuming you begin the descent at 20/2500 and it’s an approach with a 2000-foot glideslope from the FAF to the DH/DA, you’ll see roughly 22/2500 as you break out. Consider rolling off an inch of MAP every thousand feet on an approach.
Finally, keep in mind all these numbers are ballpark values. What works when you’re light on a cold day won’t work as well when you’re heavy and it’s hot. What works at 8000 feet going into ABQ may not work at 2000 feet going into SRQ. But you easily can find numbers that work most of the time, and from which you can fine-tune things. For me in most situations, the correct airspeed is more about what works best for the airplane and demands the least amount of input so I can concentrate on flying the rest of the airplane.
Airspeed Indicator Markings

Color-coding is applied to traditional round airspeed indicators and those displayed by integrated flight deck equipment like Garmin’s G1000. As every pilot should know, the speeds marked include:
- White Arc: Flap operating range. Some aircraft allow partial or approach flaps to be extended at airspeeds above the white arc.
- Green Arc: Normal operating range, from the flaps-up stall speed VS1, to VNO, the maximum speed available in level flight.
- Yellow Arc: Caution range, which typically can be entered only in a power-on descent. It should only be used in smooth air. Turbine-powered airplanes usually do not have a yellow arc.
- Lower Red Radial: Minimum controllable airspeed, VMC, for a multiengine airplane operating with a failed engine.
- Blue Radial: Best single-engine rate of climb, VYSE, for multiengine airplanes operating on one engine.
- Upper Red Radial: The airplane’s never-exceed speed, VNE.
This article originally appeared in the February 2018 issue of Aviation Safety magazine.
For more great content like this, subscribe to Aviation Safety!