


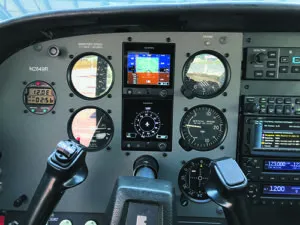
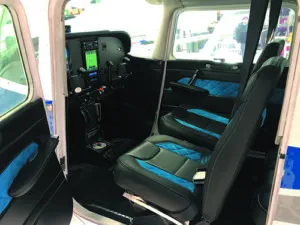
Most existing round-gauge airplanes have instrument panels that simply weren’t designed for big-screen displays. That means your shop will likely be tasked with cutting a new metal panel to make it all fit. And even if your proposed upgrade doesn’t require lots of cutting, an avionics project is the opportunity to upgrade the panel’s aesthetics from, in some cases, 1970s or earlier designs. Replacing the brittle, cracked and faded Royalite plastic overlay for a cleaner, more durable metal panel has benefits. Plus, the right paint choice can improve the panel lighting and complement a new cabin interior.

But to get there, your shop will tear the airplane to its core, removing, rewiring and installing large wiring bundles. There’s paint, placarding and if the modification alters the structure, the shop will need to get FAA approval. Yes, these are big invoices and in this article we’ll look at why it takes more planning, downtime and investment than you might appreciate. Truth is, skilled shops are turning out refurbished panels that are better than some OEM ones.
Minor And Major Alterations
Not so fast with the cutting wheel. Before a tech cuts into any panel, he’s mindful of the force-fed FAA AC 43.13-2B. This Advisory Circular deals with mechanical guidance, acceptable methods and techniques and practices for airframe alterations, and can be used to help determine if the work will result in a major or minor alteration.
Generally, any structural modification to the panel is considered major and will require additional approval. This can include an STC (some distributors sell STC’d panels) or a one-time FAA field approval. Before committing to a job ask if the panel work will be a major or minor alteration, and will the finished product come with the appropriate signoffs and maintenance endorsements. We’ve seen aircraft get flagged during prepurchase evaluations because the panel work didn’t have proper documentation. We think the better alternative to lengthy field approvals is sourcing a replacement panel that’s already PMA and STC approved. But even panel work that isn’t considered a major alteration has guidelines.
AC 43.13-2B, supplemented by AC 43.13-1B (which deals with the specifics of structural metal modifications), offers guidance on instrument panels. The go-to is the section on structural and non-structural stationary panels. The first step in the guidance is to verify if any cutting (including enlargement of existing cutouts) will be made to the primary structure.
If the panel is structural, the circular advises to make additional cutouts or the enlargement of existing cutouts in accordance with the aircraft manufacturers’ instructions, or substantiate the structural integrity of the altered panel in a “manner acceptable to the FAA.” It’s up to the installer to determine the appropriate course of approval. It’s not just about structure. There are also weight and load considerations.
For example, Garmin’s STC installation manual for the G500/600 TXi retrofit flight displays cautions that the total weight of the new equipment installed in the existing instrument panel may not exceed the total weight of the equipment that will be removed. That’s unless the total weight of all the equipment installed in the panel is within the weight limit established for the panel by the aircraft manufacturer. In other words, the new stuff may be too heavy.
On the other hand, it’s likely that the majority of retrofit flight displays could be lighter than the iron gyros that are being removed. After all, the weight savings is one bonus of the teardown upgrade, especially when removing the vacuum system.
Better Than OEM

The shops we talked with in our research all agreed that the less structure you touch, the easier it is (easy is a relative term when it comes to panel refurbs) on the overall effort, downtime and cost.
Dave Fetherston at Nexair Avionics in Plymouth, Massachusetts, told us that panel refurbishment is front and center in his shop’s busy hangar. Nexair is equipped with a modern CNC machine for cutting metal panels in-house. Then it sends them to a local finishing shop for custom powder coating. When they come back Nexair works with a laser engraver that cuts in the placarding and fills it with white epoxy paint.
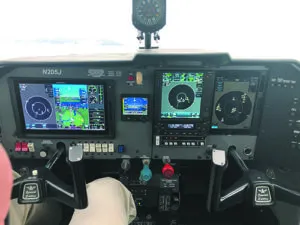
“They come out looking better than new panels from the OEMs,” Fetherston told us. He’s right. We saw some of this top-notch craftsmanship firsthand during a recent visit to the shop—including a look at the level of teardown that’s required to get the job done.

The work is done by strictly following AC 43.13 guidance and is a minor modification if you are not changing structure. Some avionics manufacturers offer their own guidance in the installation data, including specifying the panel thickness required to accommodate a given display. Panels generally aren’t provided as part of the installation kit and it’s up to the installer to build or source one. But that’s not where the work ends. There will be sizable amounts of planning before even thinking about cutting a panel. Don’t rush the process.
Layout Specifics

Digging deeper into Garmin’s TXi-series manual reveals specific requirements for planning the panel layout. For instance, the manual says that GDUs (displays) with integrated ADAHRS must be rigidly mounted without shock mounts. Nearly all primary instrument panels with spinning gyros have some sort of shock mounting to lessen vibration to help extend the life of the instruments. With respect to display readability, Garmin’s guidance for the TXi display installation says that the panel tilt cannot exceed +/-6 degrees in roll and +/-8 degrees in pitch. The panel must be perpendicular to the longitudinal axis of the aircraft yaw.

Aircraft with more traditional instrument panels will be easier to work with. But others might not accommodate the layout to your liking—or the way the equipment’s STC prescribes. This includes staying within field-of-view guidelines. Sticking with the Garmin TXi PFD/MFD as an example, the display must be located such that the screen is entirely viewable and within reach of the pilot. The manual goes on to say “it is preferable for the display to be located as far up the instrument panel as practical, and the position of the GDU display must not interfere with the installation of flight control items or control lock devices.”
As for field of view, that guidance is defined in FAA AC 23.1311-1C. It’s an exercise in comprehension and says the primary field-of-view (sitting in the pilot’s seat) values are roughly 35 degrees horizontal, 40 degrees up and -20 degrees down vertically from the pilot’s eye reference point. Get all that? The Garmin STC manual specifies that when fabricating a new panel for the GDU 700/1060, the GCU 485 controller and the location to house the standby instruments, use the same material type, thickness (not less than 0.090 inches) and corrosion protection as the original instrument panel. Corrosion protection must be in accordance with an aircraft model-specific standard practices manual, or alternatively, a chemical conversion coating per MIL-DTL-5541 Type II, or MIL-DTL-81706 Type II, and high-solids chemical and solvent resistant epoxy primer per MIL-PRF-23377, Class N. The methods, techniques and practices defined in AC 43.13-1B Chapter 4, Section 4 (Metal Repair Procedures) are acceptable and good shops will follow it to the letter.
Plan It Out – Carefully
The point is that panel replacement done in conjunction with major avionics upgrades will require a lot of planning that should involve the owner. This should start during the proposal process because the panel layout you want may not be the one the equipment’s STC allows. Even it does, it may require sizable amounts of rewiring for existing systems. Sit with the shop and envision your ultimate layout, paying particular attention to where on the panel you want the autopilot control head, as one example. The same goes for toggle and rocker switches, external annunciator panels and backup flight instruments.
Does the new panel include a primary OEM-replacement big-screen engine display? You’ll want to place it as close to your primary scan as possible. Don’t forget placards, which are required by the type certificate. In many cases the font text, size and color on the new placard is prescribed to be the same as the old placard it is replacing, and not obscured by the glareshield or any other component in vicinity.
We’ll cover lighting upgrades in a separate article, but it’s worth touching on here. As you might have discovered, the existing lighting circuits, dimming potentiometers and power supplies that have been in the aircraft for years might not be in good shape. If you plan to use them with a new panel, have the shop test them carefully and if you’re going through the expense of cutting a new panel, we advise not skimping on lighting. It can make or break a new panel, and simple DIY testing can indicate if a lighting system needs work: Is the dimming linear? That is, for full travel of the dimming control from brightest to dimmest, does the lighting respond evenly to the dimmer? If it doesn’t, now is the time to fix it.
Don’t underestimate the cost involved in both hardware and components. Lighting has come a long way.
Wrap It Up
Some shops we talked with said many projects are difficult to quote accurately because they just don’t know what they’ll run into once they tear the old panel down. Plan for cost and schedule overruns. Inevitably there will be some required rewiring that wasn’t planned for, especially if it’s been awhile since the aircraft has seen an avionics upgrade.

When it comes to panel refurbishment we strongly suggest selecting a shop that you can easily visit during the planning, building and finishing process. Since you are the one who will be sitting in front of the panel every time you fly the aircraft, you should be heavily involved in the planning. This means signing off on the final layout before the shop starts cutting.

While you’re at it, plan for future upgrades as best as practical. If a big-screen engine monitor is your goal down the road, leave an empty spot for it. Empty space is OK because why pay to have another panel built and finished during the second phase when you could reserve a spot for upgrades now?
It’s virtually impossible to nail pricing for projects of this size, but for a typical non-pressurized aircraft we would play it safe and budget at least $10,000 for a full-up replacement including paint, placards, rewiring and all the other stuff that tags along with metal panel refurbs. It’s a huge investment, but it’s one of the more satisfying improvements you can make to an aging aircraft.
This article originally appeared in Aviation Consumer magazine.
For more great content like this, subscribe to Aviation Consumer!

My first thoughts would be to qualify the candidate. Meaning, if it’s an older aircraft that’s timed out and needing a full blown restoration, is it really worth the extra expense for a glass panel upgrade? I have been flying for over 20 years and have only flown steam Guage. Only sat in a glass panel once. When I inquiried about the rental prices, he was up there with the costs of the 182RG. Just to fly his 172? Needless to say, I flew the 182 instead….
Timed out? Strange I haven’t seen an expiration date on any airframes before… an old airframe going through a full blown restoration may actually be the best candidates. If you are already doing a “full blown” restoration – unless you are going the I’m keeping it 💯 stock route, it would be a bit silly not to do some amount of glass.