


So what can you do with a multi-engine seaplane rating? You can fly firefighting aircraft that scoop water from lakes and dump it on big fires. You can fly an air taxi at a couple of small operations in Florida or Washington. You can fly PBYs with the Commemorative Air Force. Or, perhaps best of all, you can build or buy an AirCam and put it on floats.
The difficulty is getting the necessary rating, because almost no one rents seaplanes—much less multi-engine seaplanes. There are just a couple of schools in the country that offer the single-engine sea (SES) training and rarer yet is the multi-engine course. (A firm that does offer MES instruction charges $1500/hour for a Grumman Widgeon.)
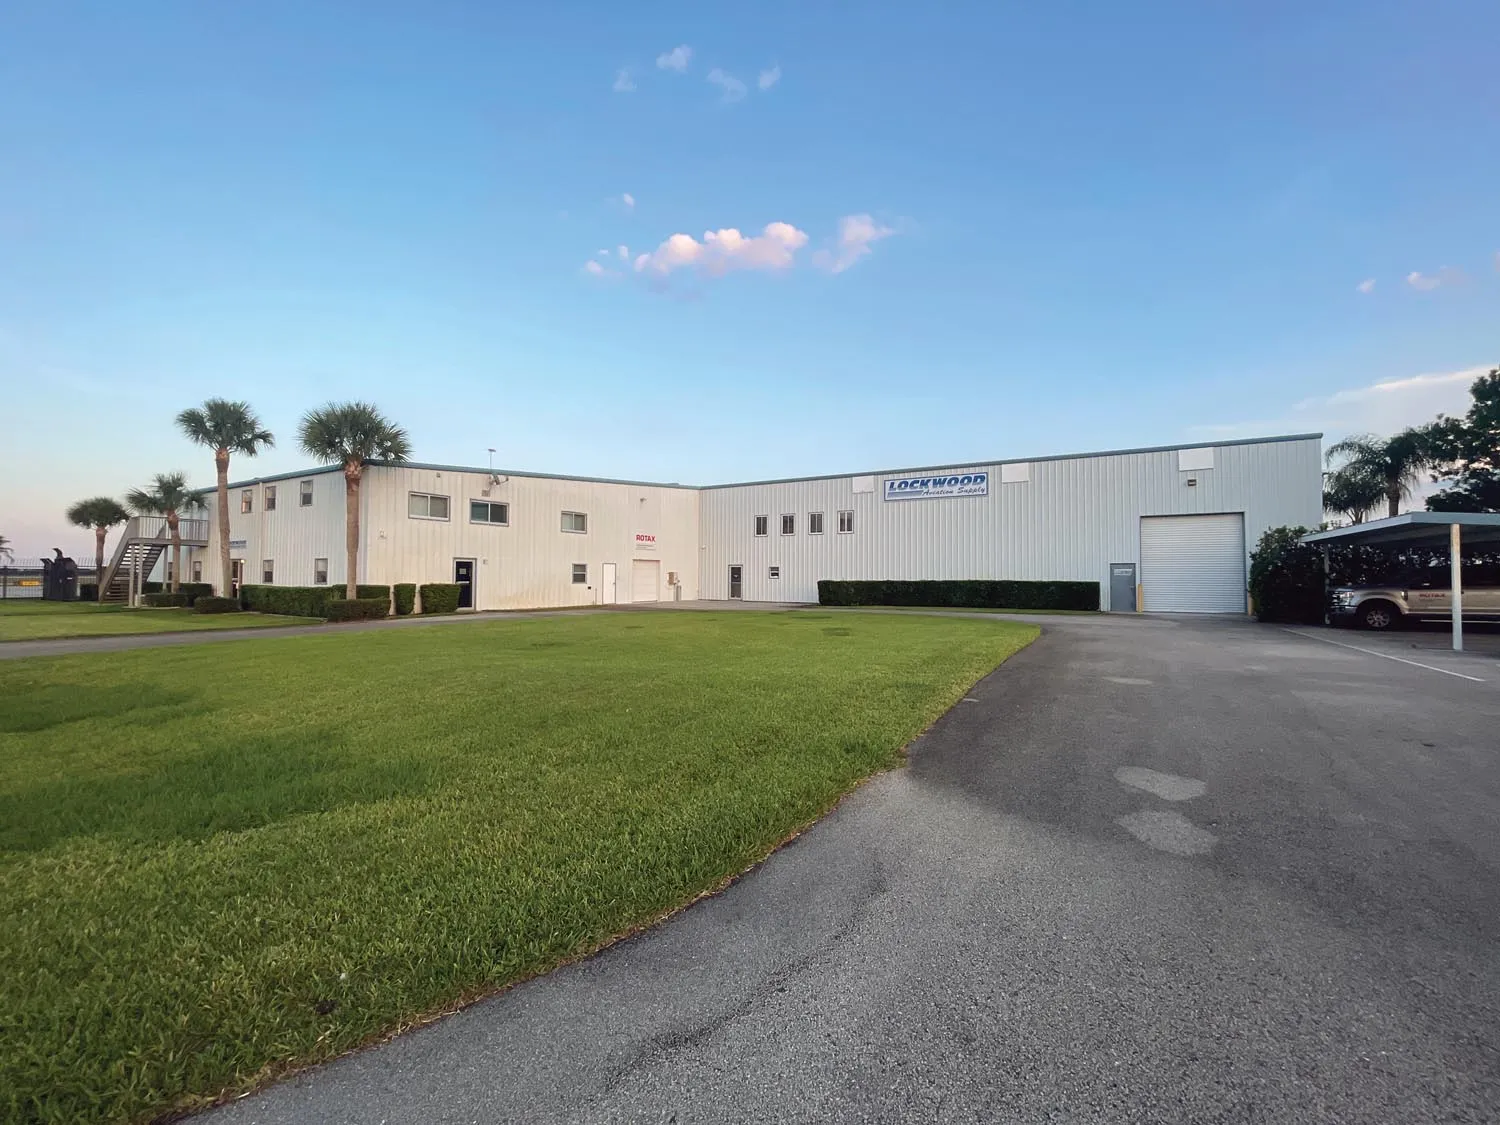
The notable exception? Lockwood Aviation in Sebring, Florida, home of the amphibious AirCam. There’s a good reason, too. Without such training, Lockwood would have no one rated to fly their airplanes—and no ratings means no sales. “No problem,” you say, “they can just hire an instructor and train folks, right?” Well that’s what they do, but since the AirCam is an Experimental, using them for commercial instruction is generally prohibited.
The FAA recognized the chicken-and-egg problem that the regs presented and created a Letter of Deviation Authority (LODA) specifically for Lockwood that allows them to provide training in the twin-engine AirCam. And while the original idea was to provide this for AirCam owners, the LODA allows them to give the training to anyone who asks. I was told of a firefighting organization that sent new hires to Lockwood to get the rating so that they can get a head start on the type-specific training on the big water bombers. To see what the process involved—and to have a few days of fun in the AirCam—I traveled to central Florida for the two-day course (plus a checkride day) to have the MES experience.
Day 1
I had arrived the evening before and was given the keys to the guest apartment on the second floor of Lockwood Aviation’s office wing. It’s a great place to stay—two bedrooms, a living area and a full kitchen—and Sebring itself is a 15-minute drive away from the airport, so if you can get it, I recommend it. A low-key evening left me ready to hit the ground running as the training started the next morning.
But before we hit the lakes, we had to go through a little ground school. Since I came to Lockwood Aviation already possessing a single-engine sea rating, I technically already understood most of the material. But that was five years ago, and I had only touched one seaplane in the interim, so a thorough review was appreciated. My instructor, Ben Lively, did a good job of quickly probing what I remembered and what I didn’t, and since I seemed to have a pretty good grasp on the basics of reading wind and water, he concentrated on operational mnemonics and procedures.

You’ll need to remember three things—WLNOT, GIFFTS and FATS. The WLNOT checklist (water/wind, lane, noise, obstructions, terrain/towers) is used to look over a potential landing area when you scout the lake. GIFFTS (gear, instruments, flaps, fuel pumps, trim, speed) is your aircraft checklist before landings. And FATS (flaps, area, trim, stick full back) is your takeoff checklist. Why not simply use GUMPS and CIGAR like you do with a typical landplane? Well they still work, but “gear” is different depending on where you’re landing, and you don’t generally have to worry about a lot of the WLNOT items for runway landings—so specializing puts you in a different frame of mind because seaplanes are…different.
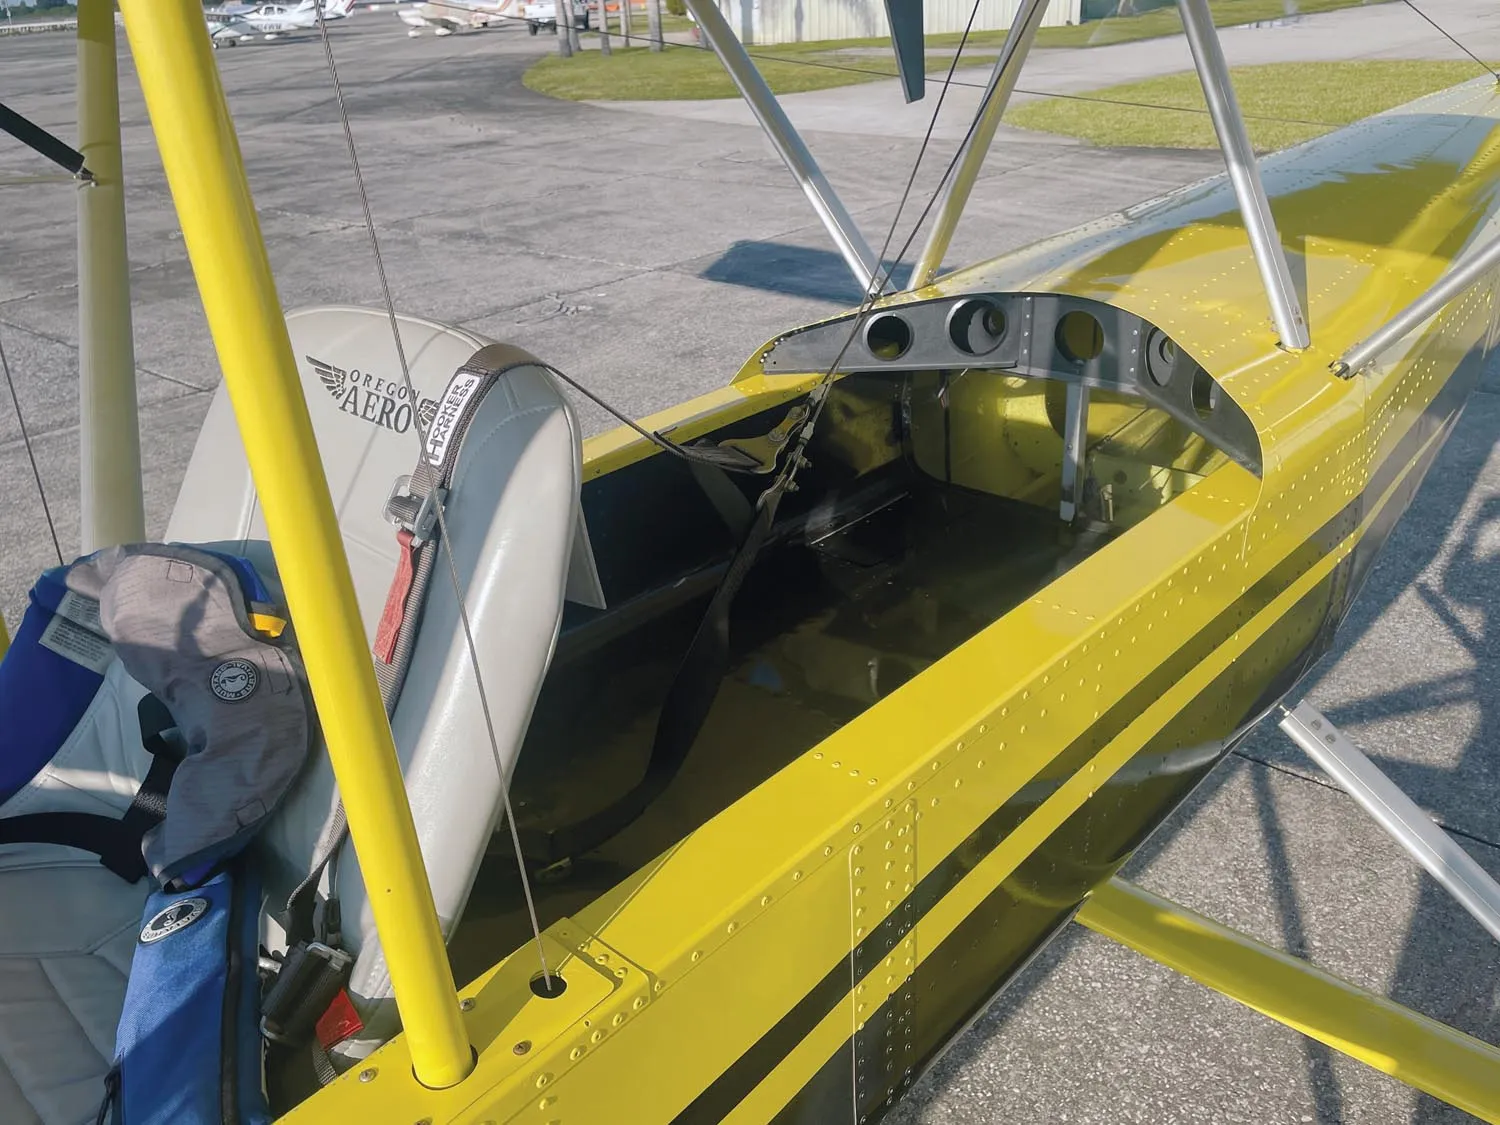
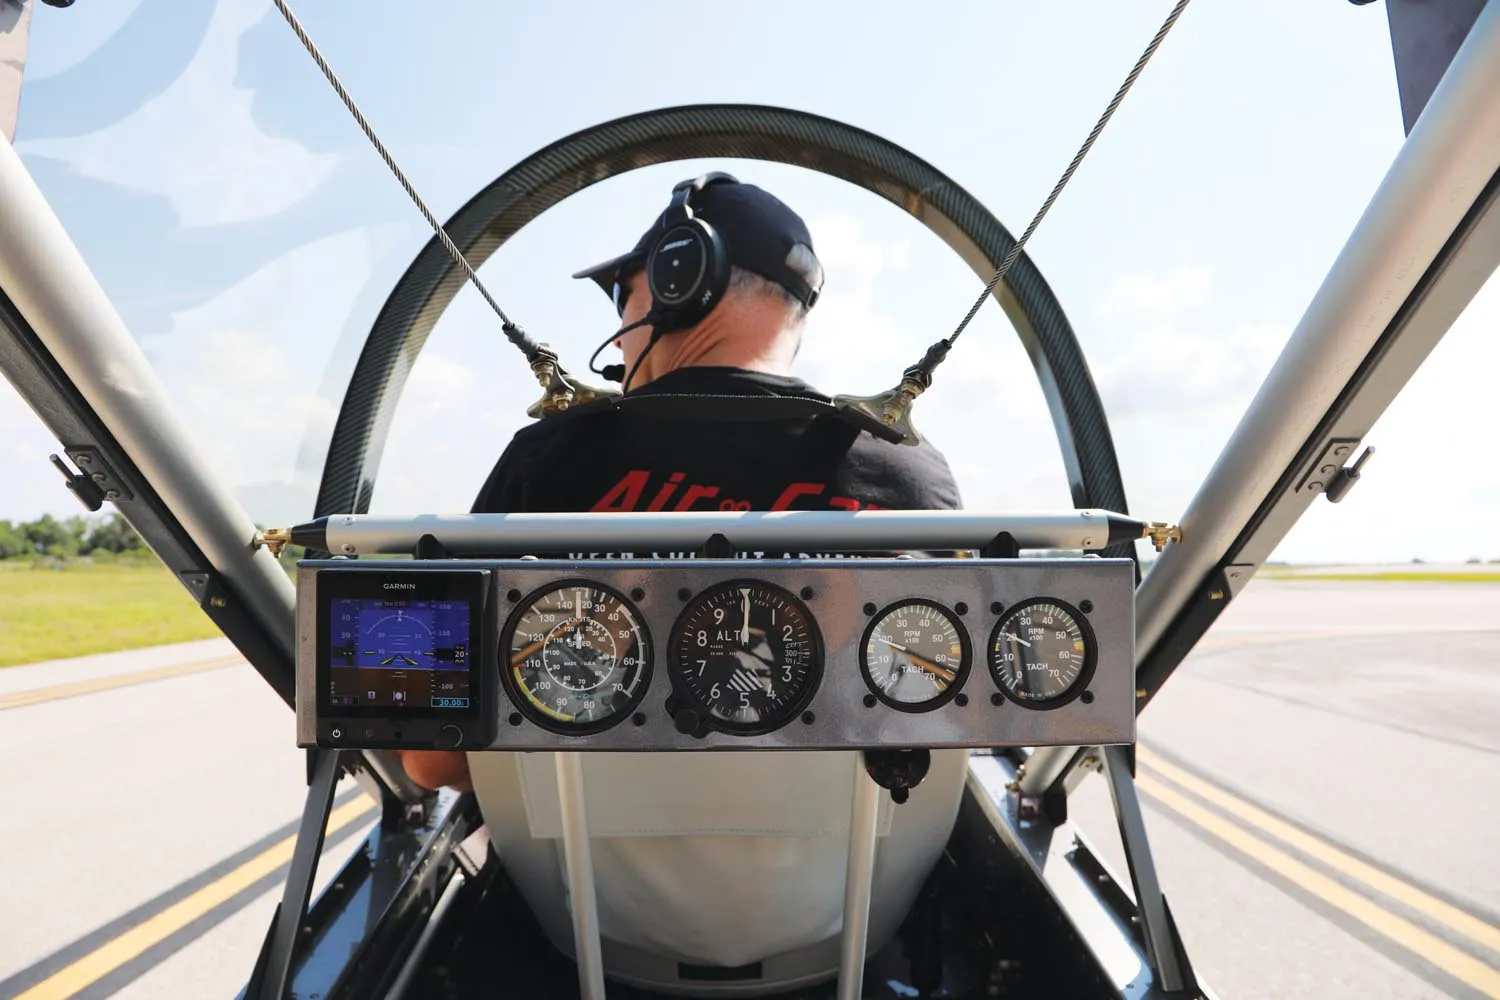
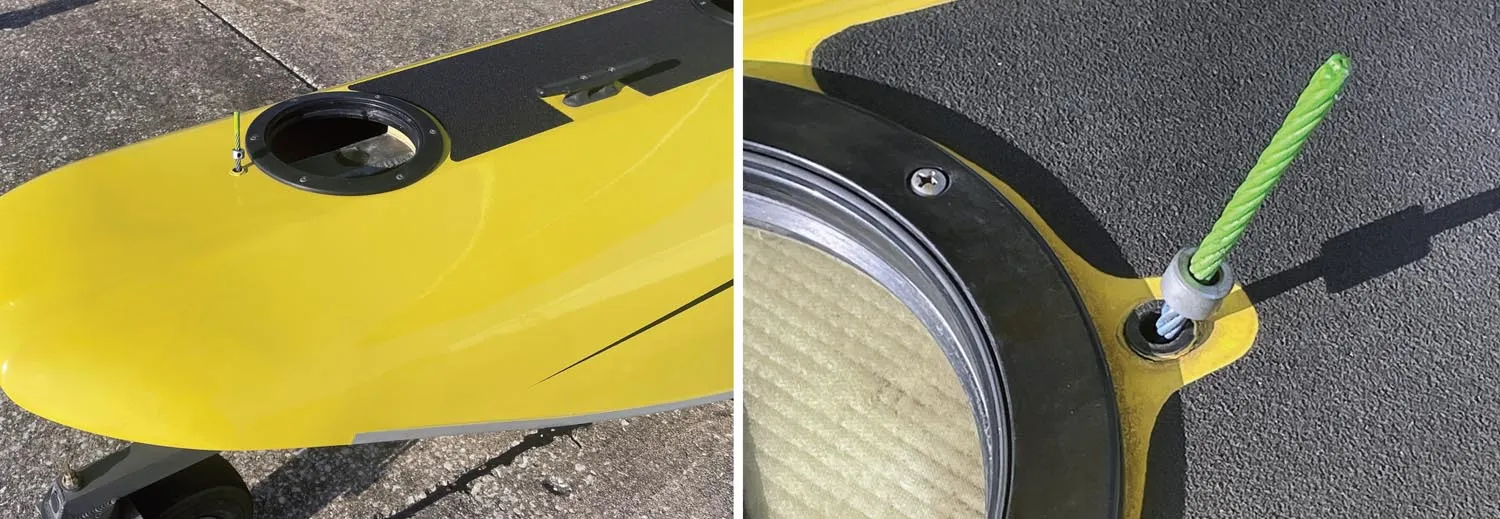
Preflight preparation takes a little more time—some of which involves getting a ladder to check the engine oil level. You start on the ground, going over the floats. This involves checking all the compartments for water (Lockwood leaves the compartment covers off overnight, so you check for water then install the covers) and making sure that nothing feels loose or bent. Once you’ve gone over the floats, you begin the airframe checklist, and this has a few unique things like checking the controls for free and correct motion by standing outside and moving the rear stick around. Once you get into the cockpit, you won’t be able to see the tail surfaces, so best check them out before you strap in. You also want to check very carefully for loose items in the baggage area or cockpits (if you are flying without the canopy) since anything that goes overboard can (and might) go through a prop—this is a pusher after all.
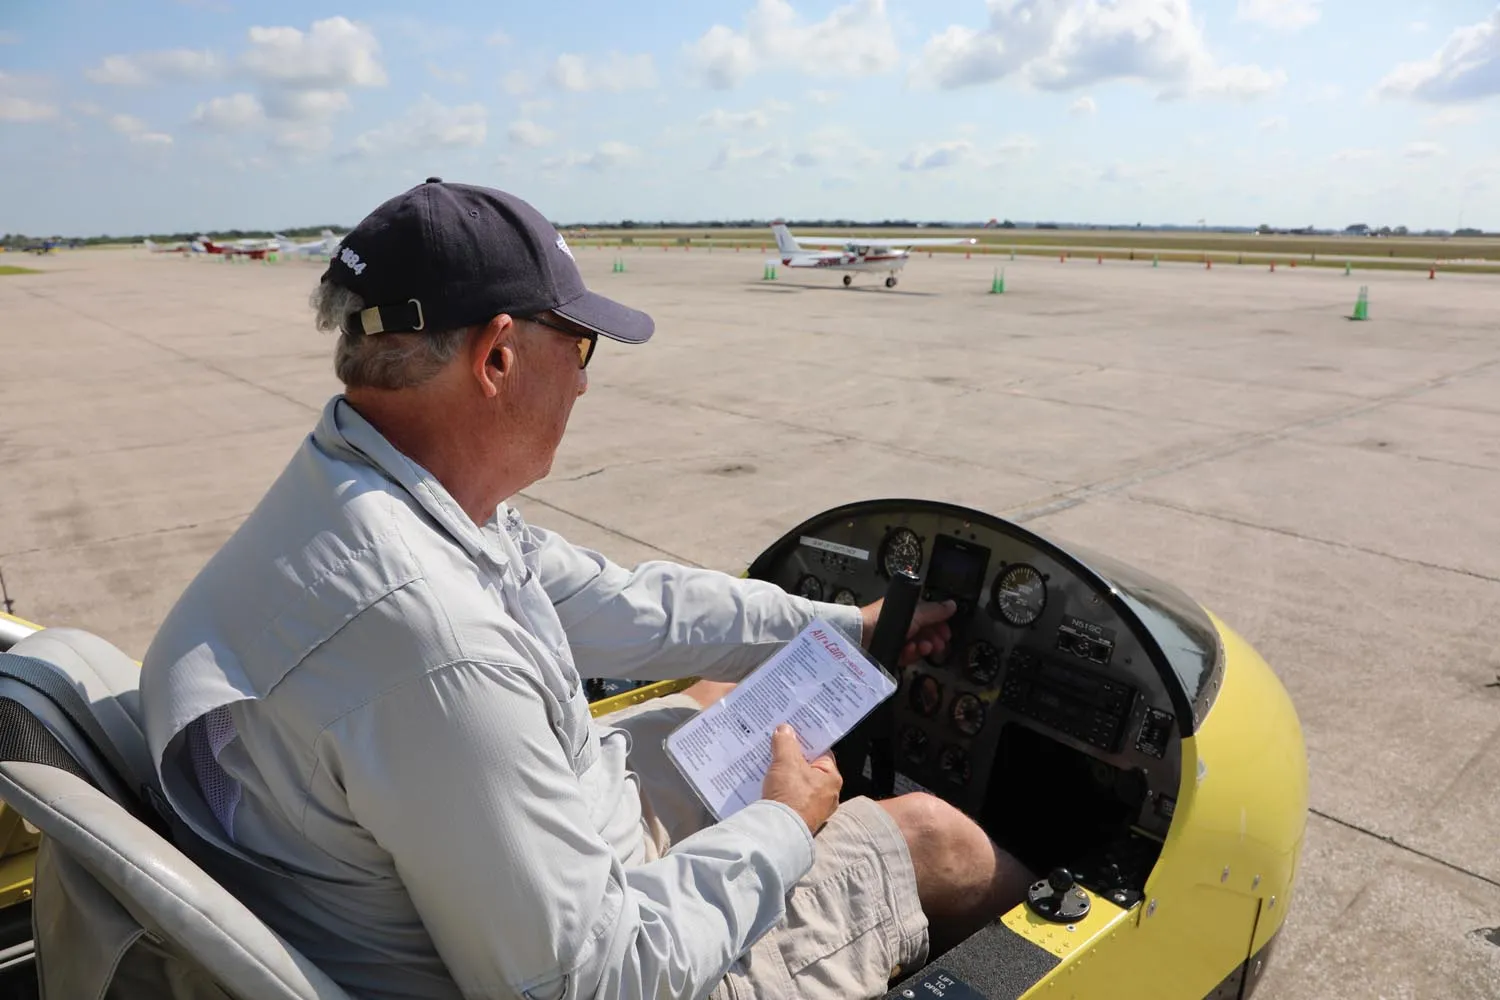
The final part of the checklist is for the engines. For this, you need the aforementioned stepladder to reach up and check the oil. And for those familiar with the dry-sump Rotax motors, spinning the props to “burp” the oil system is not unusual. But you’ll have to do it from that ladder, because they are way up there. You also want to check that the eight springs that hold the exhaust system in place are securely safety-wired so that they can’t come loose and head through those props. Fortunately, the engines are easy to check, as they are completely uncowled and everything is hanging out in the breeze.
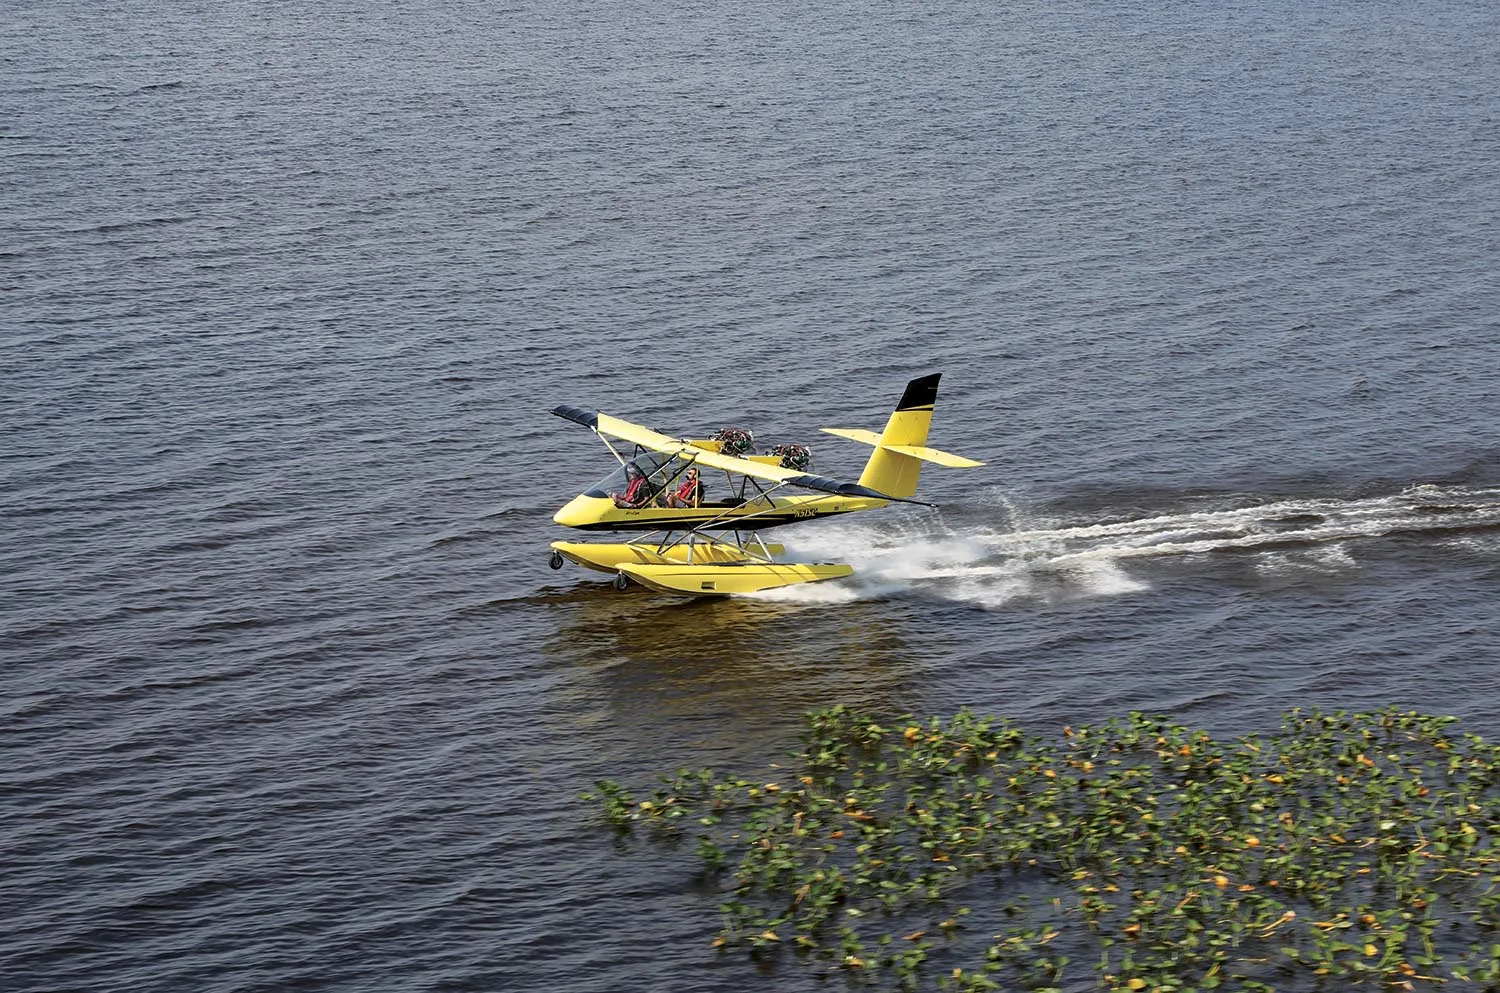
Of course, the AirCam on floats is an amphibian, so you have to also know how to operate it as a landplane, and that is how we started off—with a departure from Sebring Municipal on Runway 14. Taxiing the tall airplane makes it feel bigger than it is. The wingspan isn’t much more than that of a Cub but you have dual throttles that enhance your feel of a “big” airplane. But it is actually quite docile and maneuverable. With swiveling nosewheels (yup, there are two of them), you can steer with brakes and/or differential throttles and pirouette on the ramp quite nicely.
Land takeoffs are done with the flaps up—all you need to do after rotation is raise the gear. All water takeoffs, on the other hand, are done with 25° of flaps—but since there is no flap indicator, you simply look back from the cockpit and lower the electric flaps by holding the switch until the outboard corner of the left flap lines up with the wing’s lower flying wire. The instructors refer to this as the flap being “on the wire.” Full flaps are used for a few landings; you just hold the switch down until they stop moving.
Speeds for the AirCam are in a world all their own. Stall is about 39 mph, Vmc (minimum controllable) is 43, Vyse is 55 and best climb clocks in at 60 mph, though the instructors told me that their usual examiner (Jon Brown) prefers that you climb at 70 to add a little margin in case an engine quits.
I was surprised on our first land takeoff at just how quickly things happened for a “slow” airplane. We closed and latched the canopy after taxing into position, then I advanced both throttles to full and before I could count to any significant number we rotated and were airborne. My instructor quietly reminded me “gear,” and I had to hunt for the little toggle switch for a second, then while I was holding that in the “up” position and waiting for the motors to cycle, it was already time to get the flaps. I blew right through the briefed 500 agl altitude while doing those two things. And while doing that, it was already time to bring the throttles back to a good cruise number of about 4500 rpm. Like I said—things happen quickly in a slow airplane, mainly because the speed range is so narrow.

Going To Get Wet
Lake Istokpoga is a stone’s throw south of Sebring, making it a perfect location for Lockwood’s training. Our first day of training was a weekday in May, so water traffic was minimal. Winds and waves were light and variable, which frankly made it slightly more difficult when it came to practicing seaplane operations, because there was no rough or truly glassy water and the wind was from whichever direction you arbitrarily decided to call it. Some sort of steady wind would have made it more obvious how to choose landing lanes, but we made the best of a “good” situation and practiced all of the maneuvers required for the practical test.
Basically, you have to be able to show normal landings and takeoffs, rough water landings and takeoffs (equivalent to soft field operations on land), confined water landings and takeoffs (short field operations), glassy water landings and takeoffs (for which there is almost no equivalent except for dry lake bed ops in the West) and—special for the MES rating—single-engine landings. No single-engine takeoffs are required or advised!
Before we got started on multiple takeoffs and landings, however, we got to play boat—after one landing, we played around with step-taxiing (which is running around “on the plane” of the floats) across the lake, with some 360° turns thrown in to get the feel for the top-heavy and wind-catching “boat.” This is a great exercise for anyone who doesn’t have a lot of on-the-water experience, and also for those who do because the floatplane feels particularly tippy in turns if you’re going a bit fast or trying to turn too tight. You also get the feel for porpoising if you allow the nose to get a bit low—a motion quickly damped by bringing the stick back a little. Too much speed and you’ll lift off, too little and you’ll sink back into a plow. Getting the feel for it is probably easier for those with boating experience.
Maneuvering on the water is actually easier with the twin-engine airplane because you can steer with differential throttle as well as with rudder or ailerons. The one thing you don‘t have with the AirCam is water rudders (little rudders on the back of the floats) because, well, you don’t need them.
After getting familiar with the handling “on the step,” we started flying again—with multiple normal landings followed by the specialties. Rough water ops are analogous to rough runway ops. You want to minimize the time beating the airplane up on the rough surface. Confined water ops are basically spot landings to a reference point and takeoffs that are more interesting—you accelerate onto the step, then begin a turn to stay in a smaller area, all the while accelerating to takeoff speed when one float comes up. Once you break water, you continue the turn and fly out of your imaginary mountain valley lake.
Glassy water operations in the multi are the same as for a single-engine seaplane—you set up a descent rate that is not going to damage the airplane when you hit the water and let it fly itself on. This is because you simply can’t judge height over the water very well if there is no texture. While I learned this technique during my SES training, I have used it more frequently in land-plane flying to dry lake beds, some of which are large enough that you don’t have good altitude cues when you’re landing. I find that glassy water is more forgiving than lake beds, however. Glassy water takeoffs mean lifting one float before the other—to break the suction that is usually broken by ripples or waves— then flying away.
The only real difference between single and multi training is the single-engine landings. And, of course, the AirCam is a little different than most twins because the engines are fairly close to centerline and the props don’t feather. That means you just pull back one engine (the right engine is critical) to idle, go full power on the other, then fly an approach and landing to the lake. The AirCam is so forgiving that you at first have to recognize that an engine has failed (this can take a little while if your hand isn’t on the throttle when the instructor pulls it back) because you still have plenty of power to keep flying. In fact, you have to throttle back the good engine a little to get down to maximum flap speed to make a landing. Holding rudder into the good engine is very natural and doesn’t give you “sewing-machine leg” like more powerful twins.

Engine failures in the training environment make experienced multi-engine pilots—used to mixture and prop controls—wonder what they are missing. The only way for the instructor to “fail” an engine is to pull the throttle back all the way, and any student pilot engaged in multiple takeoffs and landings is holding both throttles, so they instantly know that an engine is gone—and which one it is. I initially found myself putting in too much rudder too quickly and getting a bit of tail wag. Don’t anticipate—just add rudder as required, take a look at the tachs to confirm which engine is down, verbalize it, then bank a little into the good engine and head for water—the easiest place to land your crippled seaplane.
Returning to Sebring for a runway landing illuminated once again the important thing to remember with amphibious floatplanes—the mantra of always saying “this is a water landing, the gear is up” or “this is a land landing, the gear is down.” You can land gear up on the land with just a little damage, but landing gear down on the water will likely lead to a flip. Lockwood’s instructors train to say “gear up for water” on downwind, base and final—and to call “gear down for land” at the same points for the runway landing. As someone who routinely goes between fixed- and retractable-gear airplanes, I already do this, just to make sure I don’t join one of those exclusive clubs.
With Day 1 flying finished by noon, it was time to relax with the briefing material and drill those new mnemonics into my brain. And, of course, to review Vmc for the checkride. I was briefed that there would be no actual Vmc demo during the checkride but I’d have to describe it (and the aerodynamics behind Vmc) during the oral—and since that and the engine-out landings are the only differences between single- and multi-engine sea, it’s probably worth spending the time to polish them up.

Day 2
Day two of the multi-engine seaplane training dawned with similar weather to the first—calm winds and clear skies. While clear skies and no chance of rain are always welcome when doing VFR flight training, the “no wind” condition started to worry us a little, because so much of seaplane training is about handling conditions with wind. There are variations in takeoff and landing techniques for rough water, confined areas and glassy water—but when all you have is mild ripples and shifty, variable winds less than 4 knots, most of them become imagining the differences the various techniques make under the different conditions.
Along with takeoffs and landings, some of the taxi and water-handling techniques are dependent on wind—for instance, “sailing” the seaplane downwind using the flight controls to point the airplane in directions while you are carried along with the wind. No wind—no motion. Nevertheless, we practiced as much as we could for the promised checkride on day three and refined the techniques we had learned on day one, bringing performance up to checkride levels.

One-Engine Landings
As previously mentioned, the AirCam is remarkably docile with one engine pulled all the way back. About the only way you can mess up the exercise is to fly far enough away from a lake that you couldn’t make it back if the other engine failed. I was cautioned that in that case, the examiner would certainly pull the good engine back to idle, claiming “bad gas” had ruined your day while letting you sweat. I only needed to be told about that lesson and not experience it during the checkride, so the mantra of “never leave a landable lake” with a single engine is ingrained in my psyche.
Just to reinforce the thought exercise, we practiced a full two-engine-out approach, which in the AirCam is both fun and breathtaking. The draggy machine descends and loses energy quickly without power, so the technique is not unlike an autorotation in a helicopter—you initiate a steep descent, building airspeed to (in the case of the AirCam) 85 mph until very close to lake level, then pulling back to trade that airspeed for flare energy and touchdown. It happens very fast, especially when started at 500 feet, the usual operational altitude for seaplanes in Florida.
We experienced one other slightly off-nominal moment in the morning training, that being a broken throttle return spring on one carb of one engine. Noticed after a landing on a lake about 5 miles from Sebring, the tach was indicating 3000 rpm on the left side with the throttle lever at idle. Clearly something our instructor Ben had seen before, he determined that we needed to head back to the airport to get it fixed, and—oh yeah—we’d need to shut the engine down on final or we’d never get the airplane to land. He elected to fly the single-engine land landing, but I had the engine switches in the front seat—so we played a good game of crew coordination, and when he was ready to “lose” the engine, I secured the ignitions, he landed and I then started it back up for the taxi to the ramp. In 10 minutes, we had a new spring installed (Lockwood is one of the best-known Rotax service centers, with parts on hand) and were winging back to the lakes to finish our polishing. The end of the day saw logbooks filled out and endorsements typed onto stickers.
The Checkride
Lockwood’s MES training program utilizes its proximity to the famous Jack Brown’s seaplane base to its advantage—located just 45 miles away (as the AirCam flies), it is well known as the place to go and get a single-engine seaplane rating in two days. More importantly, it is the home of Jon Brown, former owner of the base and probably the single most experienced seaplane DPE in the business. When I took my SES checkride several years ago, he still owned the facility but decided to semi-retire since then. The business is still owned by the family. Jon does fewer checkrides, but does all of Lockwood’s and understands the AirCam.
Of course, taking the checkride in Winter Haven means that you saddle up early in Sebring and get a bit of cross-country flying before ever getting to the examiner. An early summer morning in Florida might be iffy when it comes to weather but in our case the winds were calm, dewpoints low and it was a perfect flight at the dizzying height (for a seaplane) of 1000 feet agl. We watched the sun come up as we preflighted and launched across the citrus groves and lakes of central Florida, arriving on time for our 8 a.m. appointment. Brown’s Seaplane base is on a small lake adjacent to the Winter Haven Airport, so we made a runway landing (Brown prefers to start the checkride with a hard-surface takeoff) and taxied over to the corner of the airport where the base has a through-the-fence arrangement, leaving the AirCam right in the parking lot.
Jon Brown is a treasure trove of experience when it comes to seaplane flying, and taking an oral exam and checkride with him is a pleasure. Sure, there are the usual butterflies when it comes to any checkride, but after sitting down with him, we talked about all sorts of aviation-related topics to get to know one another before getting down to the business at hand. It’s obvious he knows how to get folks to relax—and after all, being all tensed up is no way to be evaluated.
A good oral probes not only memorized knowledge but the “why” behind the knowledge, and I’d characterize my exam more as a discussion of seaplane related topics than a question-answer session. The oral questions were mostly seaplane specific, but not multi-engine-seaplane specific. In fact, the only thing we talked about with multis were Vmc and how to dock with differential power. The answer to Vmc, by the way, is that it is caused by asymmetric power—if you start losing yaw control, pull the power back on the good engine. That’s what Jon wants to hear.
With the oral complete, we did the typical walkaround inspection, then strapped in, fired up and taxied to the runway for a standard departure. He gave me progressive taxi instructions to Runway 5 (this wasn’t a test of my ground navigation after all) and we launched into the ride—which was pretty much a repeat of the rehearsal I did with Ben the day before. The lakes within 5 miles of the airport (we never strayed farther than that) were all about half glassy, with minor ripples on the parts that had any texture at all.
The fact of the matter is that most of the checkride itself was the same as my single-engine ride, except for the engine-out landing. But it was a good review nonetheless, since I have only flown one or two seaplanes since I got my rating, because it is virtually impossible to rent one. If you’re not buying or building your own seaplane, you are unlikely to fly one—and that’s a shame. The AirCam is more than just a MES oddity. It’s a huge amount of fun on a warm day above, and on, the water.
Flying The AirCam
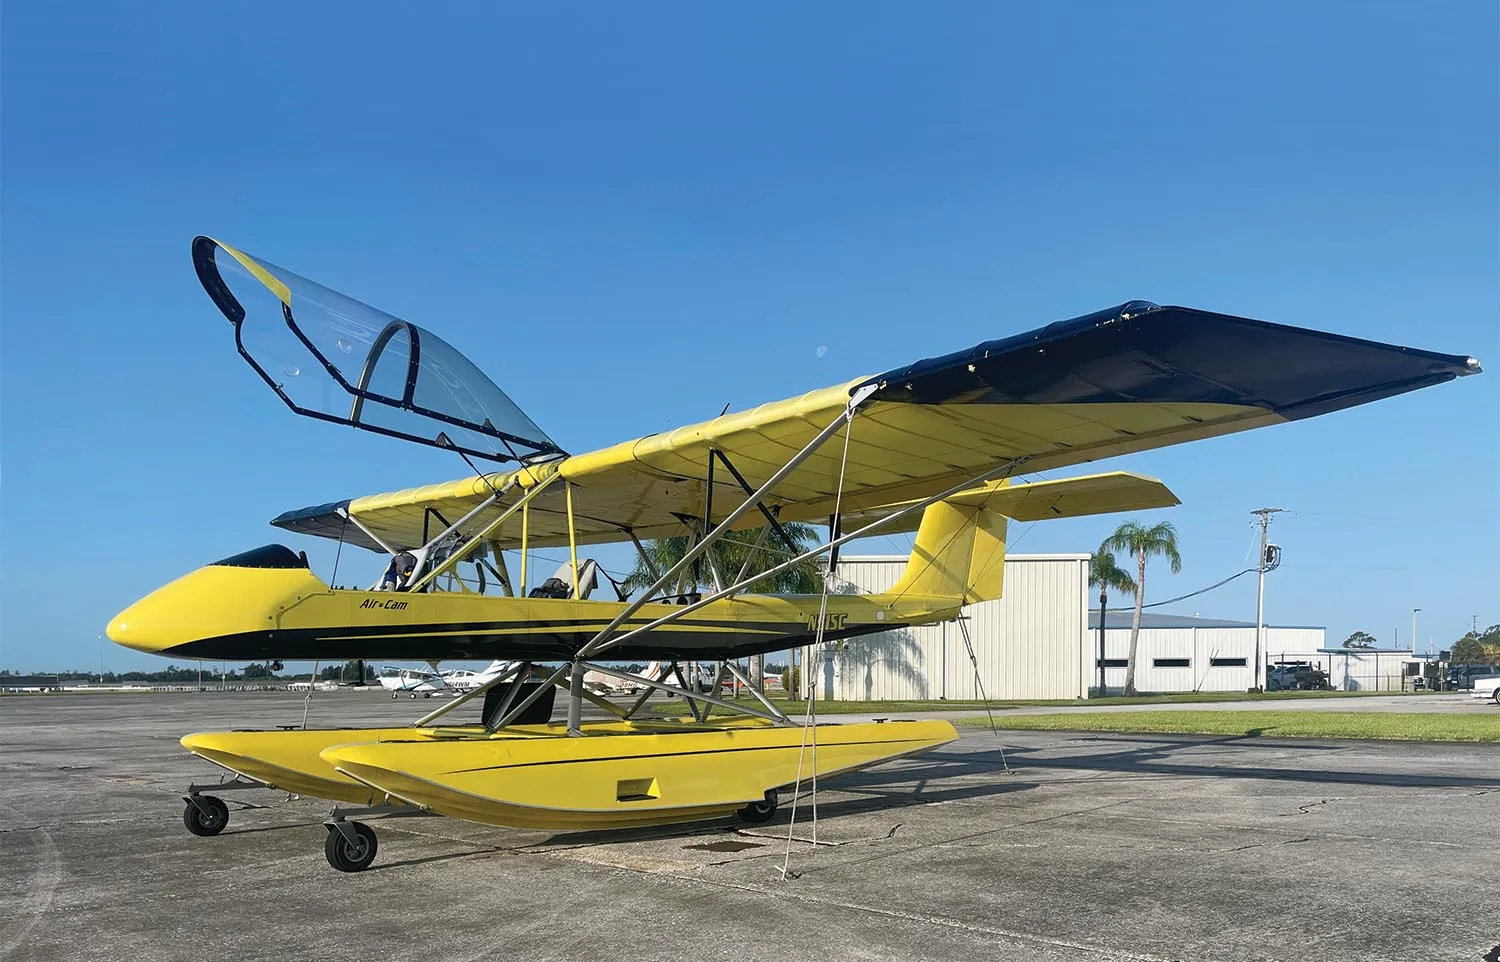
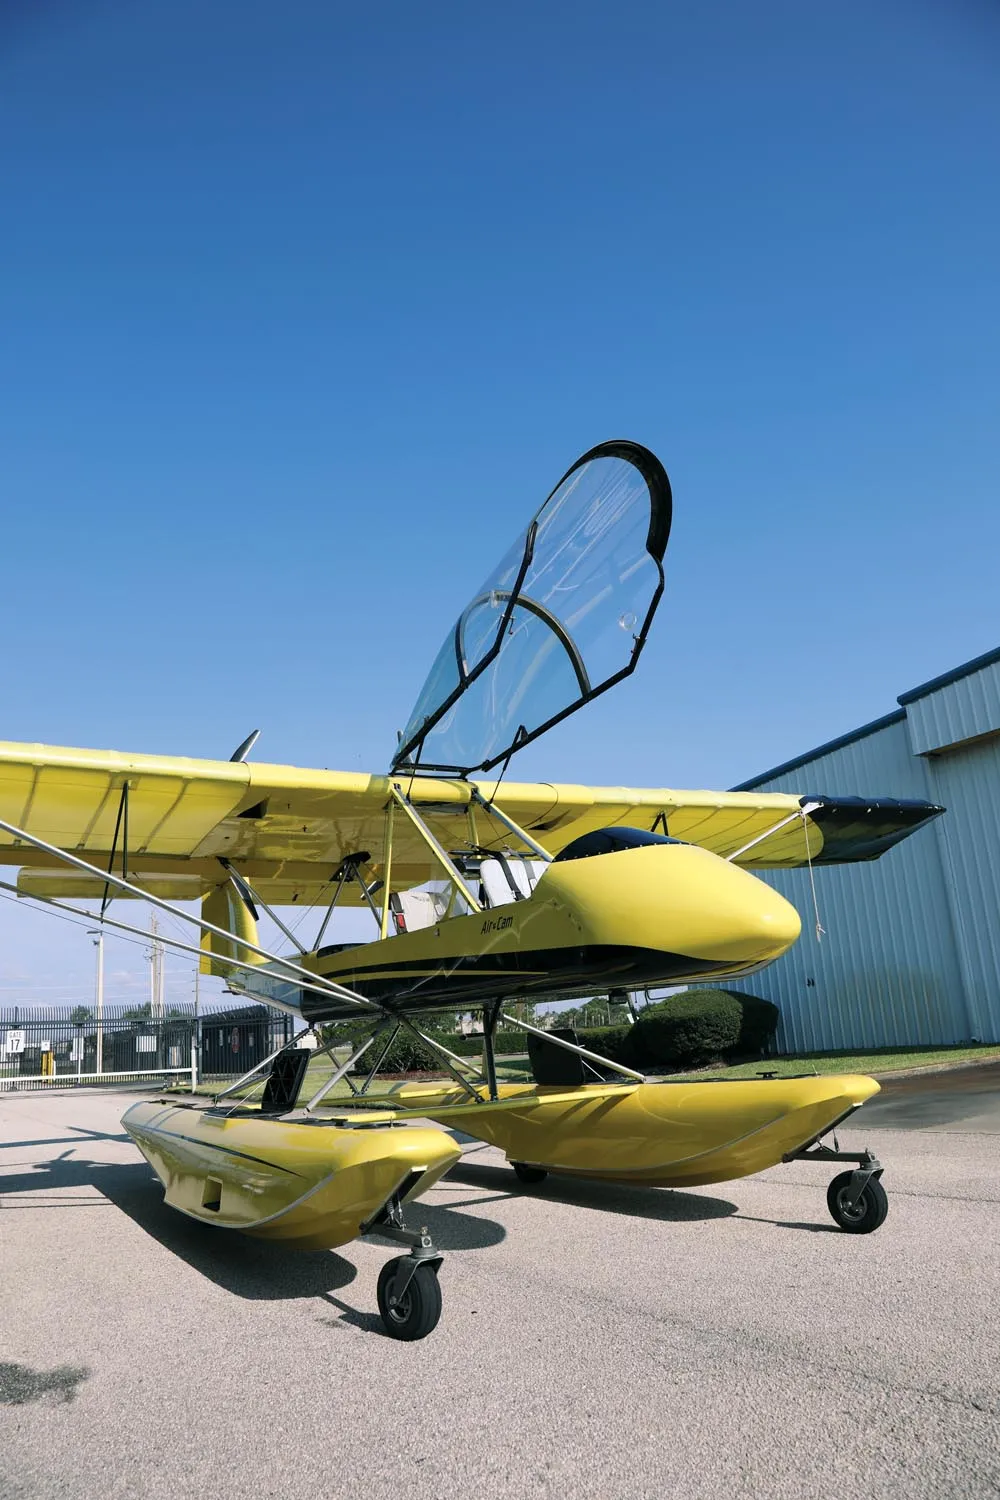
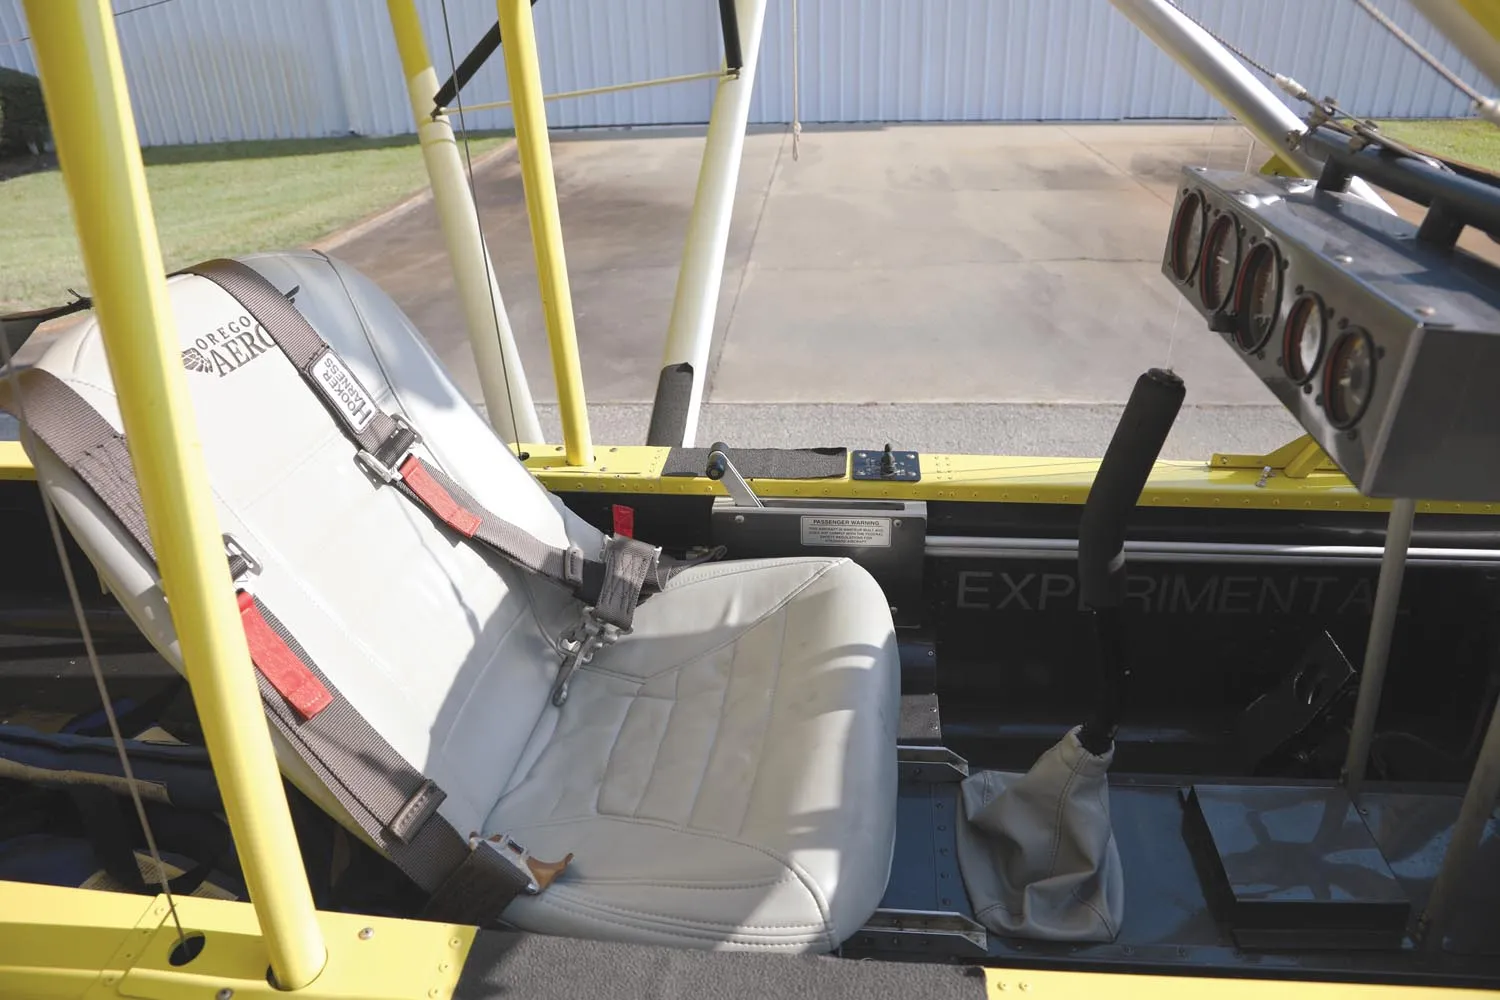
The AirCam has been described, not unkindly, as “a canoe with wings.” Yes, sitting in the airplane does give you the sense that you are “on” it instead of “in” it—but the seating is actually quite comfortable and the visibility is, of course, outstanding. In the floatplane version, you add height to the equation—you feel like the king of the ramp.
You do have to get used to the two swiveling nosewheels, and the fact that straightening them out takes a little more effort when you come to a stop after a sharp turn. Fortunately, you have differential power to help out, but it always pays to think about where they are pointed before starting out after a stop. In my few short hours with the plane, I never quite got the hang of taxiing perfectly over the middle of a tie-down spot—predicting where it is going to swivel when I do a sharp turn will take a little more practice.
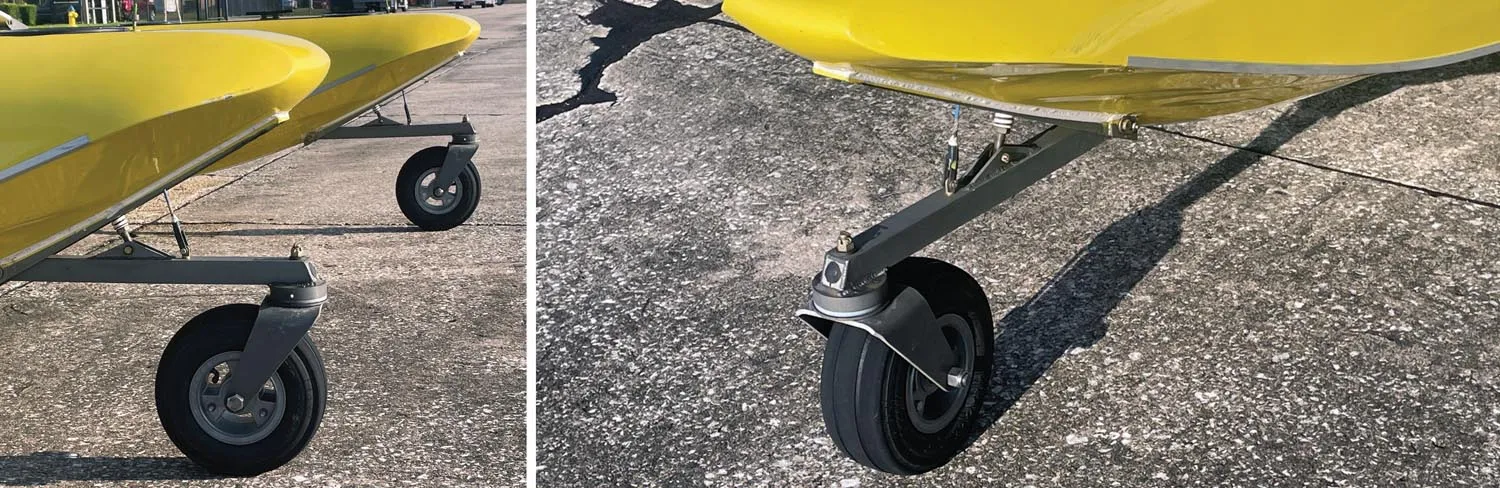
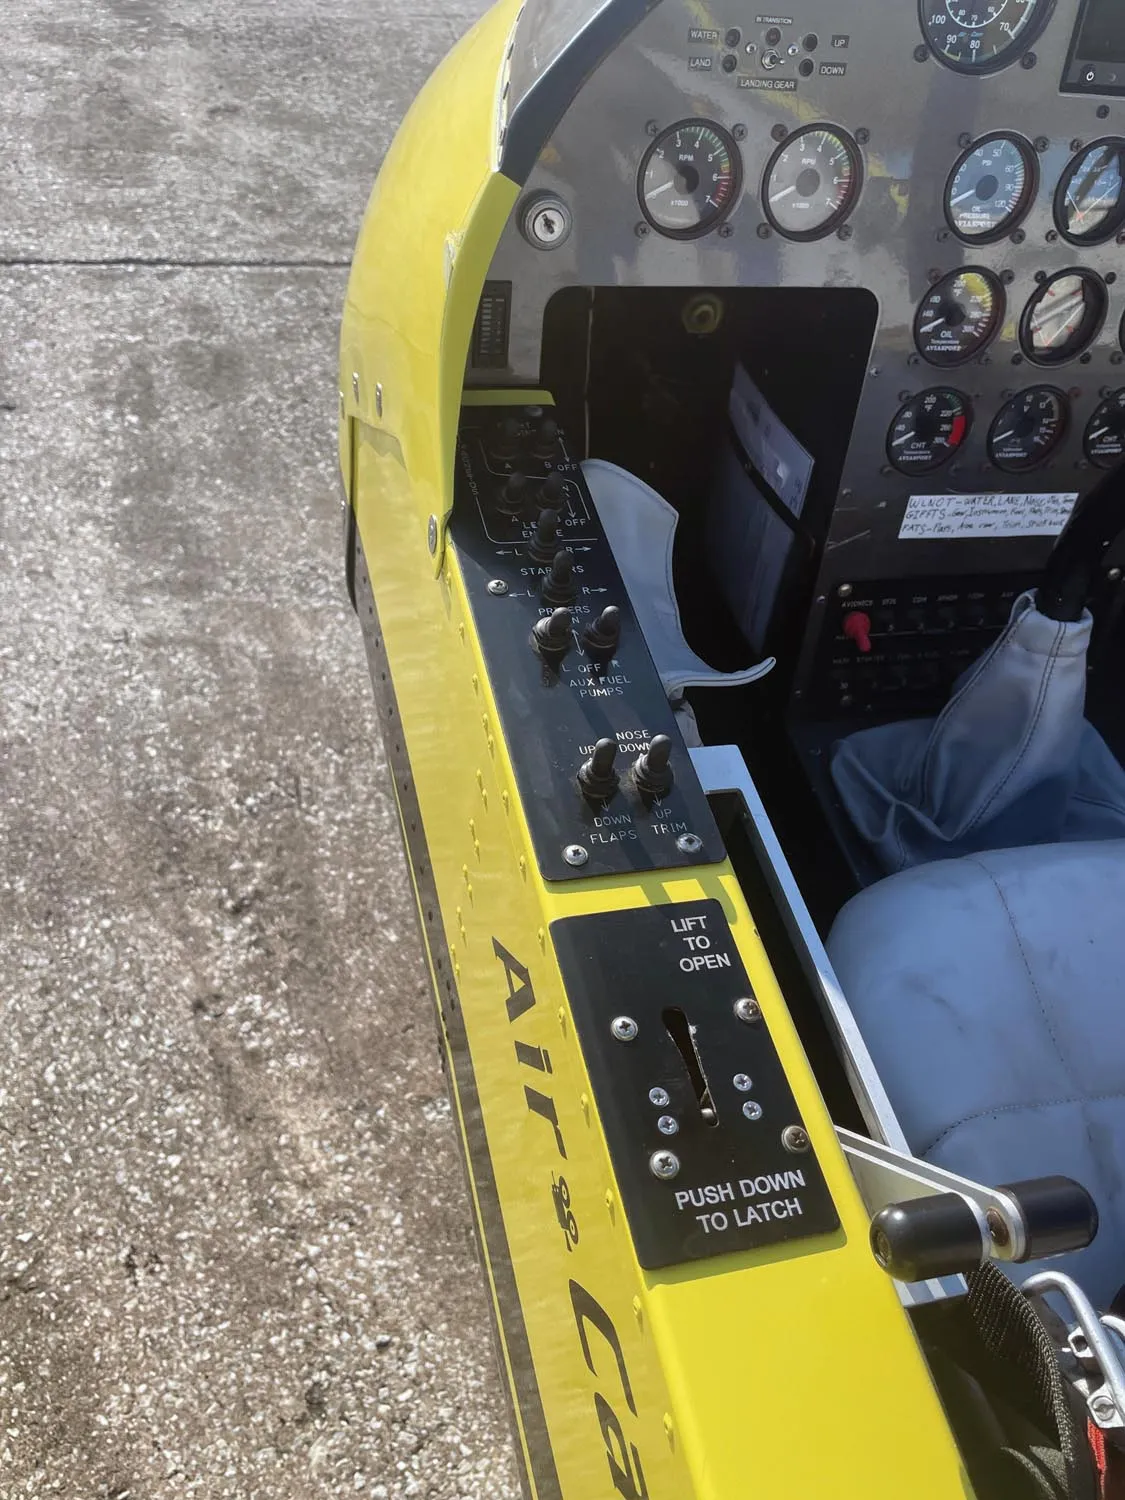
One more lesson before we fly—landing gear. The amphib has four gear motors, one for each wheel, and they are controlled by a single miniature toggle switch on the panel. There are “up” and “down” lights for each side but, more importantly, there are mechanical “straws” (really stiff cables) that stick up through tubes in the floats. The straws rise and fall with the gear, so “tall straws” means the gear is up and “short straws” means the gear is down—regardless of the lights. If you land a landplane retractable gear up, you do damage, but generally just end up in a belly slide. If you land a seaplane in the water with the gear down, you are most likely going to flip over.
OK—if you’ve got that drilled into your brain, let’s go fly. Land takeoff, gear down. Roll onto the runway and close the forward canopy if installed. If not, make sure your hat is on tight! Make sure the nosewheels are straight and add full power—the throttles have a long throw, so keep going until they stop. Watch for Vmc (43 mph), then pull back—you won’t so much rotate as levitate with a very positive rate and you’ll most likely already be through the best climb speed of 60 mph. Reach up and hold the gear switch to the up position—it takes about 10 seconds, so keep holding it, even after you get the up lights and the tall straws, just to make sure it goes over center.
If you’re flying in Florida, you’re going to level off at about 500 feet, so when you hit 400, start bringing the power back to 4800 rpm—a nice “cruising around” power setting. Push forward a little, pulse the nose-down trim to take the forces off—you’re level and ready to start hunting for lakes. There are no mixture or prop levers to play with, so this is like flying a big Cub—stick, rudder and throttle. Go enjoy!

A normal water landing begins with scanning the lake you want to use for wind direction and a clear lane (water runway) to use. You also want to be a good neighbor and consider noise to houses or people in boats, and don’t forget to check for obstructions in the water (you’ll see alligators in Florida, but they’ll dive out of your way). On land you’re going to be low over shorelines, so make sure to look for power poles.
Establish a downwind leg and pull the power back to 3200 rpm for a nice descent rate. Lower flaps to 25° for a normal water landing (45° if it’s rough or you want to land in a confined area) and nail 60 mph for approach. Repeat after me: “This is a water landing, the gear is up!” Turn base, check that the gear is still up. Do the same thing as you turn final. Don’t mess with the power—remember, you’ve got a long lake on which to land, so establish the descent rate and don’t worry about the spot. When you get down to about 10 feet, round out to touch down with the floats slightly nose up. As you kiss the water, bring the power back to idle and let the floats settle…and you’re down!
Why not reduce power if you want to land a little shorter? Well you can, but be aware that the AirCam has tons of drag and will slow down (and go down) in a hurry with the power at idle. You need a certain amount of energy to flare.
Handling
It’s the ultimate cliché to say that low and slow airplanes fly “like a Cub”…so I won’t say it about the AirCam. What I will say is that sitting in the front seat takes just a little getting used to because you are so far in front of the wing that you don’t have the same peripheral vision references that you have when you sit under the wing. When I flew the same airplane from the rear seat, it felt a little more relaxed because I wasn’t watching heading or pitch—those just held naturally based on what my vision and reflexes were used to.
Yes, you’ll feel the pendulum effect of the floats. But, otherwise, bank and yaw as you will; the airplane responds like a big friendly Labrador Retriever—just happy to oblige and to get out for some play. There is a fair amount of adverse yaw from the big ailerons, requiring timely coordination with the rudder. Fly the AirCam and you’ll have practiced your footwork.
Part of the reason that the airplane handles so well is that the AirCam is very stable in pitch—it is easy to pick an airspeed, trim for it and expect it to stay there. The only time I found this not to be true was when I was changing several things at once—speed and flap position, for instance. Early on, if I was looking back at the flaps to make sure I stopped them at 25°, I would look forward again and see that my airspeed had sagged by 5–8 mph. I solved this easily by learning what was going to happen when the flaps came out and realizing that a four count brought the flaps to the right position, so I didn’t need to look back.
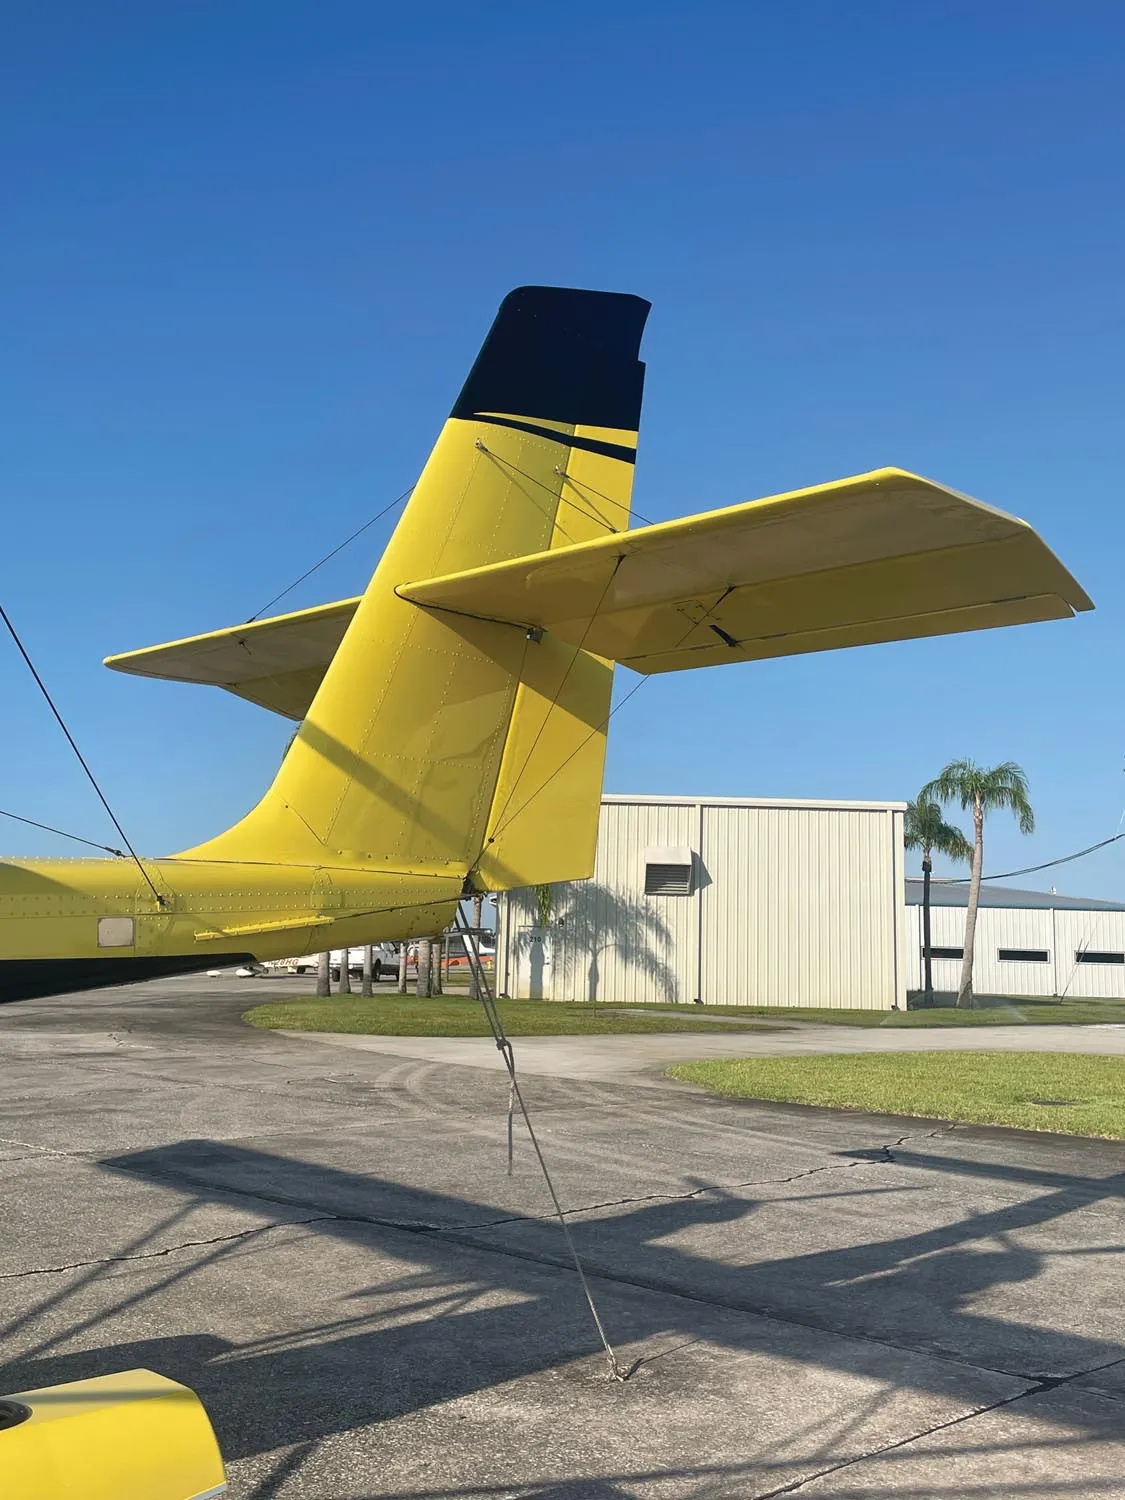
One of the often-overlooked advantages of the twin-engine configuration is its very large vertical tail—necessary to make single-engine operations easy to control. But it also gives the airplane great slip capability without a lot of rudder pedal force. Pulling power all the way back on either side (and going full power on the other) requires full deflection, but not a lot of force. Executing a dead-stick landing requires an aggressive pitch-down to gain about 85 mph of airspeed so that you have some energy to convert to a flare when you get close to the water—if you are someone who doesn’t do a lot of aerobatics, this can be exciting. But with practice you’ll realize that the airplane responds predictably and quickly during the maneuver and it is nowhere near as scary as it looks the first time.
The airplane is easy to land on water because it is slightly more forgiving of height misjudgment when the surface is soft. That doesn’t mean it’s hard to use a runway—it’s just a different sight picture than what you’re used to. My first couple of land landings were acceptable, but the arrival was a little earlier than I expected. You’re going slow enough that you’ve got plenty of time to make it all work out right.
With a previous hour of flying in the tricycle-gear AirCam added to my seaplane time, I now have about 6–7 hours in type, and I’d say that my skill level is fine—it just doesn’t take that much adjustment, although at the start, everything seems different. It’s really just pure fun in either configuration, and I sort of wish I had an expedition to explore some far-off land from the air—maybe we’ll have to put that on the calendar sometime in the future. Where’s that phone number for National Geographic?
About Those Floats
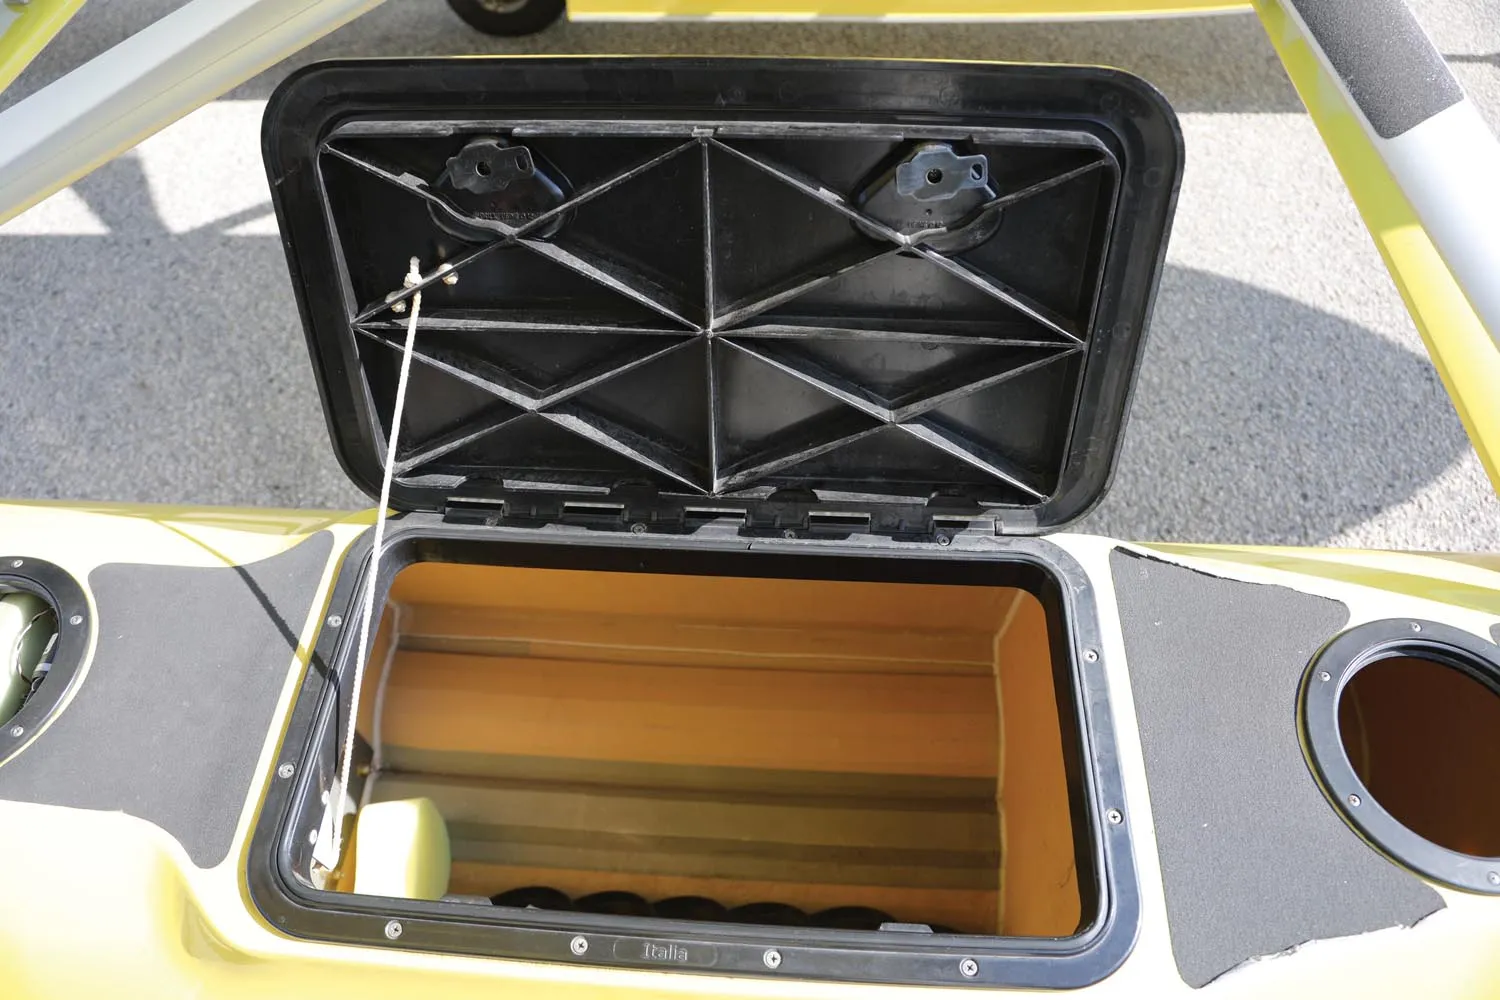
The factory AirCam is fitted with Clamar 2180 amphibious floats using a rigging package designed by Lockwood’s team at AirCam. Lockwood described just how difficult it can be to analyze the loads introduced on the airframe by the floats, because touchdowns in various attitudes can impart varying loads as the water moves and changes the forces on the seaplane. He pointed out that the “standard” design of rigging packages using both struts and tension wires was going to prove inadequate in the training environment where the airplane is routinely abused by pilots learning to land on the water—this forced a deeper dive into a completely strut-based system that is not only strong in the right places, but gives a very clean design.
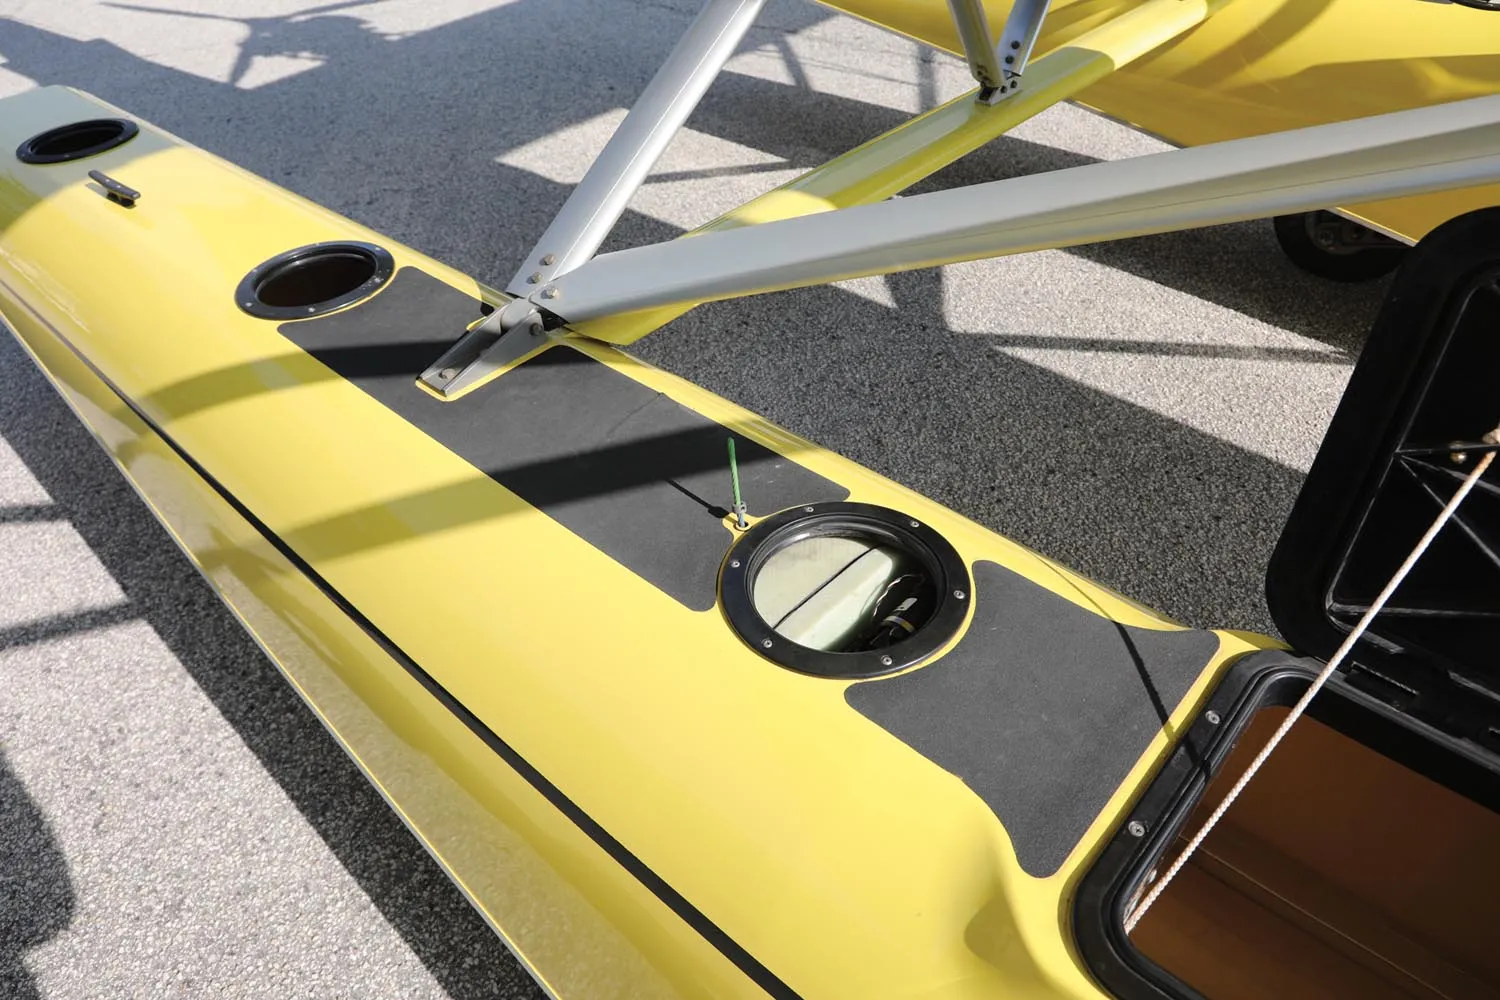
The Clamars are of carbon fiber and Kevlar construction and feature multiple compartments for water control as well as a fairly large “midships” compartment that can be used for stowage. Having some enclosed baggage area is useful if the AirCam is configured for “open air” flying, but maximum gross weight still has to be respected. The Clamar floats are Lockwood’s preferred selection because of their strength and weight. He noted that the original design used hydraulics to retract the wheels, but changing to four separate electric linear actuators saved both weight and complexity, as well as eliminating failures due to leaks in the system. The electrics have proven to be fairly reliable in the high-workload training environment.
Experienced floatplane pilots will note the absence of water rudders on the training AirCam—this was intentional, since water steering can easily be accomplished with differential thrust from the engines. Getting rid of the water rudders eliminates maintenance associated with the system and reduces both complexity and the chance for damage.
While AirCam supplies a rigging package, they do not supply floats—those have to be purchased directly from Clamar. Pricing is in the neighborhood of $50K, but we didn’t get an actual quote, so take that number as approximate and greatly subject to verification and change. The rigging package includes hardware, fittings and struts needed to attach the AirCam to the Clamar floats along with detailed instructions for installation.
Pricing An Amphibious AirCam Kit
It’s inevitable that once you fly the amphibious AirCam, and find out how much fun it is, you’ll want to at least check out the prices to see what a kit would set you back. Like most kit manufacturers, AirCam sells sub-kits, and also has a lot of options available, so you’d want to personally consult with them on putting together your perfect package. But the basics can be found on their website.
- Fuselage Kit: $29,425
- Tail Kit: $10,395
- Center Section, Wings: $23,845
- Finishing Kit: $16,500
- Total Basic Airframe: $80,165
- Rotax 912ULS package: $68,495
- Flying Aircraft Total: $148,660
But of course, you want a floatplane, so we need to add that in….
- Float Rigging Package: $5695
- Clamar Floats (approx.): $50,000
So the total for a flying amphib (less avionics, the basic package for which is listed as starting about $12,000) is $204,355.
Of course, to that, add tax and labor, plus all those options folks like to add, such as the forward (or full) enclosure. The AirCam is not a cheap kit—but it sure is fun once it’s flying!
AirCam Amphib
- Kit price: $148,660
- Estimated completed price: $204,355
- Estimated minimum build time: 1200 hrs
- Number flying (at press time): 265 (all types)
- Powerplant: 2x Rotax 912 ULS, 100 hp @ 5800 rpm
- Propeller: 2x Warp Drive three-blade, 60-inch diameter
- Powerplant options: none
Airframe
- Wingspan: 36 ft
- Wing area: 205 sq ft
- Wing loading: 7.8 lb/sq ft
- Power loading: 8.0 lb/hp
- Fuel capacity: 28 gal
- Maximum gross weight: 2000 lb
- Empty weight: 1400 lb
- Useful load: 600 lb
- Full-fuel payload: 432 lb
- Seating capacity: 2
- Cabin width: wider than you
Performance
- Cruise speed: 43–87 KTAS (50–100 mph)
- Maximum rate of climb: 1500 fpm (300 fpm single eng.)
- Stall speed (landing configuration): 34 KIAS (39 mph)
- Takeoff distance: NA
- Landing distance: NA
Specifications and pricing provided by the manufacturer.
This article originally appeared in the October 2023 issue of KITPLANES.
For more great content like this, subscribe to KITPLANES!
