


We choose to build aircraft for many reasons. There are elements of challenge to the project, of course, learning to master the details of project management while keeping the emotions in check. (As best we can.) At the end of which we find ourselves basking in our glory or deeply concerned for our sanity; sometimes a mixture of both. Most builders have some instigating reason to build beyond “education and recreation” that loosely centers on a mission: What do we want our dream airplane to do? How does it open doors in my flying? What can I do after the project is complete that I can’t do now? (And: Where did I put my 3/8-inch socket?)
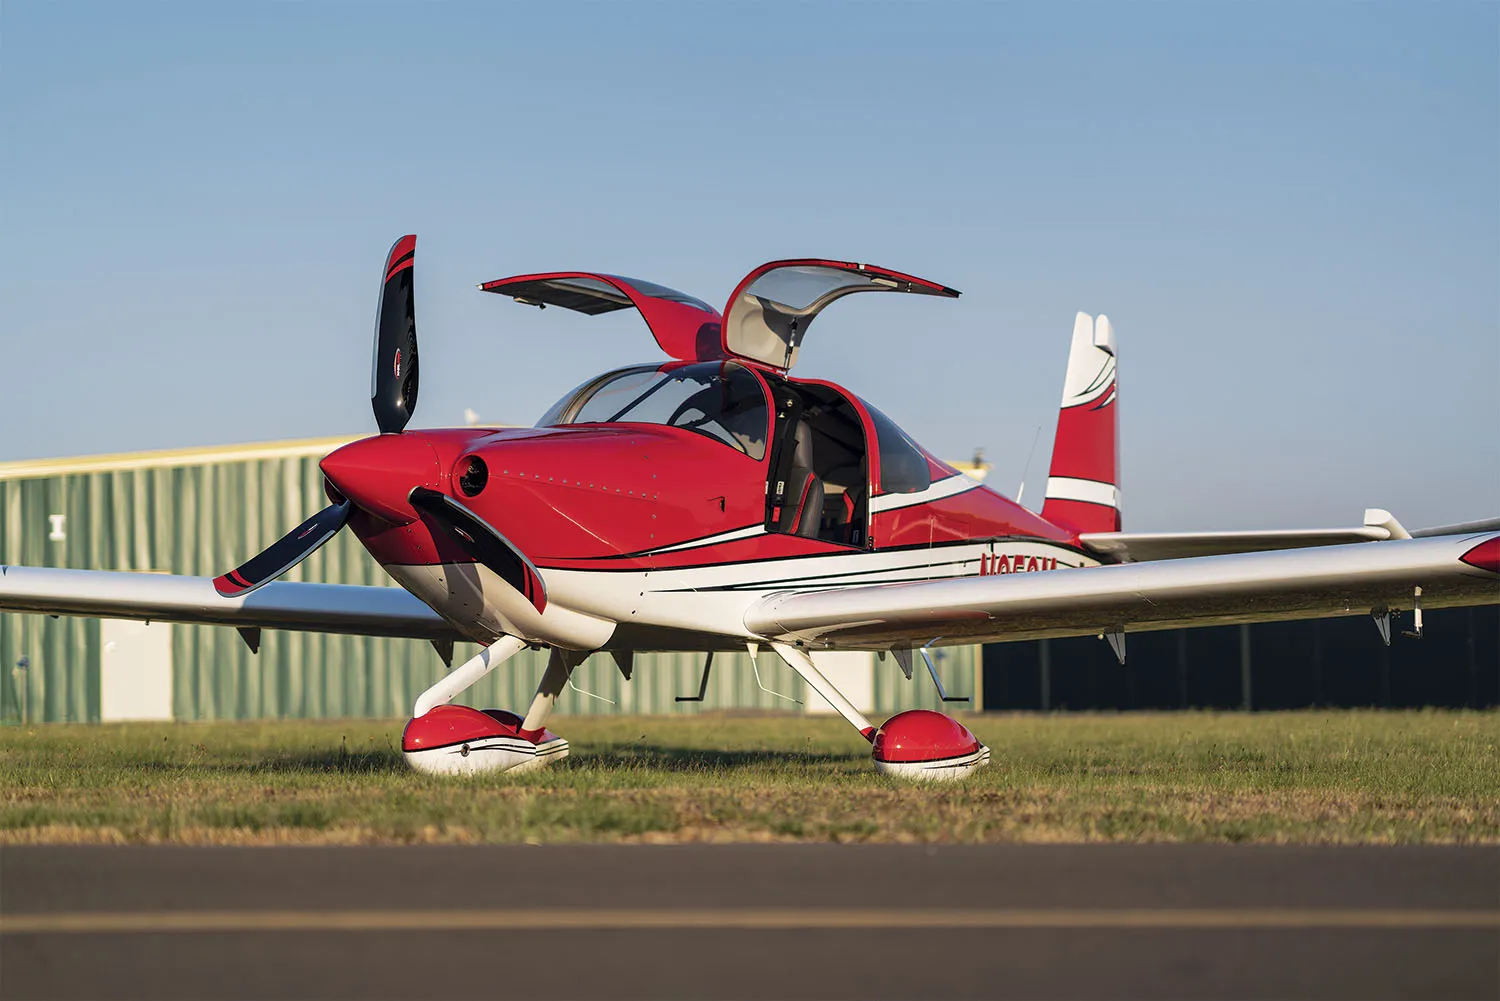
For Mark Easton, whose RV-10 you see on these pages, the answer was actually quite simple: He wanted a family airplane that was safe, one that he knew he could complete but also one that embodied some of the latest thinking in aviation. Technology was a driver for Easton, easily explained by his choice of automobile (a Tesla) but also his office. As in the right front seat of a Boeing 787 Dreamliner for American Airlines. It stands to reason, then, that Mark’s comfort with the latest in airliner tech would migrate to his Van’s RV-10 project.
But it actually started well before that. “I’ve wanted to build an RV since I was a kid. You know how you’d see those ads in the back of the magazines, ‘You can build your own airplane!’ Although no one in my family was into aviation, I always thought it would be cool to build my own airplane,” Easton says. Nearer to his current build, he says he’d narrowed it down to the RV-10 or the RV-14, “two of the newest, most modern kits Van’s makes,” and eventually landed on the 10. “I didn’t want to decide which of my two kids would get to go flying.”
Why We’re Here
Part of the reason for this exploration is to better understand how a stalwart design like the RV-10 can be modded to accept more modern technology than Van’s applied when it was first designed. Van’s penned the 10 quite conventionally, with the expected all-metal wing on the bottom, a “traditional” engine and sticks instead of yokes. About the only unusual thing for an RV—besides a six-cylinder engine up front—was the fiberglass shell that topped the cabin, a necessity as Van’s opted for doors rather than a large canopy. (Grumman AA-series owners love the visibility of the canopy, less so the chance of the interior becoming wet while getting in and out during a rainstorm.) Not to diminish the immense amount of work to create the RV-10, but it was, in the grand scheme of things, a carefully scaled-up version of what they were already familiar with.
Today, though, the opportunities to make an RV-10 your own are extensive. And knowing that our own Myron Nelson had an early (ish) RV-10 built largely to plans, I invited him to fly with Mark and compare notes, lodge a few large-scale impressions.
But let’s circle back for some context. Easton’s RV-10 is not so much a radical departure from the baseline aircraft, but more an expression of what has emerged in the ecosystem since Dick VanGrunsven first took flight in the RV-10 in May of 2003. When a particular model is popular, the aftermarket can invest in things like a custom cowling and have some assurance of a return on that investment. Easton’s airplane is a good sampler of the “good stuff” available for the RV-10 builder.
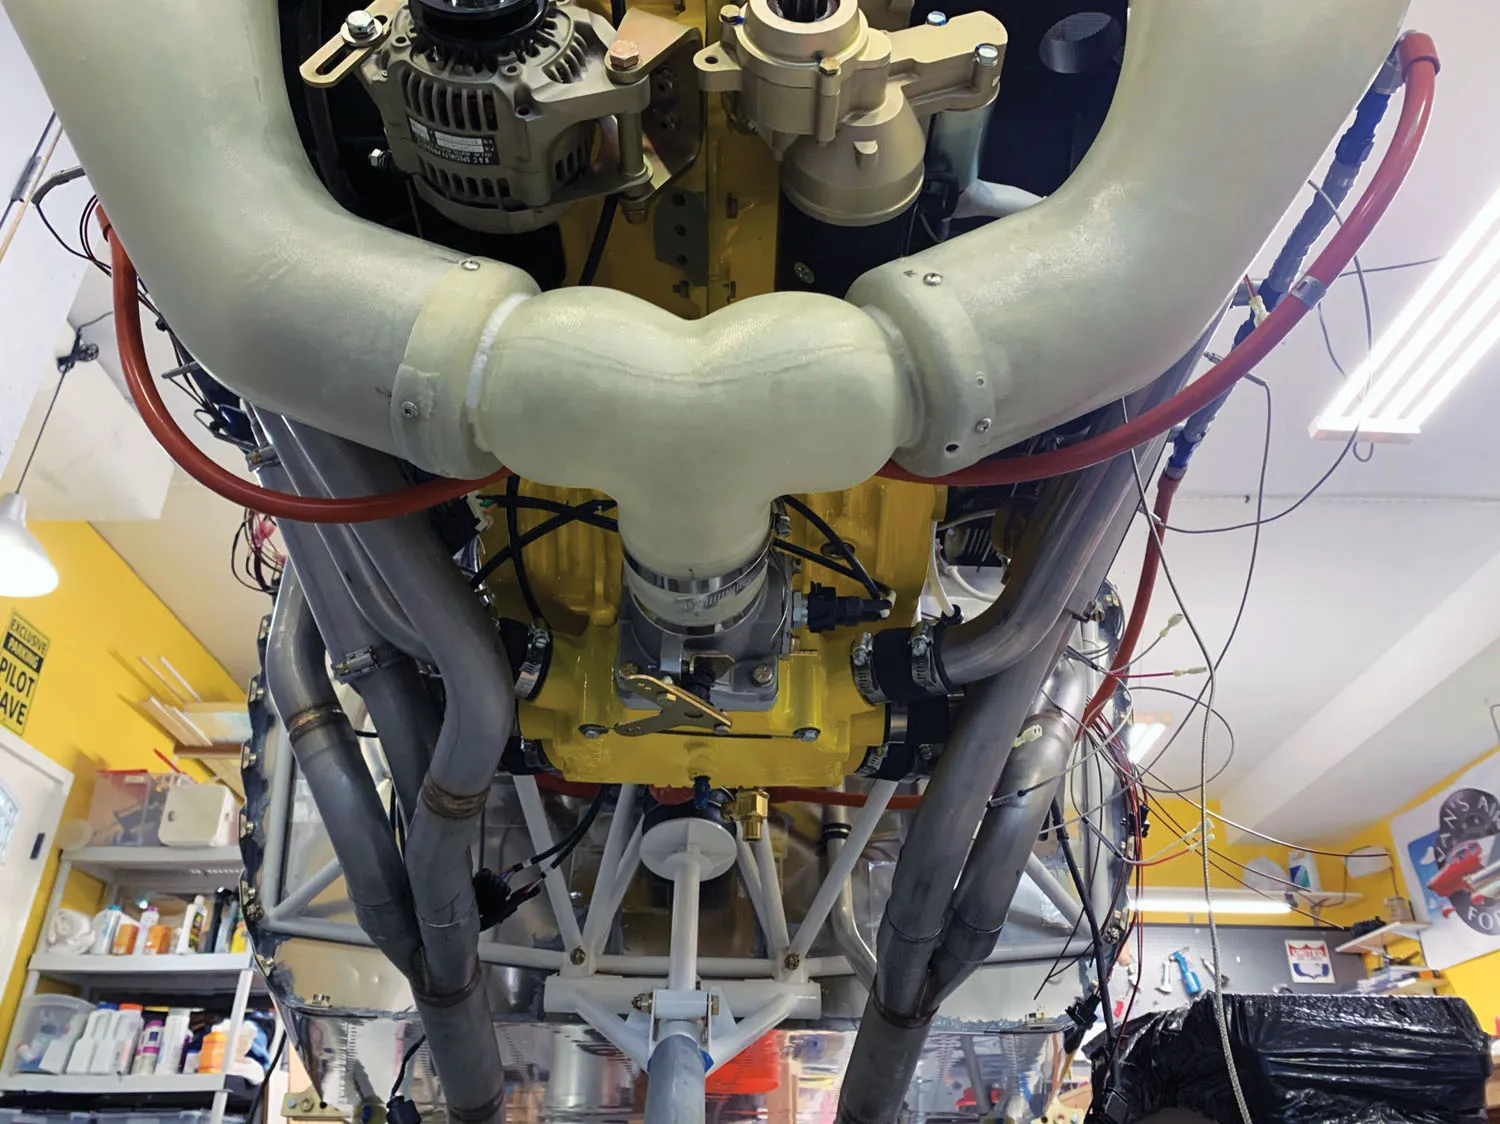
Our story starts forward of the firewall. According to Easton, “The modifications started when I decided that I wanted to use the FlyEFII system. I really didn’t want to put that on myself—it was my first airplane and my first build—and I knew that I could not get it from Lycoming under the Thunderbolt brand. So I called up Barrett Precision Engines, and Rhonda said, ‘Yeah, we can do that.’ I talked to Robert Paisley at FlyEFII, and he was on board to send the components to Barrett. That way, all the needed pieces would be built on the engine from the start.” By looping in a willing engine partner early in the process, Easton not only got assistance from Barrett but didn’t have to pay for items that he’d eventually have to strip off a “core” engine and resell.
Easton started with a narrow-deck IO-540 core that Barrett completely rebuilt with 9:1 compression and its usual menu of tricks to match internal components by weight for maximum smoothness. The choice of a narrow-deck engine was more a matter of what was available at the time, and while the so-called wide-deck configuration is current, the previous style is still supported.
“And then I found out that Barrett has a really good cool-air induction system, which I like for the extra performance. But then you had to do the Show Planes cowl to make room for that.” Show Planes, a Medford, Oregon, accessory maker and builder-assist center, had developed a round-inlet cowling system for the RV-10 that incorporated a cold-air induction system that cleverly uses the lower quarter of each inlet for the intake. The smile-shaped ducts feed down toward the throttle body, intersected by dual K&N reusable air filters; the system is configurable for use with either the Barrett cold-air system (itself an inlet plenum that sits proud of the oil pan to help keep the induction air cool) or a standard Lycoming forward-facing system.

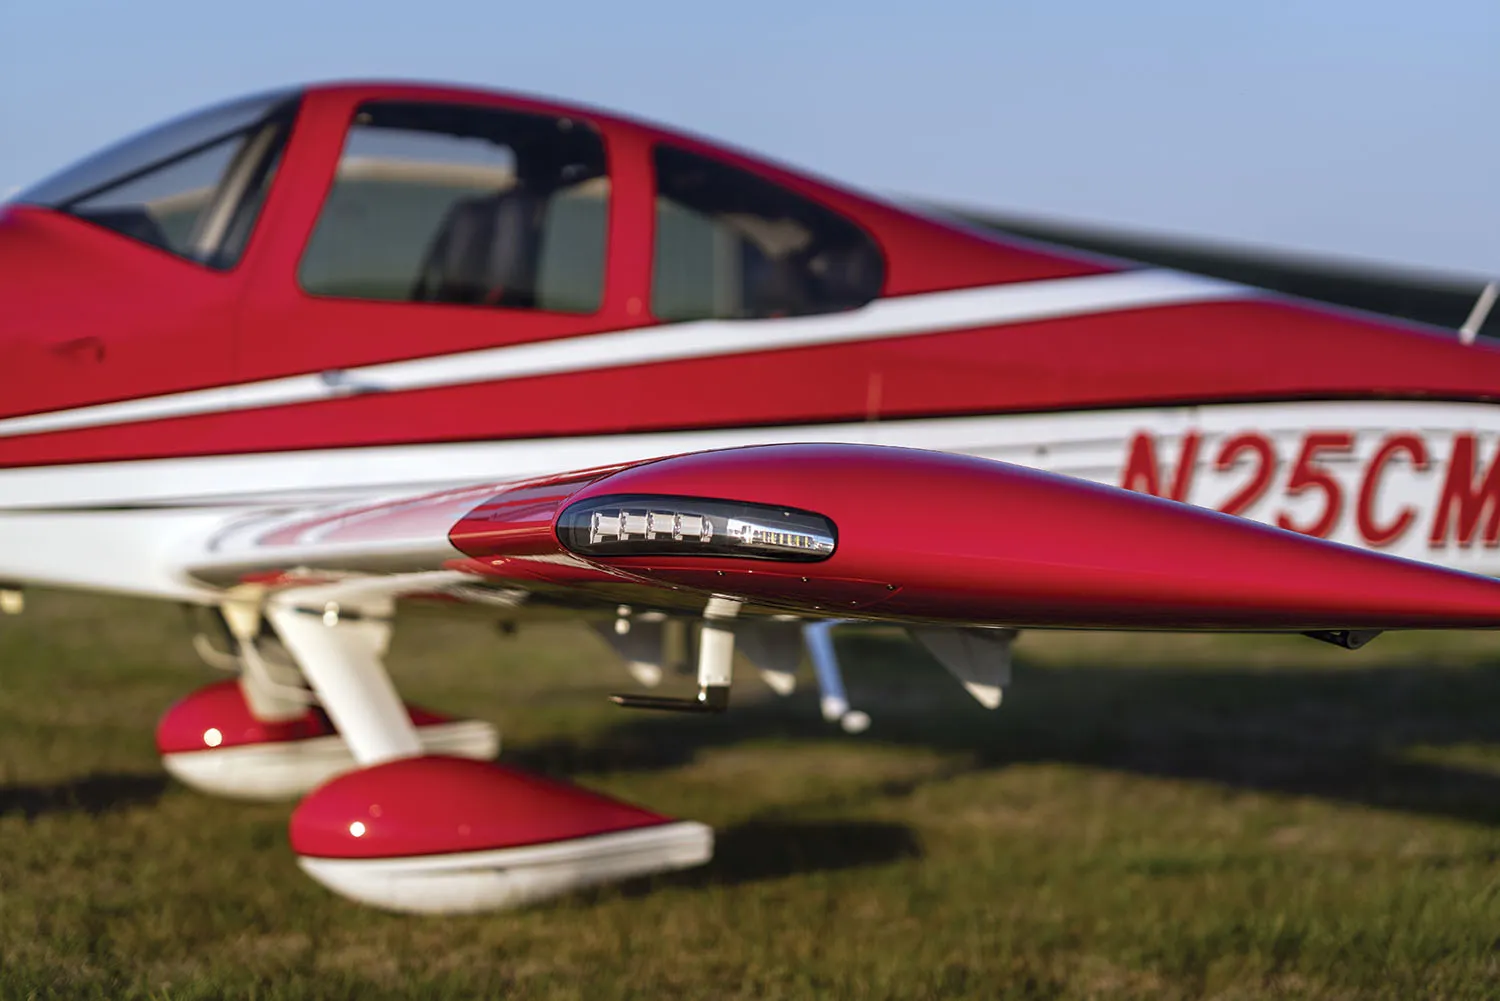
Easton again, “And then, when I discovered that it was possible to split the Show Planes cowl down the middle, which makes it easier to remove, that’s when I decided to go with a three-blade prop.” In this sense, one mod begat the next mod, which enabled another decision, three big steps away from the more conventional RV cowling and FWF configuration that comes with the kit. It’s worth noting, too, that the Show Planes cowling uses a larger spinner, but that was available from Whirl Wind Aviation, whose three-blade composite prop sits at the pointy end of the RV. Easton also went with Skybolt quick-turn fasteners for the cowling instead of the more common hidden piano hinge. “With the split lower cowling, I can remove the entire cowl by myself in 5 minutes. And, just as important, put it back on by myself.” Easton also says that this configuration helps with maintenance decisions. “I know that with the cowling being easier to remove, I’m more likely to check something I’m curious about.”
“In the end, did I need to do any of it?” Easton asks. “The cold-air induction costs money. The three-blade prop is more expensive. Could I have been happy without all of that? Sure. But it just kind of worked its way through the project.” Veteran builders know this mission creep well, but Easton tried to let the process guide itself rather than simply throw the latest and greatest at the airplane.
Avionics Ascendant
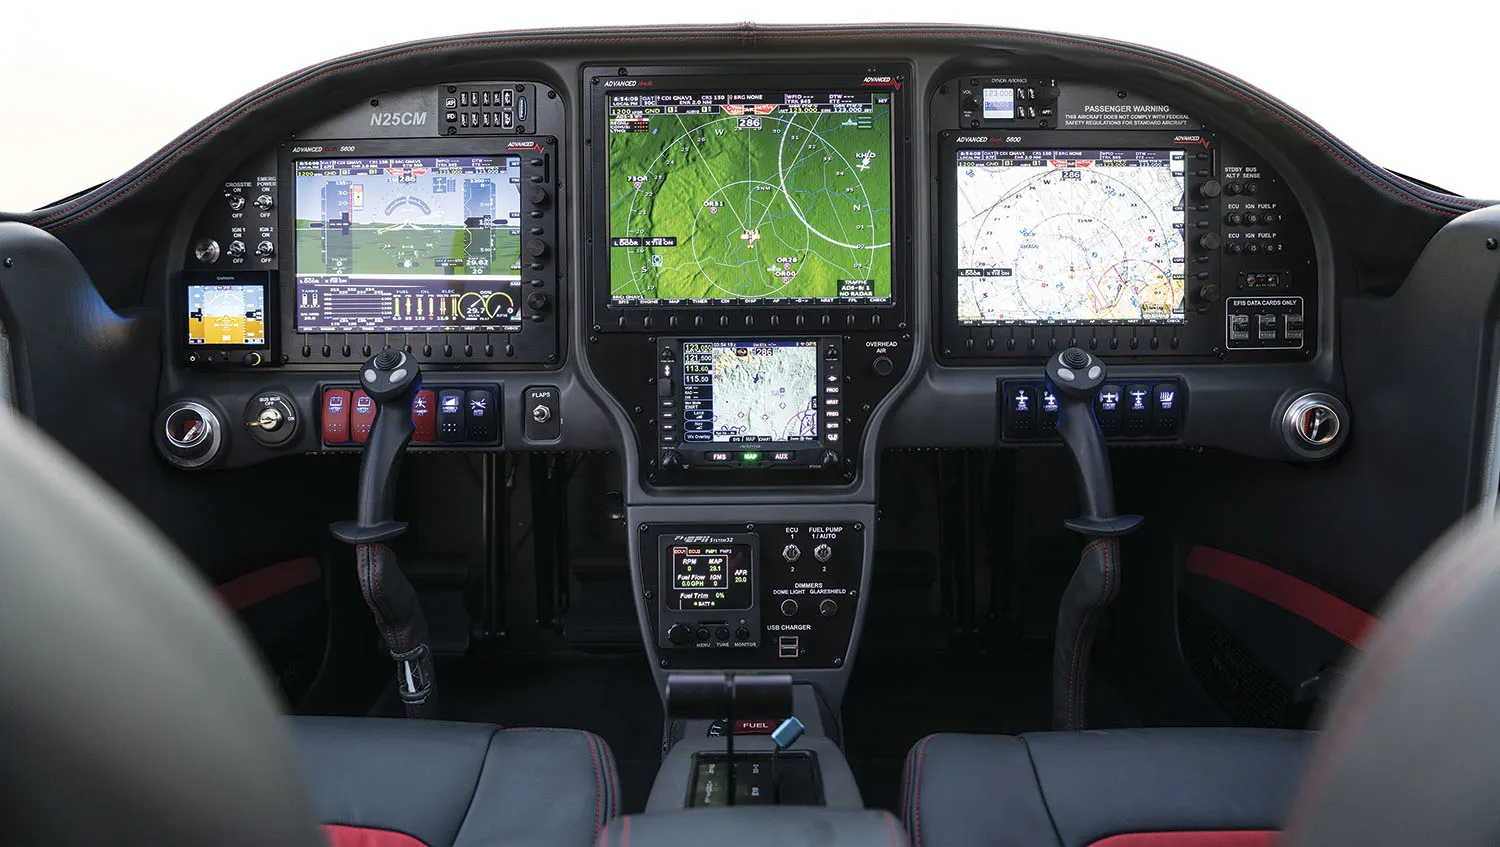
The same discussion of incremental cost informed the panel layout. Centered on Advanced Flight Systems EFISes, the panel is comprehensive and suitably redundant. “We decided to add the third screen, and that added $4200 or so to the project. But I was talking to my wife about it, and she pointed out that we’ll probably get some part of that back should we decide to sell but, more important, let’s build it the way we want to fly it.” In the typical configuration, the pilot’s screen is the primary flight display with the engine instruments along the lower edge. The large central screen is the multifunction display for moving map and weather, with the right side display configurable as either a PFD or MFD, depending on the needs of the copilot. (Mark’s wife, Caroline, is a 737 pilot for United, so a right-side PFD will be handy when she boots Mark over there.)
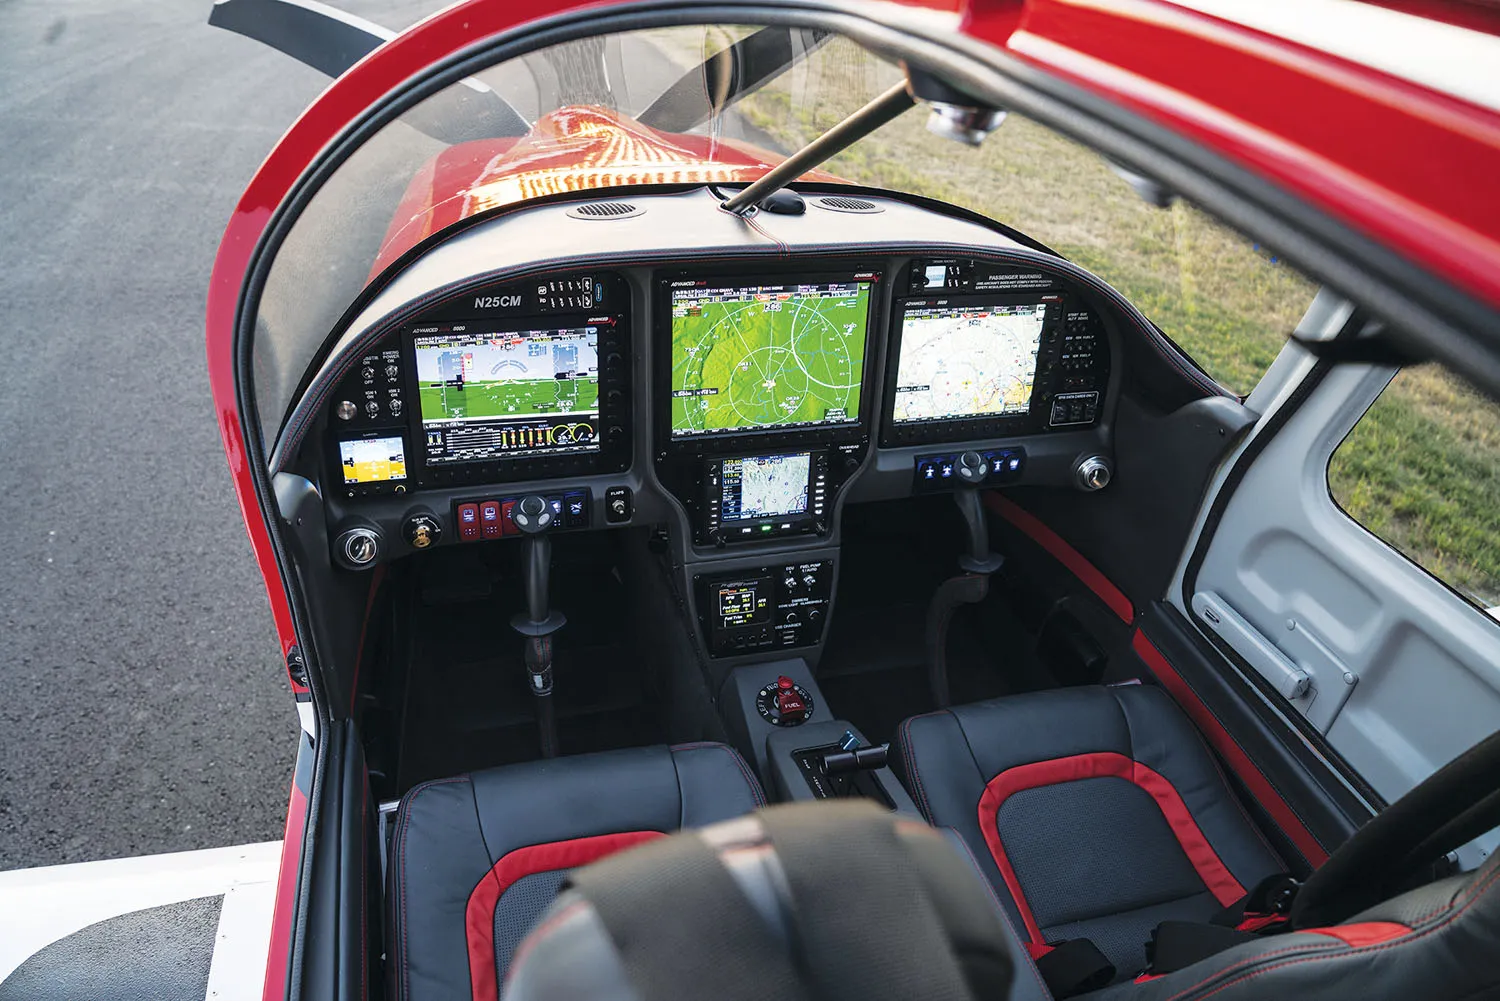
The rest of the avionics are made up of an Avidyne IFD 540 com/nav/GPS, backed up by a Dynon remote com, Dynon integrated autopilot and a Garmin G5 backup instrument. Power for all this comes through an Advanced Control Module that manages all electrical distribution for the main system and works through twin batteries, a conventional forward-mounted alternator and a backup alternator. A TCW Tech backup battery is also on board to help keep some critical systems alive in case of a massive electrical issue. (Which, fortunately, Easton has not had.) An essential bus ties all the, well, essential circuits to both main and aux buses, though those two can be crossfed so that items on either bus can be fed from the alternate source. In an electrically dependent airplane like Easton’s RV-10 (or his 787 day job), reliability and redundancy are crucial. Mark used a Quick Panel from Advanced Flight but did a lot of the integration himself.
Electrics FWF
You appreciate how important a stable, redundant electrical system is when you think more about the FlyEFII System32 digital ignition and fuel-injection system. Simply put, without electrical power, the engine doesn’t run. Developed by Robert Paisley, the system is sophisticated by light-aircraft terms, but it’s actually fairly simple among car and motorcycle systems. At its heart, the System32 has a pair of redundant Engine Control Units (ECUs) that monitor several variables: crank position, throttle position, manifold pressure, induction air temperature and fuel pressure. The ECUs take each sensor’s readings, compare them to stored maps, then calculate both the ignition timing and the fuel mixture.

Like the most common electronic fuel injection systems, injectors mounted at the induction tube on each cylinder—the top injector hole is unused—meter fuel to each cylinder. The amount of fuel they disperse depends on inlet fuel pressure and the amount of time the injector solenoid is held open, also known as dwell time or duty cycle. Because each injector is controlled individually, it’s possible to trim each cylinder’s fuel delivery so that all six have a small “GAMI spread,” or the offset in fuel flow from the first cylinder to reach peak EGT and the last, when the overall mixture is leaned. A small spread means the engine runs more smoothly at lean-of-peak (LOP) fuel mixture.
The FlyEFII system includes coil packs to provide spark at each cylinder and runs automotive plugs; the pickoff point is a set of sensors on the starter ring gear, not at the magneto drive. (Which is subject to gear lash.) In Easton’s airplane, the coil packs are above and behind the engine, mounted to the engine mount.

Of course, since System32 uses electronic fuel injection, the traditional Lycoming diaphragm pump is replaced by dual electric pumps. The system is “full return,” meaning that fuel is drawn from one of the RV-10’s tanks, circulated through the fuel pumps, lines and presented to the injectors; what’s not consumed is returned to the selected tank. Full-return systems are less prone to vapor lock than “one-way” setups, but they impose greater burdens on design and plumbing. In the grand scheme of the additional complications on Mark’s RV-10, this was not a huge new one.
The core benefits of the FlyEFII system are better-controlled fuel mixture, no need to manage the mixture knob in flight (though there is an exception) and an ignition system that can advance timing to improve efficiency. And since the fuel system is always under pressure, engine starts (cold and, especially, hot) are no-hassle affairs. The FlyEFII system can also send a data stream to the engine monitor to display fuel flow, though the dedicated System32 control head also shows fuel flow. For more on how this RV-10 flies, see “Flying the Electrons,” below.
Inside Job
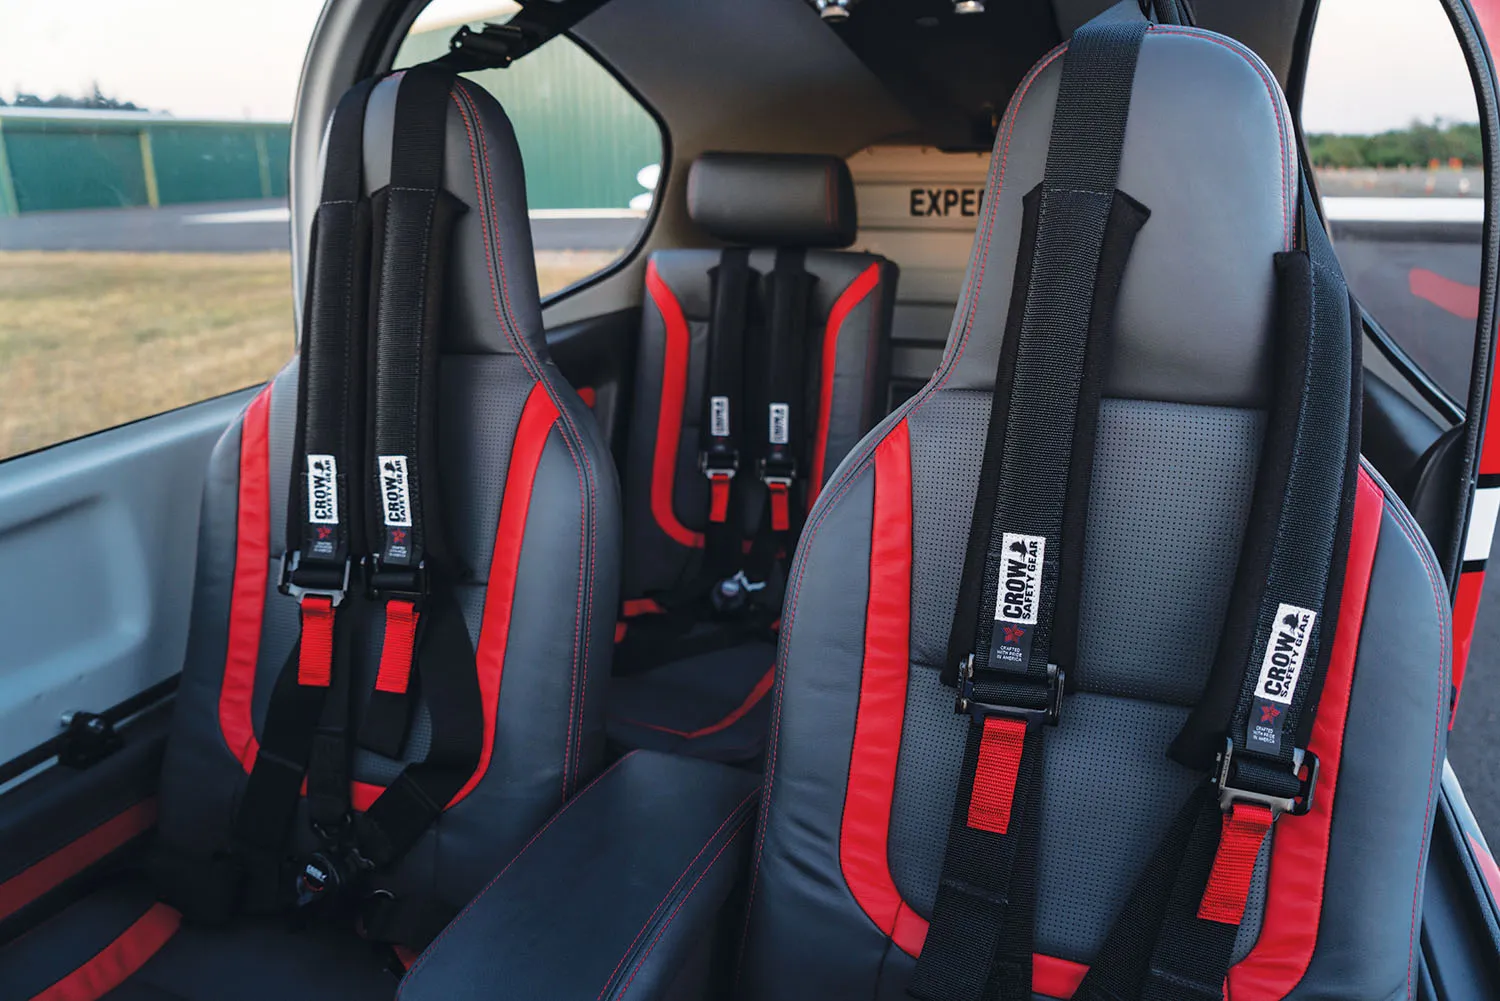
Easton spent a ton of time on the FWF and avionics, but he also splurged on the interior. Four leather seats from Aerosport Products, plus a custom center console, interior panels and other details give this RV-10 the finished feel of a modern Cirrus. Full Crow harnesses keep the passengers in place. The interior is amazingly quiet, too.
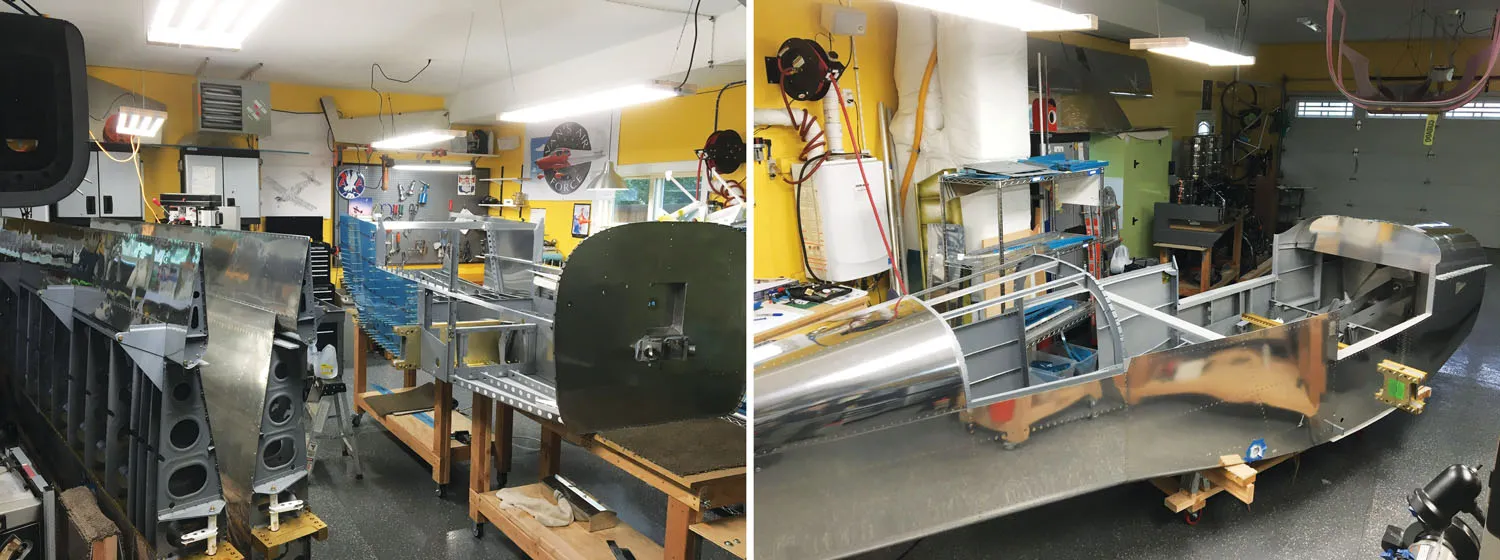
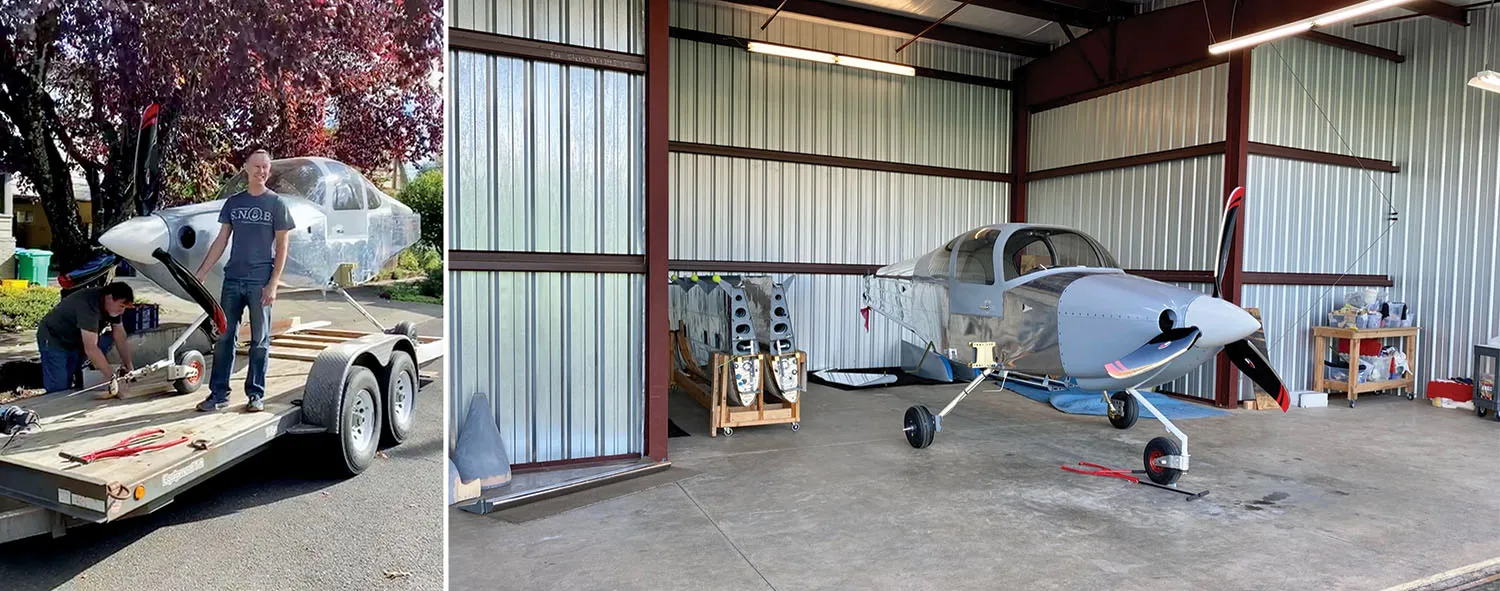
It wouldn’t be unreasonable to ask about Easton’s investment here, and his response is a number smaller than you’d think. “I’d say I have around $225,000 into the RV,” he says, noting that he saved a lot of money by starting with a “slow-build” kit, performing some avionics and much integration work on his own and farming out only what he didn’t have the expertise or tools to accomplish. Perhaps a positive side effect of his day job—time off—Easton was able to complete his RV-10 in five years. In fact, his first flight came five years and a day from the start of the project, which was built in a four-car garage in his home near Portland, Oregon.

Mark’s RV-10, like so many, is still not 100% done, though he’s already had a few vacation days traveling with the family. He’d like to continue refining the cooling system; there’s some electrical noise to ferret out, among other small items. But he’s happy with his decisions. For the most part, the gamble on the FWF technology has paid off. This RV-10 is as simple to operate as it can be yet provides excellent performance along with the versatility and fine flying qualities that made the RV-10 a success in the first place.
Flying the Electrons
I’ve watched and heard Mark Easton’s RV-10 since it rolled into my hangar row, wended its way through final completion, first flight, then off to paint and then a celebrated return to Twin Oaks. Finally, then, Mark and I had a chance to fly so I could get a taste of what his completed airplane can do and, most interesting to me, how the FlyEFII system works out there in the real world.
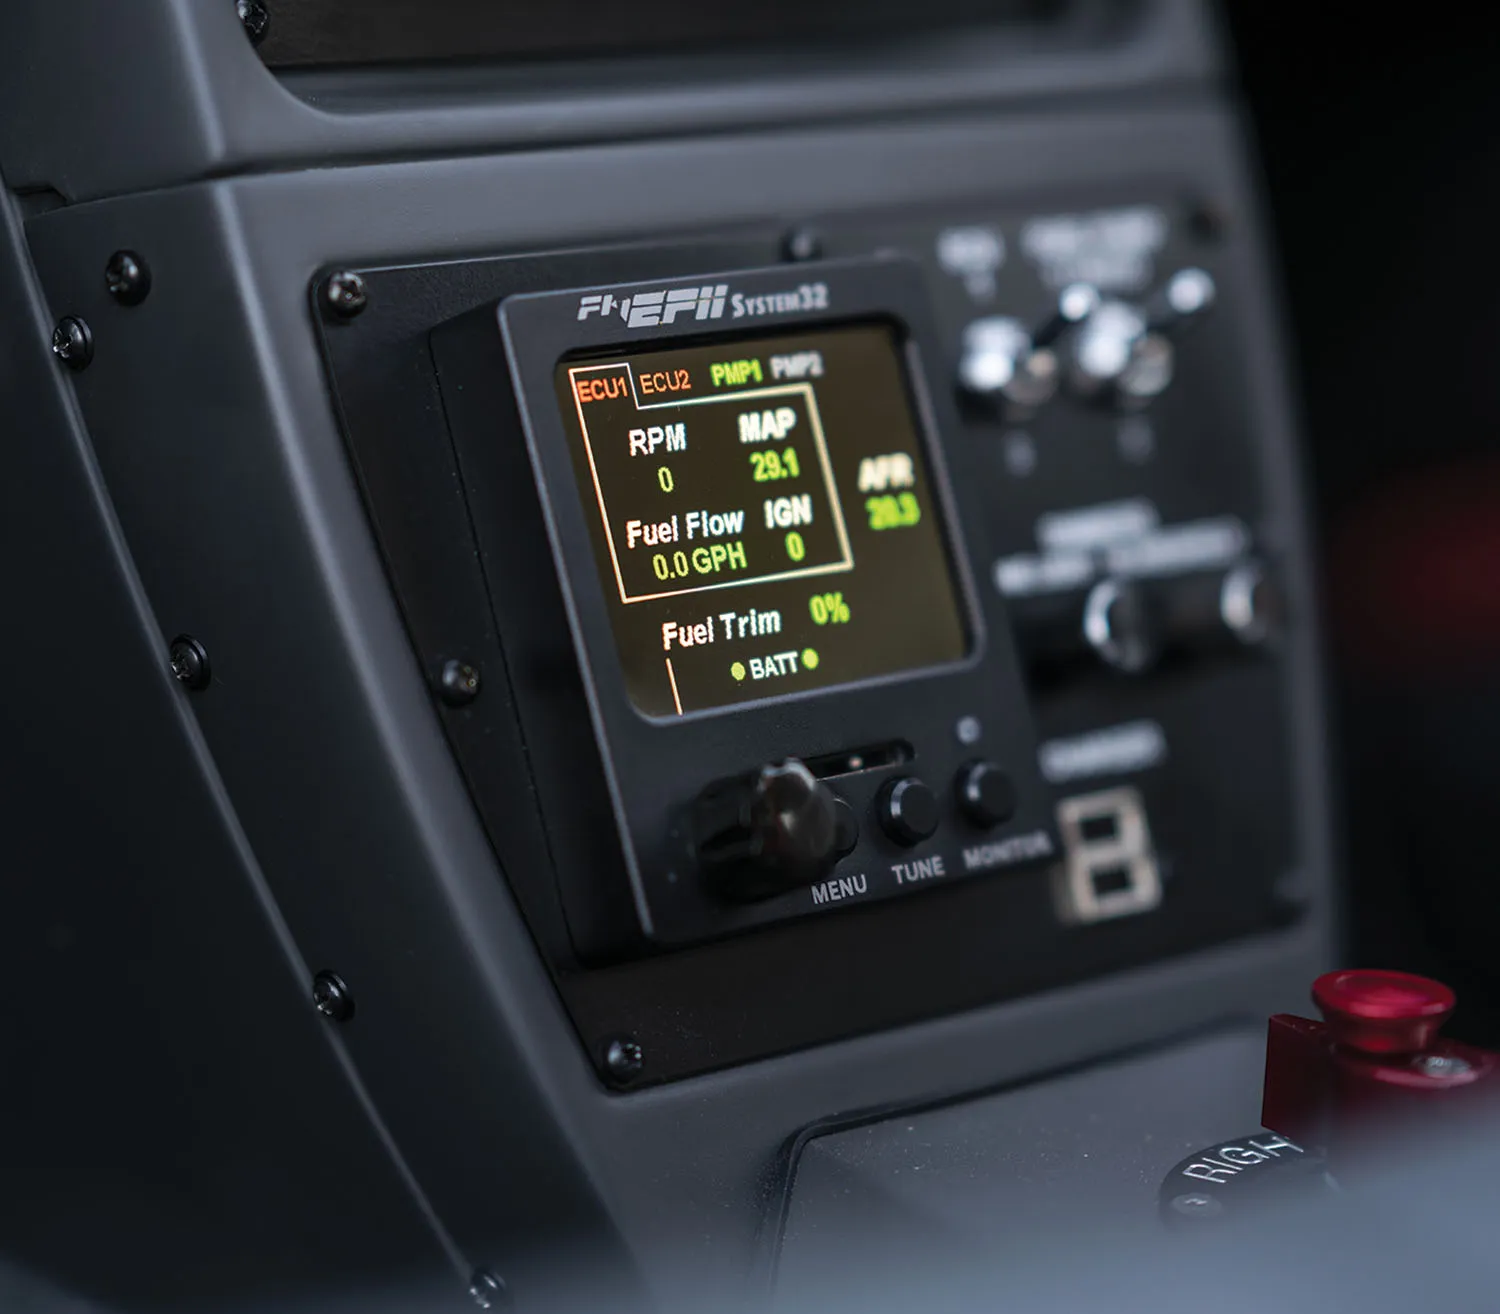
Mark’s checklist is comprehensive and once we’ve brought the key avionics online with the standby batteries, startup is a matter of switching on the ignition and pushing the start button. The big Lycoming spins quickly through three or four blades of the lightweight prop, and then, like magic, it’s humming along contentedly. Hot or cold. Mark monitors the engine’s vital signs and checks the FlyEFII monitor in the pedestal for expected readings and to verify that he’s on the baseline fuel trim setting.
Runup is just like checking magnetos, with each ignition system switched off in sequence to check function, followed by switching between the first and second ECUs and checking both fuel pumps. (The fuel pump switch has two positions: 1/AUTO and 2. In 1/AUTO, it’s running on the primary pump unless pressure drops below 20 psi, then it’ll automatically bring the second pump online.) Easton then runs up to 2000 rpm for a prop check, and following the last few checklist items, we’re ready to roll.
At full throttle, the 290-plus-horsepower IO-540 lets the Whirl Wind three-blader really dig in. Acceleration is rapid. Seven seconds after going to full throttle, we’re accelerating through 60 knots indicated, the nosewheel is light and we’re headed uphill. The initial climb at 94 KIAS is 1200 fpm, with the engine sucking down 32.2 gph at 30 inches and 2700 rpm. The System32 displays air-fuel ratio through an oxygen sensor, and it’s reading 11.3:1, a typical number for a rich condition, as you’d expect to use at high power and low airspeed.
Mark clears the pattern and has already pushed over, heading for a cruise climb speed of 140 KIAS. Now here’s where it gets a little complicated. The way the FlyEFII system is mapped, fuel scheduling and ignition timing are strongly biased by manifold pressure and rpm. As the system senses either reduced MP (as you’d get in the climb) or engine speed (as you would do pulling back the prop for a quieter, smoother climb), it begins to trim fuel and advance the timing.

On Easton’s airplane, in early flight test, this transition from takeoff configuration to climb resulted in high cylinder-head temps, themselves the result of the fuel flow reducing and the timing advancing. To partially remedy this situation, Easton has remapped the FlyEFII to prevent it from going on that part of the curve, so to speak, by telling the system to stay in the rich mixture/standard timing mode until engine speed is below 2600 rpm. That means he climbs at 2600 so that, at least during the first part of the climb at lower altitudes, the engine is getting enough fuel to stay cool. So far, this tactic has helped.
Climbing through 3500 feet, we’re doing 1300 fpm at 140 KIAS and the FlyEFII system is holding a rich mixture at around 11.5:1 air/fuel ratio at just under 27 gph. The hottest CHT this day is about to crack 390, though Easton says that, on a really hot day, the hottest cylinders are around 410°. By the end of the climb, one of the CHTs had passed 400° but quickly cooled as soon as we accelerated into cruise flight.
We tried two primary cruise checks, best-power and best-economy. After nosing over, Easton pulled the prop back to 2350 rpm, and as the engine decelerated through 2500 rpm, you could see the FlyEFII System32 begin to lean the mixture automatically and start advancing the ignition timing. Before starting the “manual” leaning part of the econ-cruise configuration, the system was showing this: 22 inches of manifold pressure at 2350 rpm, fuel flow of 13.5 gph, air-fuel ratio of about 14.7:1 and an ignition advance of 29°. This is all with the FlyEFII’s “fuel trim” knob at the zero (or baseline) setting.
To get to the lean setting—which ends up being about 50° lean of peak EGT—Easton twirls the knob to minus-10 to minus-15 setting. The airplane noticeably slows, and the FlyEFII display tells a big part of the story. Fuel flow is now down to 11.8 gph while the speeds have hung in there (147 KIAS, 172 KTAS), with the air-fuel ratio now increasing to 16:1. At our altitude of 8500 feet msl, this warmish day results in a density altitude of 10,200 feet. Once set, Easton does little more with the engine besides glance through the parameters. All but one cylinder runs in the 360–370° range; the outlier is at 385°, and Easton is on the hunt for tweaks to bring it in line with the others. When we keep everything else the same but return to the “zero trim” fuel setting, fuel flow rises to 13.8 gph with a gain of 5 KIAS, but one CHT has risen back toward 400°.
A high-speed cruise test at 2450 rpm and full throttle (still about 22 inches) results in 180 KTAS on 15.2 gph with the hottest cylinder inching just past 410°. So for 29% more fuel, you gain 8 knots true.
In practice, Easton has found that the mixture control requires only a couple of tweaks for each flight; he takes off on the baseline and leaves it there unless he has a compelling reason to add more fuel (say for cooling) and then gets to cruise altitude, resets the fuel trim knob to a lean-of-peak cruise setting, sits back and enjoys the view. A change of altitude or atmospheric conditions is automatically compensated for. He can choose to descend in the lean mode and only need to reset to the baseline fuel trim conditions prior to landing. In our flight, the fuel flow and air-fuel ratio tracked exactly as you’d expect them to during the descent and pre-landing phase, taking some workload out of the picture. Modern, all very modern.
—M.C.
Comparing Notes
I vividly remember deciding to buy an RV-10 kit sight unseen from the moment the four-seater had been announced. I would be lying if I didn’t say that some aspects of the demonstrator aircraft struck me as less than impressive, especially the Spartan interior dressing and a rather simple instrument panel. Of course, we all know that Van’s built its dominance by offering kits that were designed to be simple, light and (relatively) inexpensive. However, those had been up to that point sport aircraft and not luxury cruisers designed to compete with the best from Wichita, Duluth and the like.

The genius (intentional or not) behind the RV-10 and its follow-up RV-14 was that the new kits gave buyers an exceptionally engineered base structure that customers with the desires and means to Jaguarify their project could do so to their heart’s content using their wallet’s contents, which many promptly did. The initial builders with stylish ideas and/or fondness for bleeding-edge technology had to pretty much craft and fabricate the fancy dress-ups themselves, but before long, pioneers like Advanced, Aerosport and SteinAir started designing, crafting and selling complete packages of panels and interior accouterments rivaling certified aircraft and even luxury automobile standards, giving builders far more options. Even air conditioning became an option. (A no-brainer for this Arizona pilot.)
I was fortunate to be invited to participate in the review of Mark Easton’s shining example of what today’s top of the line can be, and it is a stunner. Not only for the cosmetics inside and out but also mechanically, with its state of the art FlyEFII/EI system. The financial magic of such a project is that one can dress up an RV-10 to the nines and still cost out at a fraction of a comparable factory offering…and end up with a better end result to boot!

Ironically, the long-scheduled event ended up taking place on the very day of the 1000-year heat dome in the Portland area—it was actually hotter in Portland than Phoenix that day—which at least gave my older, simpler, more old school equipped RV-10 a slight reprieve from having rocks thrown at it by merit of its installed (and loved) Airflow Systems A/C system, which is about the only luxury item that Mark’s airplane didn’t have (yet).
Would I trade Mark straight across? In a gnat’s heartbeat, but I would have to order the A/C retrofit the next day. Would I trade if I had to chip in the difference in build cost? Hmmm, maybe, maybe not. I’m kind of proud of my $7 yoga mat glareshield cover and other efforts to save build cost.
If I were in the core stage of planning out a build today rather than what were available options 10 years ago, would I build differently and incorporate a lot of the options that examples like Mark’s have? Absolutely.
The beauty of what is available today is that someone can build an RV-10 or similar project any way that they want and for a budget that they are willing to withstand. Even though the budget can reach six figures between Spartan and spectacular, the good news is that, if it’s smartly built, it should still garner a market value in excess of its cost to build. It will be fascinating to see what the next decade brings. Just like automobiles, there are strong markets at all cost/fitment levels. Choices are good.
—Myron Nelson
Van’s RV-10
- Kit price: $53,475 ($68,225 quickbuild)
- Estimated completed price: $85,000–$225,000
- Estimated build time: 2000 hr
- Number flying (at press time): 988
- Powerplant: Lycoming IO-540, 290-hp
- Propeller: Whirl Wind three-blade, constant-speed
- Powerplant options: Lycoming O/IO-540, 235-260 hp
AIRFRAME
- Wingspan: 31.8 ft
- Seating capacity: 4
- Fuel capacity: 60 gal
- Maximum gross weight: 2700 lb
- Typical empty weight: 1600 lb
- Typical useful load: 1100 lb
- Full-fuel payload: 740 lb
PERFORMANCE
- Cruise speed: 168 KTAS (197 mph) @ 75%
- Cruise speed: 153 KTAS (176 mph) @ 65%
- Climb rate: 1450 fpm
- Stall speed: 55 kt (68 mph), full flaps
- Takeoff distance: 500 ft
- Landing distance: 650 ft
Specifications and pricing provided by the manufacturer. All performance based on 260-hp engine and maximum gross weight.
This article originally appeared in the November 2021 issue of KITPLANES magazine.
For more great content like this, subscribe to KITPLANES!

Great article. That RV-10 is an incredible accomplishment and value.
I’m curious if he is running Swift 94UL or Mogas because of the O2 sensor.
Just a minor correction – 168k = 193 MPH.
I really like this RV-10 and hope to start something similar one of these days if the retirement account supports it. I won’t be focusing on IFR, so hopefully that G5 to the left of the other 4 big screens would be overkill for me when combined with 3 independent power sources.
I would be surprised if an Air/Fuel ratio of 11.3:1 isn’t standard for a Lycosaur, but dang is that a ton of fuel doing nothing but cooling the engine! In my perfect world (LOL) I would try adding big adjustable cowl flaps to add more air cooling for takeoff and the base setting would immediately go to something more like 16:1 for cruise climb as soon as cooling allowed, assuming sufficient excess power to support. Without a clumsy human in the way taking the engine from excess fuel cooling to excess air cooling without spending time in the high knock danger zone in the middle SHOULD be doable at relatively high power settings.
I thought Van’s aircraft were available as certificated aircraft – is that only certain models?