


Most of us spend our time aloft droning along in straight-and-level flight. For the typical pilot, turns are reserved for the traffic pattern or flying an approach, and occasionally for entering a holding pattern or performing a course reversal. And we rarely exceed 30 degrees of bank. On one hand, that’s okay, since our relative lack of experience with turns—at least when compared with the time we spend straight and level—means we probably don’t perform them well, with altitude excursions, poor rudder technique and failure to roll out on the desired heading among common mistakes.
On the other hand, practicing turns can teach us a lot about how and why the airplane flies as it does, and how well or poorly we both anticipate what it wants to do and manage its tendencies. Steep turns, in fact, are a great way to refresh some basic skills. They’re a required task for a private certificate and, if we want to maintain our skills to at least those of a private pilot, we should be able to nail them. But before you head out to practice them, let’s talk a bit about what’s going on in steep turns, including the aerodynamics and how the airplane’s design can work against us, with an idea to at least sharpen up our skills with the more mundane, 30-degree-orless banked turns.
The FAA’s Airplane Flying Handbook (FAAH-8083-3B) defines a steep turn as one or more 360-degree-to-720-degree turns, in either or both directions, using a bank angle between 45 degrees to 60 degrees. Use the diagram below to get the picture of how the maneuver should look.
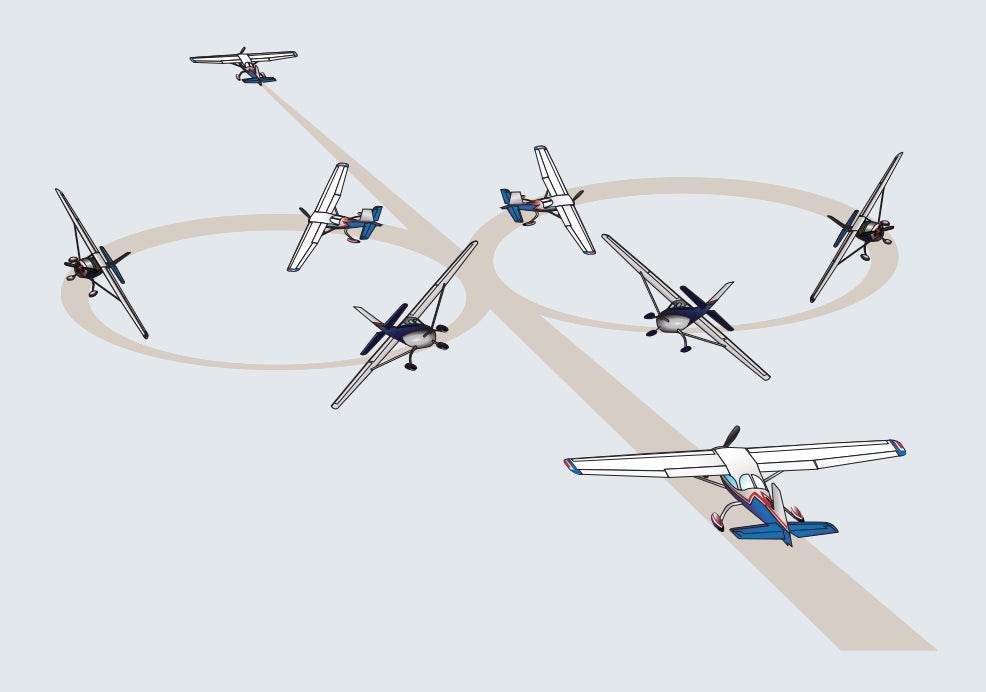
Sounds (and looks) simple, right? And they are, with a little practice. But there’s actually a lot going on here, which is why steep turns are great way to test and improve your skills. By way of explanation, the diagrams below explore two important mileposts toward understanding why steep turns require some practice.
Increased Load Factor
One of the first things we need to understand about steep turns is that they increase the load factor imposed on the airplane. In normal, unaccelerated, straight-and-level flight, the airplane experiences exactly 1G of load, the force gravity exerts. That the airplane stays aloft is a result of the lift generated to overcome gravity. In a climb, the mount of lift generated exceeds that necessary to maintain level flight. In a descent, the lift generated is less than necessary. Both the airplane’s speed and the wings’ angles of attack figure prominently in how much lift is generated and, thus, the airplane’s trajectory.
Figure 1, below, depicts a medium-banked airplane and the relationship between the horizontal and vertical lift components in a graphic you’ve probably seen a version of before. For our purposes, the biggest takeaway from this graphic is that, in a banked turn, the vertical lift component we’ve been relying on in straight and level flight is joined by a horizontal component. It’s this horizontal lift component that actually turns the airplane, while the vertical component works to keep it aloft. The airplane’s weight remains the same but centrifugal force also is present. The airplane’s weight and the imposed centrifugal force combine to impose a greater load on the airplane. How much more load?
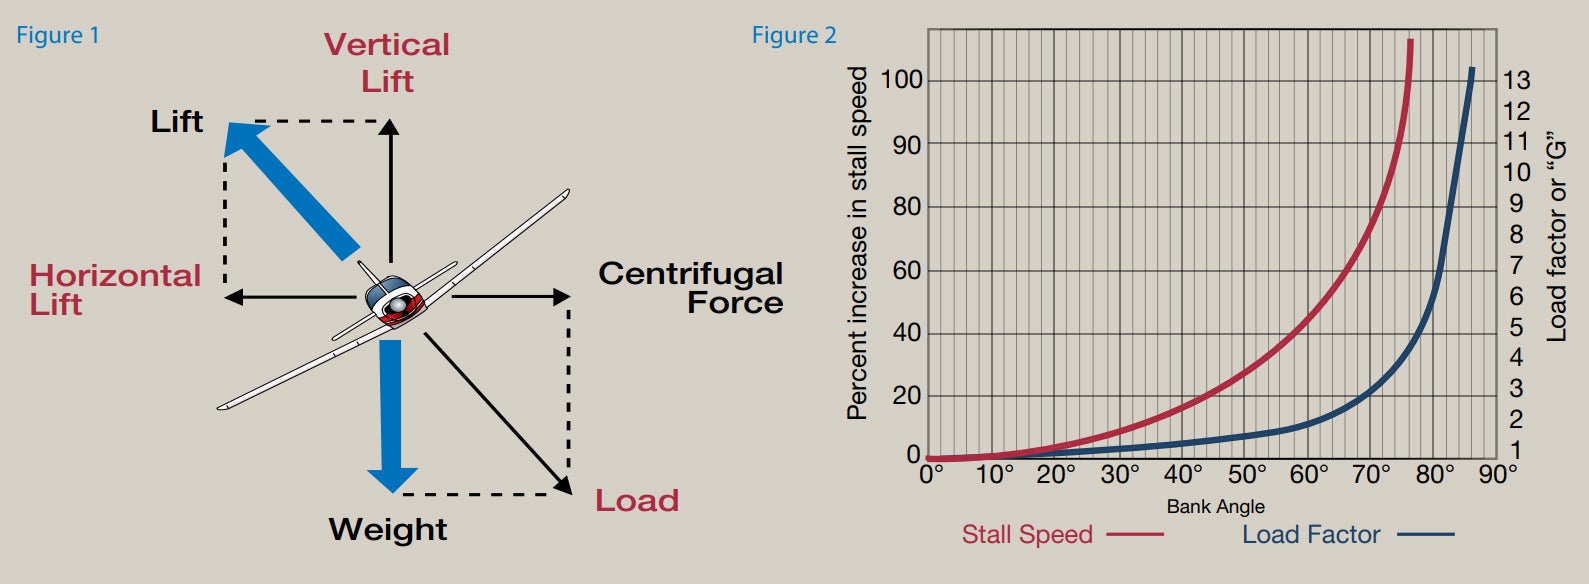
That question is addressed in Figure 2, which you’ve probably seen before and which also graphs how load factor increases with bank, presuming a constant-altitude turn. One of the takeaways here is that load factor, the dark blue curve measured in multiples of the gravity force, G, always increases when there’s a horizontal lift component. In a 60-degree-banked turn, the total load factor approaches 2G, or twice the force of gravity.
That’s the force pushing you down in your seat when the bank angle is steep enough in a level turn. Without appropriate input on the pitch control, the airplane will not maintain altitude, one of the factors determining the quality of a steep turn demonstration.
Entry And Stall Speeds
Another takeaway from Figure 2 is that stall speed increases in a bank, and really increases in a steep turn. In a 60-degree bank, stall speed increases by 30 percent. For example, if you’re flying a Cessna 172S Skyhawk SP, with a published flaps-up, power-off stall speed (VS1) of 53 knots, the airplane’s stalling speed in a 60-degree bank now is 69 knots. (Coincidentally, 1.3 times VS1 is the speed you’d want to fly on short final when demonstrating a no-flaps approach and landing.)
The punchline is that performing steep turns also requires some degree of airspeed control. With the airplane’s weight-adjusted maneuvering speed as the maximum speed in a steep turn, and its flaps-up stalling speed (VS1) as the minimum speed, you’re operating in a narrower range of speeds than you may be accustomed. This has implications when flying in turbulent air but, typically, as long as the maneuver is begun at the manufacturer’s recommended entry speed, the steep turn is coordinated and speed is not allowed to decay, this isn’t a concern.
It can become a concern, however. If the steep turn is mishandled—by significant overbanking, for example—to the point the slower-moving inside wing stalls, an accelerated stall may be in your future. In extreme situations, when airspeed is allowed to decay and the turn is not coordinated, an accelerated stall can lead to a spin entry. Neither will endear you to your passenger, your instructor or your pilot examiner on a checkride.
Coordinating The Turn
Throughout a steep turn, it is expected the airplane will be in coordinated flight. This typically is measured by the inclinometer’s ball in the turn-and-bank indicator/turn coordinator. But the aerodynamics of a steep turn can be a factor. For example, at a 45-degree bank angle, the elevator/stabilator of an airplane with a conventional tail (i.e., one with its stabilator/ horizontal stabilizer mounted perpendicular to the vertical stabilizer/rudder assembly) can begin to act as a rudder, and vice versa (airplanes with a V-tail present a whole ‘nuther situation).
Additionally, when flying a single-engine airplane, the left-turning tendency comes into play. This behavior results from the engine’s torque, the spiraling slipstream, P-factor and gyroscopic precession, and depends on the direction in which the engine turns the propeller. The propellers of airplanes manufactured in the U.S. typically turn in a clockwise direction when viewed from the cabin, which results in the tendency to be to the left. The props on airplanes manufactured in other countries may turn counterclockwise, which will translate into a right-turning tendency. We’ll presume you’re flying a single made in the U.S.
The left-turning tendency is the same reason you need right rudder on that made-in-the-U.S. single on takeoff and in high-power/low-airspeed situations. This means the airplane will tend to want to turn left and you will need less rudder input to coordinate a steep turn in that direction. It also means you’ll need more rudder to maintain a coordinated steep turn to the right. This has implications when rolling out of a steep turn in one direction and immediately rolling into one to the opposite direction.
The overbanking tendency (see the sidebar below) means that in steep turns, you may need to apply aileron opposite the turn to prevent exceeding the maximum bank angle for the maneuver. When executing a steep turn to the left, overbanking and the left-turning tendency likely will require even more opposite aileron.
The left-turning tendency also has implications when practicing steep turns at different power settings and airspeeds, which will result in slightly different control effectiveness. If you’re practicing for a checkride, you’ll want to ensure your practice sessions are conducted at consistent power settings and airspeeds.
Quality
There are a number of ways to gauge the quality of your steep turns. Perhaps most obvious is to complete the turn(s) at the same altitude you entered. Excursions are allowed—see the appropriate practical test standard/airman certification standard to determine how much slack there is. Another measure of the maneuver’s quality is how steadily the desired bank angle is maintained. Again, refer to the appropriate PTS/ACS for allowed tolerances.
Keep in mind those tolerances are there to help you perform the maneuver and that at steep bank angles, shallowing the bank a few degrees may help arrest a descent while you apply greater back pressure, and steepening the bank a bit may help with a slight climb.
However, the gold standard for determining the steep turn’s quality is whether you feel the airplane fly through its own wake turbulence. This means you’ve managed to maintain the desired altitude and flown a more-or-less perfect circle. Encounter the wake four times during a 720-degree turn in one direction and then the other, and you’re ready for the checkride. Or to impress your friends.
And don’t forget your clearing turns.
A typical steep turn demonstration will look like the diagram at right, with two turns in opposite directions. Factors used to judge its quality include:
- Performing clearing turns before maneuver begins
- Establishing the recommended airspeed
- Maintaining entry altitude throughout
- Maintaining constant bank angle
- Proper coordination of the turn/rudder use
- Using outside references instead of instruments
- Scanning outside for other traffic during maneuver
- Preventing disorientation throughout turns
- Proper planning to roll out on desired heading
Overbanking Tendency
When we bank an airplane and allow it to turn—as opposed to performing a slip—one wing creates more lift than the other. That’s the wing outside the turn. If we’re turning left, as depicted in the diagram at right, the right wing generates more lift. Why? Because it’s moving faster through the air than the inside, left wing. Both wings are bolted to the fuselage—how is that possible? Precisely because both wings are bolted to the fuselage, the outside wing has to move faster than the inside one.
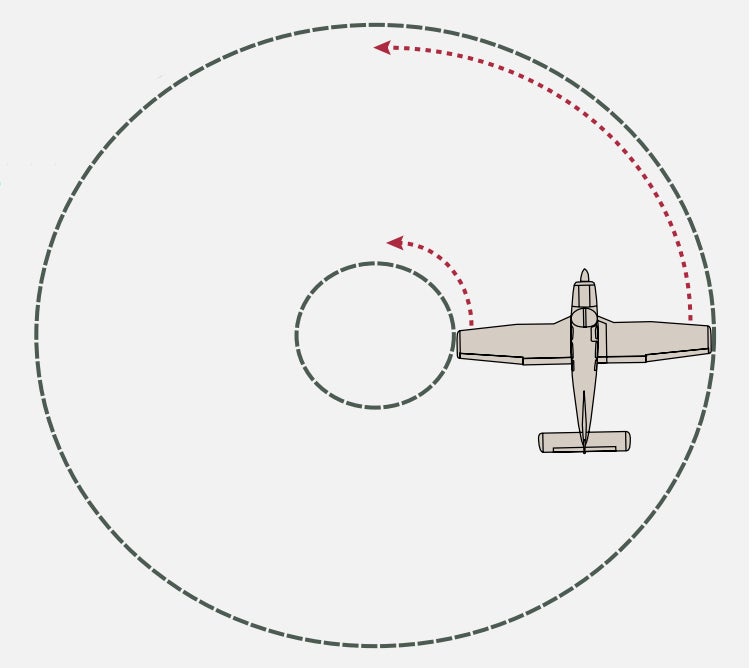
Look again at the diagram at right. The dashed red lines detail the paths each wing takes in the turn. The outside/right wing—in this example—has greater distance to travel in the same amount of time, so it has to move through the air faster, however slightly.
Since the outside wing is moving faster, it generates more lift than the inside one. A result of generating more lift is that the outside wing wants to rise, increasing the bank angle. The effect is more pronounced the greater the difference in the wings’ speed—bank angle, in other words. When performing steep turns, the overbanking tendency is at its greatest.
Power And Pitch Trim In Steep Turns
Some texts, including the FAA’s Airplane Flying Handbook, suggest adding power and/or nose-up pitch trim is appropriate when performing steep turns. That may be true when flying an underpowered airplane at its maximum gross weight. However, we caution against adding power or nose-up trim during the maneuver for a couple of reasons.
Any configuration change you make during a steep turn has to be undone when returning to straight-and-level flight. That translates to greater workload and a possible altitude bust. For another, a steep-turn demonstration may consist of a 720-degree turn in one direction followed immediately by one in the opposite direction. When rolling through wings level to transition to the opposite direction, added power and/or nose-up trim also can result in exceeding the chosen altitude.
In our view, it’s better to use a power setting resulting in a level cruise airspeed at or below the recommended entry/maneuvering speed and leave the power alone throughout the demonstration. Less can go wrong; adding too much power, for example, or forgetting to remove it while returning to level flight. Adding nose-up pitch trim during the maneuver begs for a similar outcome.
We prefer to use the pitch control instead of trim to provide the additional nose-up input needed during the maneuver, which allows finer control and minimizes the need to relax back pressure, and then increase it again when transitioning from one direction to the other. If the resulting control forces are too heavy, however, apply a predetermined amount of nose-up trim before entering the maneuver and understand you’ll need nose-down input on the pitch control before and afterward.
This article originally appeared in the September 2020 issue of Aviation Safety magazine.
For more great content like this, subscribe to Aviation Safety!

“In a climb, the mount of lift generated exceeds that necessary to maintain level flight. In a descent, the lift generated is less than necessary.”
Not true. A constant-rate climb requires the exact same amount of lift as level cruise. The same for a constant-rate descent.
Any time the total lift (combination of the wing’s lift and any angled/vectored thrust or power) exceeds that necessary for level flight the vertical RATE will increase. In other words, the climb will accelerate. So to transition from level flight to climbing flight does require more lift than continued level flight, but that formula balances back out once a stead state climb has been achieved.
The same (opposite) is true for a transition from level flight to descent, followed by a constant rate descent.
Perhaps a confusion of gravity load and lift force? An aircraft climbing at a steady rate must produce more lift than in level flight. If altitude increases, the aircraft has more potential energy . This energy comes from more lift than used in level flight. Yes, G load is constant during the climb.
According to the FAA Pilot’s Handbook of Aeronautical Knowledge, H-8083-25B, page 5-23, David B. is correct.
Yes, David is absolutely correct. In a steady-state climb (or descent, or level flight) total lift of the aircraft is equal to weight. I’ve seen this cause a lot of confusion even amongst experienced pilots. I believe it has to do with the somewhat incomplete and not-really-correct way that we typically explain lift. Airplanes fly because they *displace* air. Air is not a fixed medium the plane can rest on, it’s something with inertia that the plane continually has to push downwards in order to keep flying. Let’s use a helicopter as an example, because it simplifies the explanation. In a steady hover, the rotor is displacing air downwards fast enough to exert, on the air, the exact weight of the heli. Assuming constant air density, the altitude of the heli doesn’t matter. Aerodynamics don’t know or care where the surface of the earth is. Now, if a mysterious force (let’s say, a giant magnet above the heli) suddenly started lifting the heli, the force exerted by the rotor blades would be *less* than the weight of the heli, because the heli is moving upwards through the air. To continue exerting the same force on the air as before, the rotors would have to turn faster, or increase pitch angle, either of which would require more power from the engine (unless the increased pitch results in a higher efficiency state, but that’s another discussion). Think of being in a small boat and sticking your hand in the water as you travel. If you want to “paddle” with your hand, you have to move your hand faster than if the boat were sitting still, to feel the same force on your hand against the water.
Now let’s forget the giant magnet for a minute and imagine what it takes for the hovering heli to climb in the real world. Pitch is increased, which puts more load on the engine, requiring more power (with the efficiency disclaimer previously mentioned). On that initial pull, the rotors are exerting more force than the weight of the heli. This results in an upwards acceleration. As vertical speed increases, so does the speed of air being pulled through the rotors. As explained above, this reduces the total force exerted on the air by the rotors, until that force is once again equal to the weight of the heli. It is, once again, in equilibrium, albeit in a climb.
We can apply this to a fixed-wing plane (or a helicopter in forward motion), it’s just a little more complicated. In a plane, the wings must be pulled through the air so they can displace air downwards. Now, for the airplane, I will refer to total lift of the plane, rather than focus on the wings, because the prop, fuselage, horizontal stabilizer, and just about any other external structure, almost always contribute to the total lift equation (for instance, in a climb, the prop is pointing slightly upwards, and thus contributes to total lift, whereas a slightly nose-heavy plane with a relatively weak pitch moment from the particular airfoil of the wing will result in downward pressure from the horizontal stabilizer….but I digress).
OK, so if you’re cruising along straight and level in an airplane, and pull the nose up, what happens? You immediately being to climb, and airspeed immediately begins to decrease. Now, we learn in ground school that an airplane climbs through “excess power”, which is actually correct per my helicopter explanation above, but doesn’t quite give us the whole story. What happens if you start that climb and don’t touch the throttle? Assuming a relatively shallow climb, we airmen all know what will happen: the plane eventually settles into a stable climb at a constant vertical speed, albeit at a lower airspeed. Why is this? After all, we didn’t add power, so what about the “excess power” thing? Go back to the heli explanation…..at our original airspeed, the column of air that the plane is displacing now has to be moved faster for the airplane to exert the same force on the air (that is, a force equal to the weight of the plane). This happens immediately, by increasing the angle-of-attack of the wing (we also redirect some of the prop’s thrust upwards due to the pitch-up angle, which contributes to lift). But what goes along with the production of lift by a wing? Drag. It’s just like when the helicopter increases blade pitch to climb. In both cases, we require more power. But since we didn’t add power, our thrust-vs-drag equation is out of whack. In the heli, you pretty much have to add power (again, keeping in mind my little disclaimed about efficiency), because the heli was using all its power just to produce lift (we can disregard the tail rotor in this case). But in the plane, we’ve been using a lot of our thrust just to overcome parasitic drag, and that goes down as speed is reduced. So in our initial climb, we have more drag than thrust. As the airplane slows, drag is reduced, until the thrust-drag ratio is once again in balance. Voila, we are climbing. We do, in fact, have “excess power” for the slower airspeed we’re now flying at (if you leveled the nose to stop the climb, the plane would accelerate back to the higher airspeed).
It should be simple to see how this can all be reversed in the case of a descent. I’m too tired to run through that example, and you’re probably tired of reading. In closing, if the author’s assertion regarding lift were correct, the occupants of an ascending elevator would be under constant excess G forces (greater than 1 G) for the entire ride.
Now, everyone go pick up a copy of Stick and Rudder. 🙂
” In a 60-degree bank, stall speed increases by 30 percent”. This is an incorrect statement however, it is correctly depicted in the diagram.
The Vs1 increases by the square root of the load factor. In a 60 degree turn this is 1.41 (the square root of 2). So the speed at which AoA critical is reached, during a 60 degree level turn, is increased by 41%.
Kind regards,
Stephen
“In a climb, the mount of lift generated exceeds that necessary to maintain level flight. In a descent, the lift generated is less than necessary.”
How much wing lift is being developed in a vertical climb?
How much wing lift is being developed in a vertical descent?
In each case, what has happened to the amount of lift developed by the wing as the wing transitioned from horizontal to vertical: has it increased, decreased, or remained the same…?
“In our view, it’s better to use a power setting resulting in a level cruise airspeed at or below the recommended entry/maneuvering speed and leave the power alone throughout the demonstration.” Bad idea. In a typical draggy trainer, that will normally result in a loss of airspeed below which is allowed on the checkride. It also fails to teach the pilot how to balance pitch and power not only for the steeps, but in a number of other situations – landing approaches (especially base to final turns), and when maneuvering. How many times have you read an accident report where the pilot was maneuvering, loss track of airspeed, and experienced LOC.
Personally I think the way flight training teaches steep turns is misguided. You don’t learn steep turns to pass the flight test you learn steep turns to be able to make a sudden rapid turn to avoid hitting another airplane or an obstacle. A secondary objective is to be comfortable using all of the available performance of the airplane.
Successful steep turns come from setting the correct pitch attitude when you roll in. The common mistake is to let the nose drop which sets up a spiral dive entry. I demonstrate this by rolling to 45 deg of bank with the correct aircraft pitch attitude to maintain altitude and then trim the aircraft and then lay both arms on my lap. The airplane will cheerfully chug around the turn maintaining altitude with absolutely no input from me, because it is in the correct pitch attitude
Another thing that doesn’t seem to be captured is the importance of the aircraft flightpath. If you are in a descending steep turn you have unloaded the airplane and you basically can’t get into trouble. A climbing steep turn however can be extremely dangerous. This is a common accident scenario after short field takeoff’s into obstacles. The pilot cranks in a bunch of bank trying to climb around the obstacle and then stalls, spins and dies.
There are basically three forms of energy available to a pilot…and these are balanced in any steady flight state. Chemical energy as converted by the powerplant, potential energy in the form of available altitude, and kinetic energy available in the form of airspeed. You can trade speed for altitude, or altitude for speed, but when lacking both power is the only one that can be added. One can never gain chemical energy because fuel used is gone (or battery load in the future!). In a steady state climb additional power is needed to gain altitude – potential energy increase by adding chemical energy. In a steep turn the kinetic energy decreases due to f.e. added induced drag and as one does not want to compensate this by using available potential energy (altitude) the option available is an increase in power – adding chemical energy.
During takeoff maneuvering there usually is very little to trade – low altitude, low speed, and max power set. Proper aircraft pitch/bank control is the only variable left…
What exactly is a clearing turn if I’m about to simply turn?
The ACS never directs a “clearing turn”. Rather , the applicant must “clear the area”. All that is required is to look in the direction the turn will take prior to initiating the turn. For a high with aircraft, it may be prudent to raise the wing the on the side the turn will be made to get a good view before beginning the steep turn.